
Introduction
Propagating roses from cuttings is a simple yet highly rewarding way to expand your garden. Rather than purchasing new plants, you can take a healthy cutting from an existing rose bush and grow your own new roses. This method not only allows you to save money but also ensures you can replicate the qualities of the parent plant—whether it’s a specific color, fragrance, or growth habit that you admire. If you’ve ever wanted to fill your garden with lush, fragrant roses or gift loved ones with a homegrown plant, this guide will take you through each step of the process. By the end, you’ll have the confidence to propagate roses from cuttings and watch them thrive.
Understanding the Benefits of Propagating Roses from Cuttings
While roses can be propagated through various methods—such as grafting or growing from seeds—cutting propagation is favored for several reasons:
- Consistency: Growing roses from cuttings ensures that the new plant will have the same characteristics as the parent, unlike growing from seed, where the offspring might not resemble the parent.
- Economical: Rather than purchasing new rose plants, you can simply create more from what you already have.
- Simplicity: The process is straightforward and can be done with minimal tools.
- Sentimental Value: If you have a cherished rose bush, perhaps a family heirloom or a gift, propagating it allows you to preserve that particular plant.
Let’s dive into the process of growing roses from cuttings, starting with the necessary preparations.
Step 1: Choose the Right Time and Rose Bush
Timing is crucial when it comes to propagating roses from cuttings. The best time to take rose cuttings is during the spring or early summer when the plant is actively growing and producing new stems. Select a healthy, disease-free rose bush that is vigorous and known for producing high-quality blooms. The success of your propagation largely depends on the health of the parent plant.
Step 2: Gather Your Materials
Before you start, gather the following materials:
- Pruning shears or sharp scissors
- Rooting hormone (optional but highly recommended)
- A small pot or container filled with potting mix or compost
- A plastic bag or clear plastic bottle to create a greenhouse effect
- Spray bottle for misting
- Clean water
Step 3: Select a Healthy Stem
Look for a strong, mature stem from the parent plant. The best stems for propagation are semi-hardwood, which means they aren’t too young and soft, nor too old and woody. Ideally, the stem should have bloomed recently or be preparing to bloom. Aim for a stem that is around 6-8 inches long with at least four to five healthy leaves.
Step 4: Cut the Stem
Using sterilized pruning shears, make a clean cut just below a leaf node. A leaf node is the small bump where a leaf emerges from the stem. The cut should be made at a 45-degree angle to increase the surface area for root development. This allows the cutting to absorb more moisture and nutrients when placed in soil.
Step 5: Remove the Lower Leaves
Carefully remove the leaves from the lower half of the cutting, leaving only the top two sets of leaves intact. This is important because removing excess leaves minimizes water loss through transpiration, giving the cutting a better chance to develop roots before it dries out.
Step 6: Apply Rooting Hormone (Optional)
To encourage faster and more reliable root growth, dip the cut end of the stem into rooting hormone. While it’s not necessary, rooting hormone increases the likelihood of success, especially for beginners. Simply dip the cut end into the hormone powder or gel, and shake off any excess.
Step 7: Plant the Cutting
Fill a small pot or container with a high-quality potting mix or a mixture of compost and perlite for good drainage. Using a pencil or your finger, create a hole in the soil to insert the cutting. Place the cutting about 2-3 inches deep into the pot and gently press the soil around it to hold it in place.
Step 8: Create a Greenhouse Effect
Covering your rose cutting with a plastic bag or a clear plastic bottle (cut off the bottom) creates a mini-greenhouse environment. This helps to maintain high humidity levels, which is critical for root formation. Make sure the plastic doesn’t touch the cutting directly, and keep the soil moist but not waterlogged. Misting the inside of the plastic covering occasionally will help maintain the humidity.
Step 9: Place in Indirect Sunlight
Place the pot in a location that receives bright, indirect sunlight. Avoid direct sunlight, as it can cause the cutting to dry out too quickly. Ideally, the cutting should be in a location with a temperature range of 65-75°F (18-24°C). Keep the soil moist but not soggy, watering it gently whenever it feels dry.
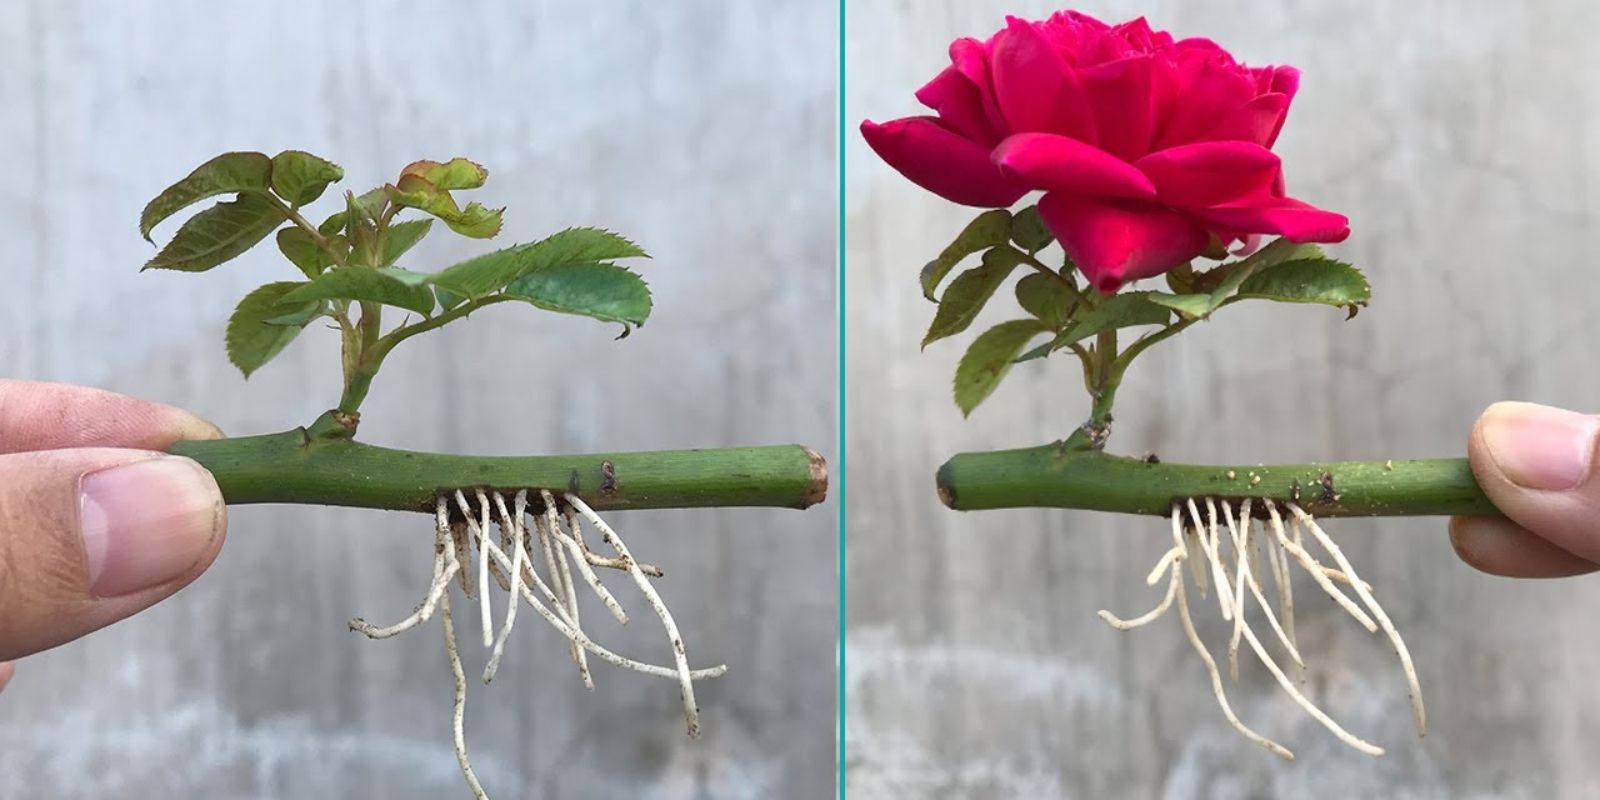
Step 10: Wait for Roots to Develop
Patience is key! It usually takes 4-8 weeks for the cutting to establish roots, depending on the conditions. During this period, avoid disturbing the cutting or removing the plastic cover too often. You’ll know roots have formed when you see new leaf growth, which is a positive indicator that the cutting is now self-sufficient.
Step 11: Transplanting Your Rooted Rose Cutting
Once your cutting has developed strong roots, it’s time to transplant it into a larger pot or directly into your garden. If planting outdoors, make sure to choose a well-drained spot with full sun exposure. Roses thrive in rich, loamy soil, so it’s essential to amend your garden soil with compost or well-rotted manure to give the new plant the nutrients it needs to flourish.
Tips for Success:
- Maintain High Humidity: Using a plastic cover helps maintain the moisture needed for the cutting to thrive.
- Sterilize Your Tools: Always sterilize your pruning shears to prevent the spread of disease between plants.
- Avoid Overwatering: While it’s essential to keep the soil moist, too much water can cause the cutting to rot before it roots.
- Patience is Key: Root development takes time, so resist the urge to check too often or transplant prematurely.
Common Issues and Troubleshooting
- Wilting Cutting: If your cutting wilts, it may be due to a lack of humidity or insufficient water. Adjust the plastic cover and mist more frequently.
- Blackening of the Stem: This could indicate rot, which is often caused by overwatering. Make sure the soil has good drainage and that you aren’t overwatering.
- No Root Development: If after 8 weeks there’s no sign of rooting, the cutting might have failed. Try using fresh cuttings, checking the temperature, and considering rooting hormone for the next attempt.
Conclusion
Propagating roses from cuttings is a rewarding process that allows you to grow beautiful rose bushes at home with ease. By following the steps outlined in this guide, you can enjoy the beauty and fragrance of roses without purchasing new plants. With a little patience and care, you’ll be on your way to expanding your rose collection or creating the perfect gift for a loved one. Don’t forget to share your progress with fellow gardeners online!
Engage with Us!
Have you tried propagating roses? Share your experience and photos with us using #GrowYourOwnRoses #RoseCuttingsSuccess #DIYGardening and let’s inspire others to get started! 🌹✨