
Hydroponic gardening is an innovative and efficient method of growing plants without soil, using nutrient-rich water to nourish the roots. This soilless approach offers numerous benefits, including faster growth rates, higher yields, and the ability to grow plants in limited spaces. Whether you’re a seasoned gardener looking to try something new or a beginner eager to start a productive indoor garden, hydroponic gardening can be a game-changer. This comprehensive guide will walk you through the basics of hydroponic gardening at home, helping you get started on this exciting journey.
What is Hydroponic Gardening?
Hydroponic gardening is a method of growing plants in a nutrient solution rather than soil. The term “hydroponics” comes from the Greek words “hydro” (water) and “ponos” (labor). By providing plants with essential nutrients directly through the water, hydroponics allows for precise control over growing conditions and can significantly increase plant growth and productivity.
Advantages of Hydroponic Gardening:
- Faster Growth: Plants often grow faster in hydroponic systems because they receive optimal nutrients and water.
- Higher Yields: Controlled environments can lead to higher yields and more consistent results.
- Space Efficiency: Hydroponic systems can be set up vertically or in compact spaces, making them ideal for urban gardening.
- Reduced Soil-Borne Diseases: Without soil, there’s less risk of soil-borne diseases and pests.
Step 1: Choose Your Hydroponic System
Several hydroponic systems are available, each with its own advantages and suitability for different types of plants and growing conditions. Here are some common hydroponic systems to consider:
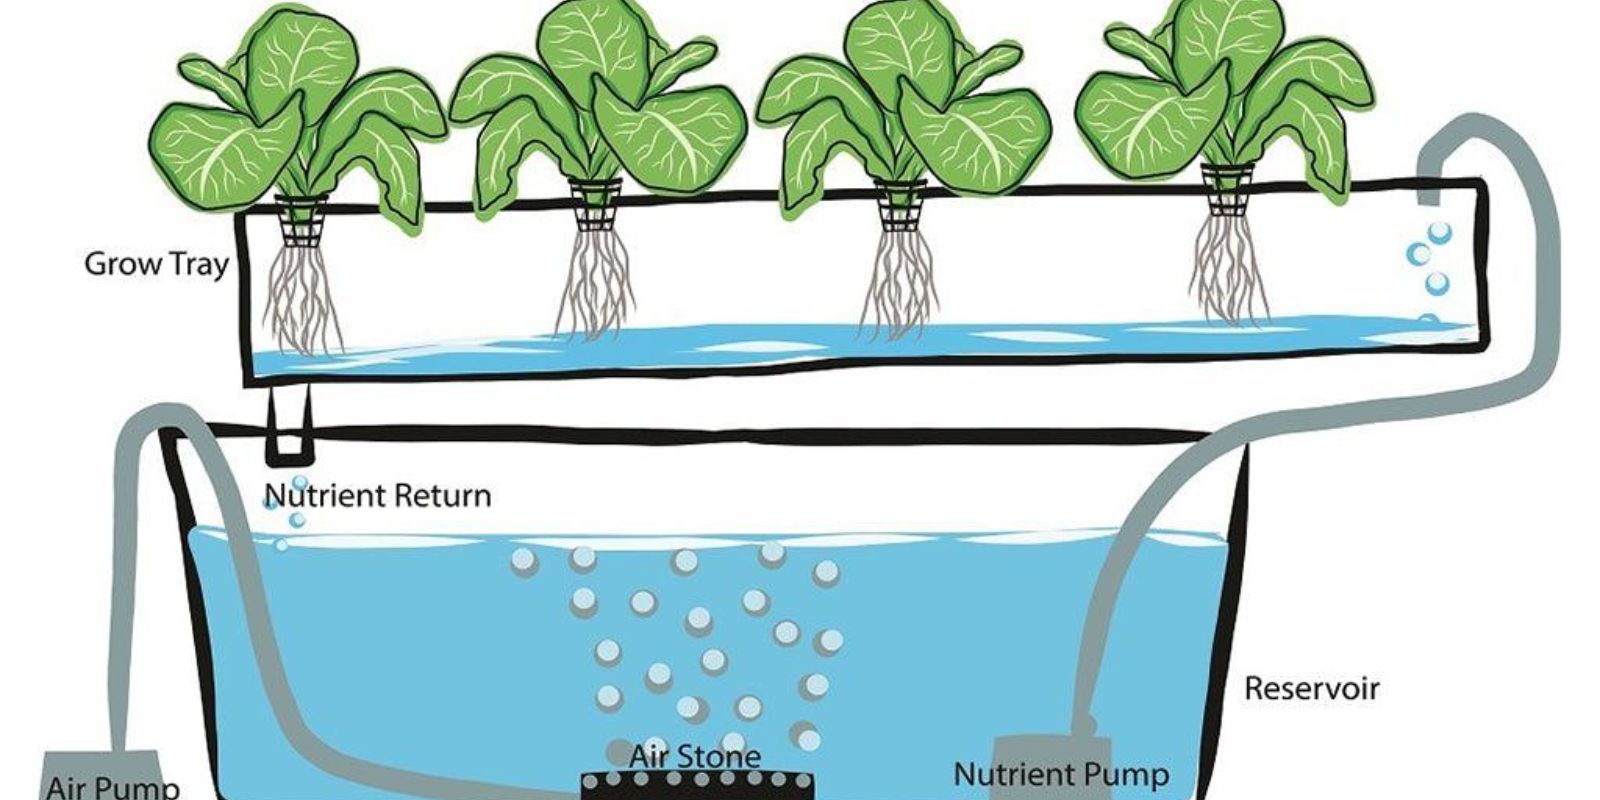
1. Deep Water Culture (DWC):
- How It Works: Plants are suspended in a nutrient-rich water solution with their roots submerged in the water.
- Pros: Simple setup, fast growth, and good oxygenation for roots.
- Cons: Requires regular monitoring of water levels and nutrient concentrations.
2. Nutrient Film Technique (NFT):
- How It Works: A thin film of nutrient solution flows over the roots of plants in a sloped channel.
- Pros: Efficient use of nutrients and water, suitable for small plants like lettuce.
- Cons: Can be prone to nutrient imbalances and requires a constant flow of water.
3. Ebb and Flow (Flood and Drain):
- How It Works: Plants are periodically flooded with nutrient solution, which then drains away.
- Pros: Provides good oxygenation and can be used for a variety of plants.
- Cons: More complex setup and requires a timer to control flooding cycles.
4. Drip System:
- How It Works: Nutrient solution is delivered to plants through drip emitters.
- Pros: Versatile, suitable for various plant sizes, and easy to control nutrient delivery.
- Cons: Can be prone to clogging and requires careful management of nutrient distribution.
5. Wick System:
- How It Works: A wick draws nutrient solution from a reservoir to the plant roots.
- Pros: Simple and low-cost setup, no need for pumps or timers.
- Cons: Less efficient for larger plants and may not provide adequate oxygenation.
Step 2: Set Up the Grow Area
Creating the right environment for your hydroponic system is crucial for success. Here are some key considerations for setting up your grow area:
**1. *Lighting:*
- Type: Use full-spectrum grow lights to simulate natural sunlight and provide the necessary light for photosynthesis.
- Placement: Position lights 12-18 inches above plants, adjusting as they grow to ensure proper light coverage.
**2. *Ventilation:*
- Air Circulation: Ensure good air circulation to prevent mold and mildew. Use fans to keep air moving and maintain a consistent temperature.
- Temperature: Maintain a temperature range of 65-75°F (18-24°C) for optimal plant growth.
**3. *Humidity:*
- Control: Monitor humidity levels and use a humidifier or dehumidifier as needed to keep humidity between 40-60%.
**4. *Space:*
- Location: Choose a location with easy access to water and electricity. Hydroponic systems can be set up indoors, in greenhouses, or on balconies.
Step 3: Prepare the Nutrient Solution
The nutrient solution is the lifeblood of your hydroponic garden, providing essential nutrients directly to the plant roots. Here’s how to prepare and manage your nutrient solution:
**1. *Select Hydroponic Nutrients:*
- Type: Use a hydroponic nutrient mix specifically designed for soilless growing. These mixes usually contain essential macronutrients (nitrogen, phosphorus, potassium) and micronutrients (calcium, magnesium, iron).
- Form: Nutrients come in liquid or powdered form. Follow the manufacturer’s instructions for mixing and dosage.
**2. *Mix the Solution:*
- Water Quality: Use clean, pH-balanced water. Avoid tap water with high chlorine levels, which can harm plant roots.
- Mixing: Combine nutrients with water according to the recommended ratio. Stir thoroughly to ensure complete dissolution.
**3. *Monitor and Adjust:*
- pH Levels: Check and adjust the pH of the nutrient solution to maintain a range of 5.5-6.5. Use a pH meter and pH adjusters if needed.
- EC Levels: Measure the electrical conductivity (EC) to ensure proper nutrient concentration. Adjust as necessary based on plant needs.
Step 4: Plant Your Seeds or Seedlings
Starting plants in a hydroponic system involves choosing the right growing medium and placing seeds or seedlings into the system.
**1. *Choose Growing Medium:*
- Options: Common hydroponic growing media include rock wool, clay pellets, and perlite. Each medium has its own advantages in terms of water retention and aeration.
- Preparation: Pre-soak the growing medium as needed and ensure it is properly drained.
**2. *Plant Seeds or Seedlings:*
- Seeds: Start seeds in a small container or seed tray filled with the chosen medium. Once seedlings are strong enough, transfer them to the hydroponic system.
- Seedlings: Gently place seedlings into the growing medium of your hydroponic system, ensuring that the roots are properly supported and in contact with the nutrient solution.
Step 5: Monitor and Maintain Your Hydroponic System
Regular monitoring and maintenance are essential for a healthy hydroponic garden. Here’s what to keep an eye on:
**1. *Water Levels:*
- Check Daily: Ensure that the water level in the reservoir is adequate and top up as needed.
- Clean: Regularly clean the reservoir and components to prevent algae growth and clogs.
**2. *Nutrient Solution:*
- Refresh: Replace the nutrient solution every 2-4 weeks to prevent nutrient imbalances and ensure optimal plant growth.
- Adjust: Continuously monitor pH and EC levels and make adjustments as needed.
**3. *Plant Health:*
- Inspect: Regularly check plants for signs of nutrient deficiencies, pests, or diseases. Address any issues promptly.
- Prune: Remove dead or damaged leaves to promote healthy growth and improve air circulation.
Conclusion
Hydroponic gardening offers an exciting opportunity to grow plants efficiently and effectively, even in limited spaces. By choosing the right system, setting up your grow area, preparing the nutrient solution, and providing proper care, you can enjoy a thriving hydroponic garden at home. Whether you’re growing herbs, vegetables, or flowers, hydroponics can transform the way you garden and provide you with fresh, healthy produce year-round.
Ready to start your hydroponic gardening adventure? Dive into this soilless growing method and share your progress with the gardening community using #Hydroponics #HomeGarden #SoilFree #GrowSmarter. Embrace the future of gardening and watch your plants flourish!