
Introduction:
Roses are one of the most beloved flowers in the world, cherished for their beauty, fragrance, and timeless appeal. However, to achieve a thriving rose garden filled with abundant, healthy blooms, proper care is essential. One of the most important tasks for maintaining rose plants is pruning. While pruning roses might seem daunting to some gardeners, it is an essential step in promoting growth, improving flowering, and keeping your roses disease-free.
This article will guide you through the process of pruning roses, providing helpful tips and expert advice to help you achieve the best results. Whether you’re new to rose gardening or have years of experience, this step-by-step guide will ensure your roses thrive year after year.
Why Prune Roses?
Pruning is the process of cutting back parts of the plant to encourage better growth, maintain the plant’s shape, and remove any diseased or damaged parts. For roses, pruning serves several important purposes:
- Promotes Healthy Growth: Pruning helps remove dead or diseased wood, allowing the plant to focus its energy on healthy new growth.
- Encourages More Blooms: Regular pruning stimulates the rose plant to produce more flowers by encouraging the growth of new shoots and buds.
- Shapes the Plant: Proper pruning allows you to shape the plant, preventing it from becoming unruly or overly dense.
- Increases Air Circulation: A well-pruned rose bush allows better airflow, which can help prevent disease and improve plant health.
- Revitalizes the Plant: Over time, pruning helps to rejuvenate older rose bushes, ensuring that they remain productive and vibrant.
Now that we understand why pruning is so important, let’s dive into the steps you need to follow to prune your roses effectively.
Best Time to Prune Roses
The timing of your pruning is crucial. Pruning at the wrong time can damage the plant or reduce flowering potential. Here are some general guidelines for when to prune different types of roses:
- Hybrid Tea, Floribunda, Grandiflora, and Shrub Roses: The best time to prune these varieties is in early spring, just before the new growth begins. This is typically when the buds begin to swell, but before they open. Pruning in early spring helps to remove any winter-damaged or dead wood and sets the stage for healthy, vigorous growth during the growing season.
- Climbing Roses: Prune climbing roses in early spring or after their first bloom to maintain their structure. You may also prune them lightly after the first flush of flowers to remove spent blooms and encourage a second round of flowering.
- Old Garden Roses: These roses should be pruned immediately after their bloom cycle. As they only bloom once, pruning them in the fall or after blooming helps keep them healthy for the next season.
Tools You’ll Need for Pruning Roses
Before you begin pruning, ensure that you have the right tools. Proper tools not only make the job easier but also help prevent damage to the plant.
- Pruning Shears: A sharp pair of pruning shears is essential for making clean, precise cuts. Choose a bypass pruner (not anvil-style) for the best results.
- Loppers: For larger branches or thicker stems, a pair of loppers will give you more leverage and make the task easier.
- Gloves: Roses are known for their thorns, so it’s a good idea to wear sturdy gloves to protect your hands from scratches.
- Disinfectant: To prevent the spread of disease, clean your tools before and after each use with rubbing alcohol or a diluted bleach solution.
Step-by-Step Guide to Pruning Roses
Now that you have your tools ready, let’s go through the steps to prune your roses correctly.
Step 1: Inspect the Plant
Before you start cutting, take a step back and inspect your rose plant. Look for signs of damage, disease, and dead wood. This is an excellent time to assess the overall health of the plant and decide how much pruning is needed. Focus on removing any weak or sickly parts of the plant first.
Step 2: Remove Dead, Diseased, or Damaged Wood
Start by cutting away any dead or diseased wood. This is essential for the overall health of the plant. Dead wood appears dark, dry, and brittle, while diseased wood might have spots, lesions, or unusual growth. Use your pruning shears to remove these parts of the plant, cutting back to healthy tissue. Disinfect your tools between cuts to prevent spreading disease.
Step 3: Cut Away Weak or Spindly Growth
Next, look for any thin, weak, or spindly growth that won’t produce strong flowers. These branches should be removed to allow the plant’s energy to focus on stronger stems and new shoots. These smaller, weaker branches often grow in the center of the bush and can restrict airflow, leading to disease issues.
Step 4: Shape the Plant
Once you’ve removed any unwanted growth, it’s time to shape the rose bush. The goal here is to maintain a balanced, open structure that allows light and air to reach the center of the plant. You should aim to create a vase-like shape, with an open center and outward-growing branches. This shape promotes good airflow and sunlight penetration, which are essential for healthy roses.
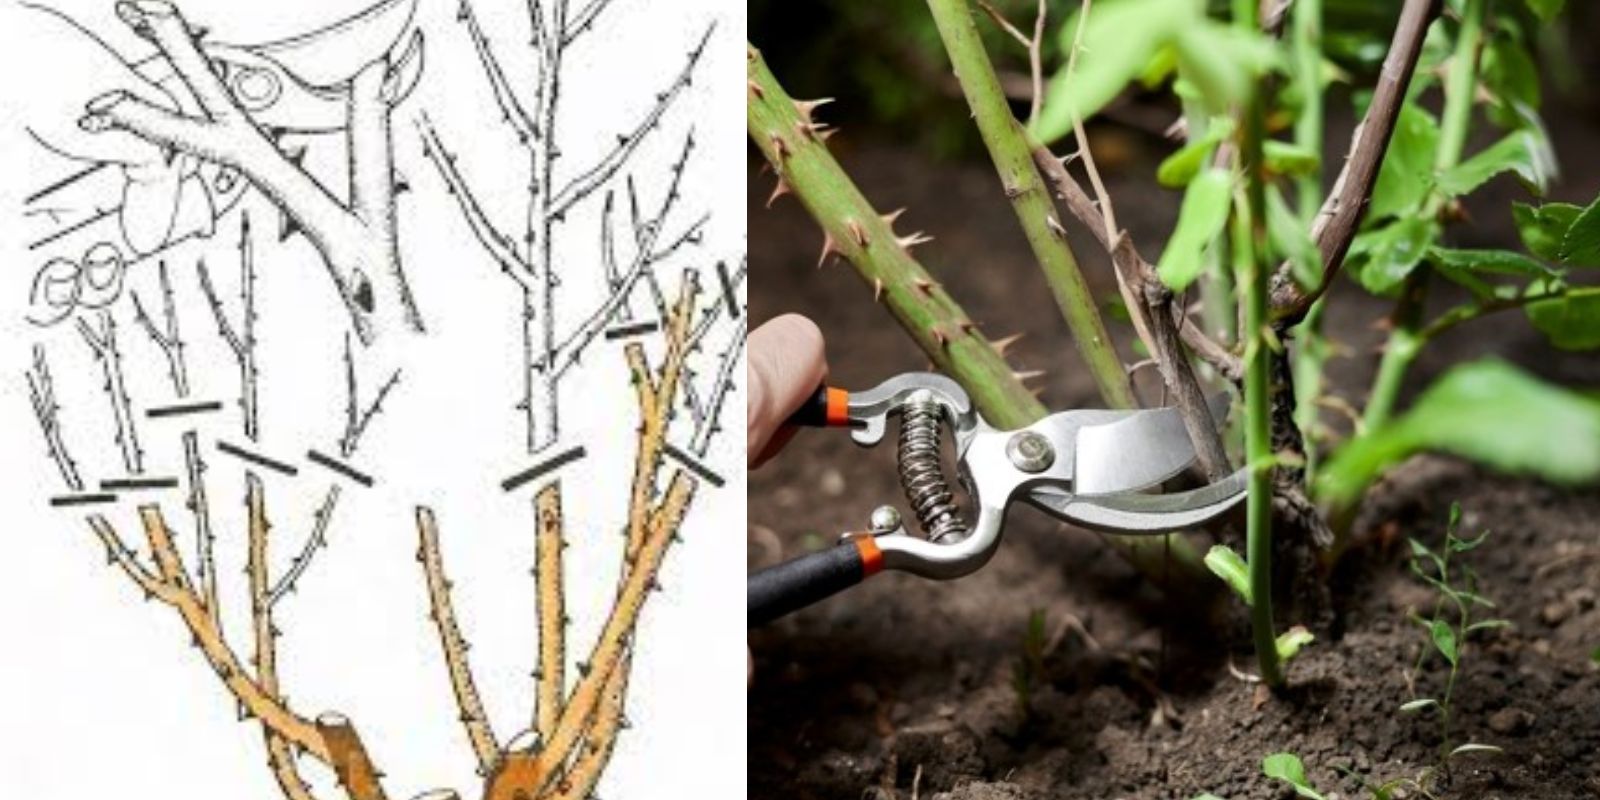
Step 5: Trim Long Canes to Encourage Lateral Growth
For any long, leggy canes, cut them back to just above a healthy outward-facing bud. This encourages lateral branching and helps prevent the plant from becoming too tall and spindly. By cutting just above an outward-facing bud, you encourage the new growth to move outward, rather than inward, helping the plant maintain an open shape.
Step 6: Remove Old Wood
After the first flush of blooms, remove any old wood that may have become crowded or spindly. Older wood may stop producing flowers, and removing it opens up space for new, more productive growth. Be sure to remove any dead flowers or spent blooms (also known as deadheading), as this helps redirect the plant’s energy into producing more flowers.
Step 7: Clean Up the Plant
After pruning, clean up any debris around the plant. This includes leaves, branches, and spent flowers. Rose plants are susceptible to diseases like black spot, so removing infected plant material from around the base of the plant helps prevent the spread of disease. Dispose of these clippings properly and avoid composting them if they show signs of illness.
Tips for Specific Types of Roses
- Climbing Roses: For climbing roses, you can prune lightly after their first bloom to remove spent flowers and encourage a second round of blooms. Ensure you don’t cut back too much of the main structure, as climbing roses bloom on old wood.
- Shrub Roses: Shrub roses can tolerate a hard prune. If your shrub rose is becoming too large or unruly, feel free to cut it back by one-third to one-half of its overall size.
- Bush Roses: Bush roses benefit from light pruning after their first bloom, followed by a more extensive prune in late fall or early spring to prepare them for the growing season.
Common Pruning Mistakes to Avoid
- Pruning Too Early: While it’s essential to prune in early spring, be careful not to prune too early in winter or late fall. Doing so may expose the plant to frost damage.
- Cutting Too Much: While pruning is important, cutting too much of the plant can stress it and reduce flowering. Be conservative with your cuts, especially on older plants.
- Not Cleaning Tools: Failing to clean your pruning tools can spread diseases from one plant to another. Always disinfect tools before and after use.
Conclusion
Pruning roses is a vital part of keeping them healthy and thriving. By following the steps outlined in this guide, you can ensure that your rose plants grow vigorously, produce abundant flowers, and remain free of disease. Whether you’re tending to hybrid teas, climbing roses, or old garden varieties, the principles of pruning remain the same.
With the right tools, timing, and technique, you can master the art of rose pruning and enjoy beautiful, healthy roses year after year. Happy pruning!
Call to Action: Are you ready to give your roses the care they deserve? Follow these tips and share your rose garden transformations with us! 🌹💚
#RosePruning #GardeningTips #HealthyRoses #BloomingRoses #RoseGarden #HomeGardening #GardeningCommunity #GardenCare