
As the cooler days of autumn approach, many gardeners believe that the growing season is over, but in fact, it is an excellent time to propagate plants for next year’s garden. Fall offers a perfect opportunity to multiply your favorite plants with the help of cuttings. By taking advantage of the cooler temperatures and the slower growth periods, you can create strong, healthy plants that will thrive in your garden. In this article, we’ll explore how to propagate plants with cuttings in October and November, why it works so well during the fall, and the best techniques for successful propagation.
Why Fall is the Ideal Time for Plant Propagation
Autumn is often seen as a time of rest for many plants, but it is actually one of the best times to propagate. During the fall months, plants are entering a period of dormancy, which means they are not actively growing. This gives cuttings a chance to develop strong roots without the pressure of producing leaves or flowers. Additionally, the cooler temperatures of autumn and winter provide an ideal environment for rooting, as it helps the plant focus its energy on root development rather than on foliage production.
By propagating in the fall, you can ensure that your new plants will have a head start come spring, ready to burst forth with new growth when the weather warms up.
Step-by-Step Guide to Taking Fall Cuttings
Let’s take a deeper dive into how to propagate plants through cuttings. Follow these steps for success!
1. Selecting the Right Plants for Propagation
Not all plants are suitable for propagation via cuttings, so it’s important to choose the right ones. The best candidates are those that naturally root easily from cuttings. Some excellent choices for fall propagation include:
- Shrubs: Semi-hardwood cuttings from plants like roses, hydrangeas, forsythia, and lilacs are ideal.
- Herbs: Lavender, rosemary, thyme, and sage are perfect candidates for cutting propagation.
- Perennials: Many perennial plants, such as hostas, geraniums, and daylilies, can also be propagated using cuttings.
It’s important to choose plants that are healthy and free of disease. Cuttings taken from weak or diseased plants will likely result in poor root development, so be sure to start with healthy specimens.
2. Making the Right Cut
When it comes to taking cuttings, the technique matters. The best time to take a cutting is from the “semi-hardwood” section of the plant—this is the part of the branch that is partially mature but not yet fully lignified (woody). Semi-hardwood cuttings have a higher chance of rooting compared to younger or older wood.
- Use sharp, clean pruning shears to make your cuts. This helps prevent damage to the plant and reduces the chance of disease.
- Cut a healthy stem that’s about 10-15 cm long. Make the cut just below a node (the small bump where leaves or branches emerge). This will help ensure that your cutting has the best chance of rooting.
- Remove the lower leaves from the cutting, leaving only the top few leaves. This reduces moisture loss and prevents rotting.
- If the leaves are large, consider cutting them in half to reduce transpiration (the loss of water from the leaves), which will make it easier for the cutting to focus on root growth.
3. Preparing the Substrate
For cuttings to develop roots, they need a well-draining, sterile medium. The goal is to provide enough moisture for the cutting to stay hydrated while also allowing air to reach the developing roots. Here’s how to prepare the right growing medium:
- Seed-Starting Mix: A lightweight, well-draining seed-starting mix is ideal for rooting cuttings. It’s often sterilized, reducing the risk of fungal infections.
- Sand and Soil Mix: You can also use a mix of coarse sand and soil. The sand encourages good drainage, while the soil provides nutrients once the cutting starts to root.
- Perlite and Vermiculite: Another option is a mix of perlite and vermiculite. This helps with drainage while keeping the medium light and airy.
You can either root the cuttings in individual pots or in a shallow tray. Make sure that whatever container you use has drainage holes to prevent waterlogging.
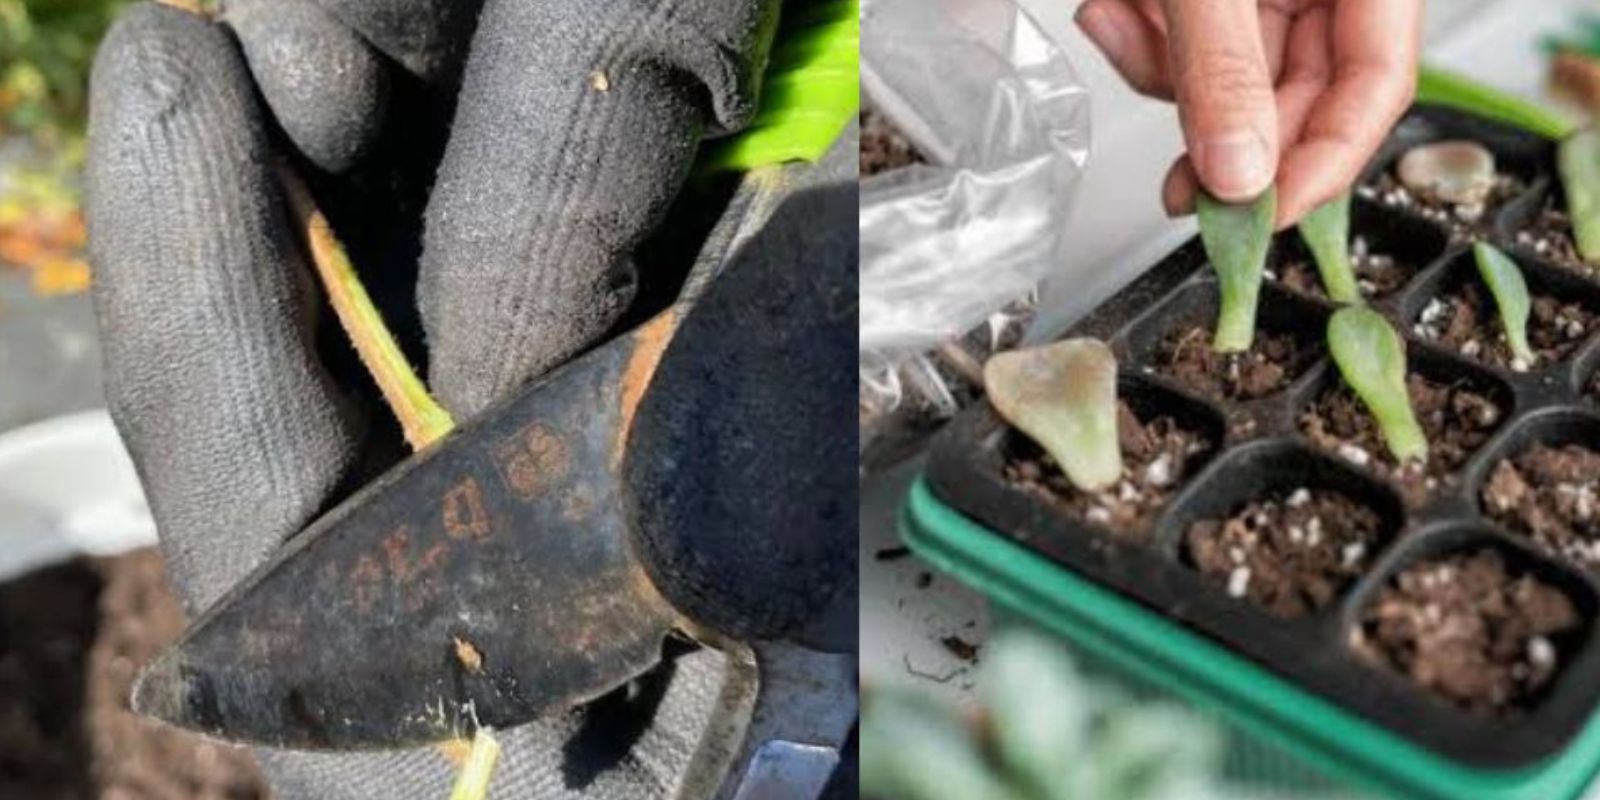
4. Planting the Cuttings
Once you’ve prepared the cuttings and the substrate, it’s time to plant them. This is a crucial step for ensuring that the cuttings root successfully.
- Insert each cutting about 2-3 cm deep into the substrate, ensuring that at least one node is buried beneath the soil surface. The node is where the roots will emerge from.
- Space the cuttings apart to ensure they have room to grow and don’t compete for nutrients or water.
- Gently firm the soil around the cutting to ensure it is held in place and in good contact with the growing medium.
5. Creating a Humid Environment
In order to successfully root cuttings, they need high humidity. This mimics the moist environment that they would naturally experience when rooting in the wild. To create this humid environment, you can:
- Cover the Cuttings: Use a clear plastic bag, cloche, or plastic container to cover the cuttings. This creates a mini greenhouse effect and helps maintain the humidity around the cuttings.
- Mist the Cuttings: You can mist the cuttings with water every day to help keep the humidity high. Be sure not to overdo it—too much moisture can lead to fungal problems.
- Avoid Direct Sunlight: Place the cuttings in a bright, but not direct, sunlight location. Too much sun can dry out the cuttings before they have a chance to root.
6. Caring for Your Cuttings
Once your cuttings are planted and covered, it’s important to provide the proper care to help them develop roots:
- Keep the Substrate Moist: Check the soil regularly to ensure it remains slightly moist. However, avoid letting the cuttings sit in water, as this can cause them to rot.
- Maintain a Warm Temperature: Cuttings generally prefer a warm temperature, between 18°C and 21°C (65°F – 70°F). Too much heat can cause the cutting to wilt, so keep the temperature moderate.
- Watch for Root Growth: After several weeks, you should begin to see roots developing. You can check by gently pulling on the cutting to see if it resists. Once the cutting has developed a strong root system, it’s ready for transplanting into a larger pot or directly into the garden.
7. Transplanting the Rooted Cuttings
Once your cuttings have developed strong roots, they can be moved to larger containers or planted in the garden. Be sure to gradually acclimate the new plants to outdoor conditions if they have been rooted indoors. This process is called “hardening off,” and it helps the plants adapt to the change in environment.
- If transplanting into pots, use a well-draining potting mix.
- If planting outdoors, choose a location that offers partial shade at first, then gradually move the plants to a sunnier spot as they grow stronger.
Benefits of Fall Propagation
- Cost-Effective: Plant propagation is an affordable way to grow more plants without having to buy them.
- Expand Your Garden: Fall cuttings are an excellent way to increase the number of plants in your garden, ensuring that you’ll have a lush and vibrant garden next year.
- Grow Plants that Are Hard to Find: Propagating from your existing plants allows you to grow rare or unique varieties that may be hard to find in stores.
Final Thoughts
Fall propagation through cuttings is an excellent and rewarding way to grow your garden on a budget while ensuring strong and healthy plants for the following growing season. By following the steps outlined above and choosing the right plants, you can enjoy a bountiful and beautiful garden year after year. So, embrace the autumn season and get ready to propagate, grow, and thrive!
Now it’s time to try this out in your own garden! Happy propagating, and remember to share your success with fellow gardeners!