
Gardenias, known for their exquisite white flowers and delightful fragrance, are a staple in many gardens and landscapes. These evergreen shrubs bring a touch of elegance and charm, making them a favorite among gardeners and flower enthusiasts alike. If you have a gardenia plant and wish to expand your collection or share the beauty with friends and family, propagating gardenias from cuttings is an effective and rewarding method. This article will provide you with a detailed, step-by-step guide on how to successfully propagate gardenias from cuttings, ensuring that you have beautiful blooms for years to come.
Understanding Gardenias
Before diving into the propagation process, it’s essential to understand what makes gardenias special. These shrubs belong to the Rubiaceae family and are native to tropical and subtropical regions. They thrive in well-draining, acidic soil and require plenty of sunlight to flourish. Gardenias are cherished for their glossy, dark green leaves and fragrant, creamy white flowers that typically bloom in late spring to early summer. The flowers not only add beauty but also fill the air with a sweet, intoxicating scent.
Why Propagate Gardenias?
Propagating gardenias from cuttings offers several advantages:
- Cost-Effective: Instead of purchasing new plants, you can grow your own from an existing gardenia.
- Preservation of Varieties: If you have a specific cultivar or variety of gardenia that you love, propagation ensures that you can maintain its unique traits.
- Sharing with Friends: Propagated plants make excellent gifts for gardening friends or family members who appreciate beautiful flowers.
- Satisfaction of Growing: Watching a cutting grow into a full-fledged plant provides immense satisfaction and joy for any gardener.
When to Take Cuttings
Timing is crucial when propagating gardenias. The best time to take cuttings is during the late spring or early summer, when the plant is in its active growing phase. This is when the stems are softer and more conducive to rooting. Avoid taking cuttings in the fall or winter when the plant is dormant, as success rates will be significantly lower.
Selecting the Right Cuttings
Choosing the right cuttings is essential for successful propagation. Here’s what to look for:
- Healthy Stems: Select stems that are healthy and free from disease. Look for firm, vigorous growth rather than weak or leggy stems.
- Length: Ideal cuttings should be about 4 to 6 inches long. This length is manageable and allows for enough foliage to photosynthesize while roots develop.
- Leaf Nodes: Make sure your cuttings include at least one leaf node, as this is where roots will emerge.
Tools and Materials Needed
Before you begin the propagation process, gather the necessary tools and materials:
- Sharp, sterilized pruning shears or scissors
- Rooting hormone (optional but recommended)
- Small pots or trays with drainage holes
- Well-draining potting mix (a blend of peat moss and perlite is ideal)
- Plastic bags or clear plastic domes to maintain humidity
- Water
Step-by-Step Guide to Propagating Gardenias from Cuttings
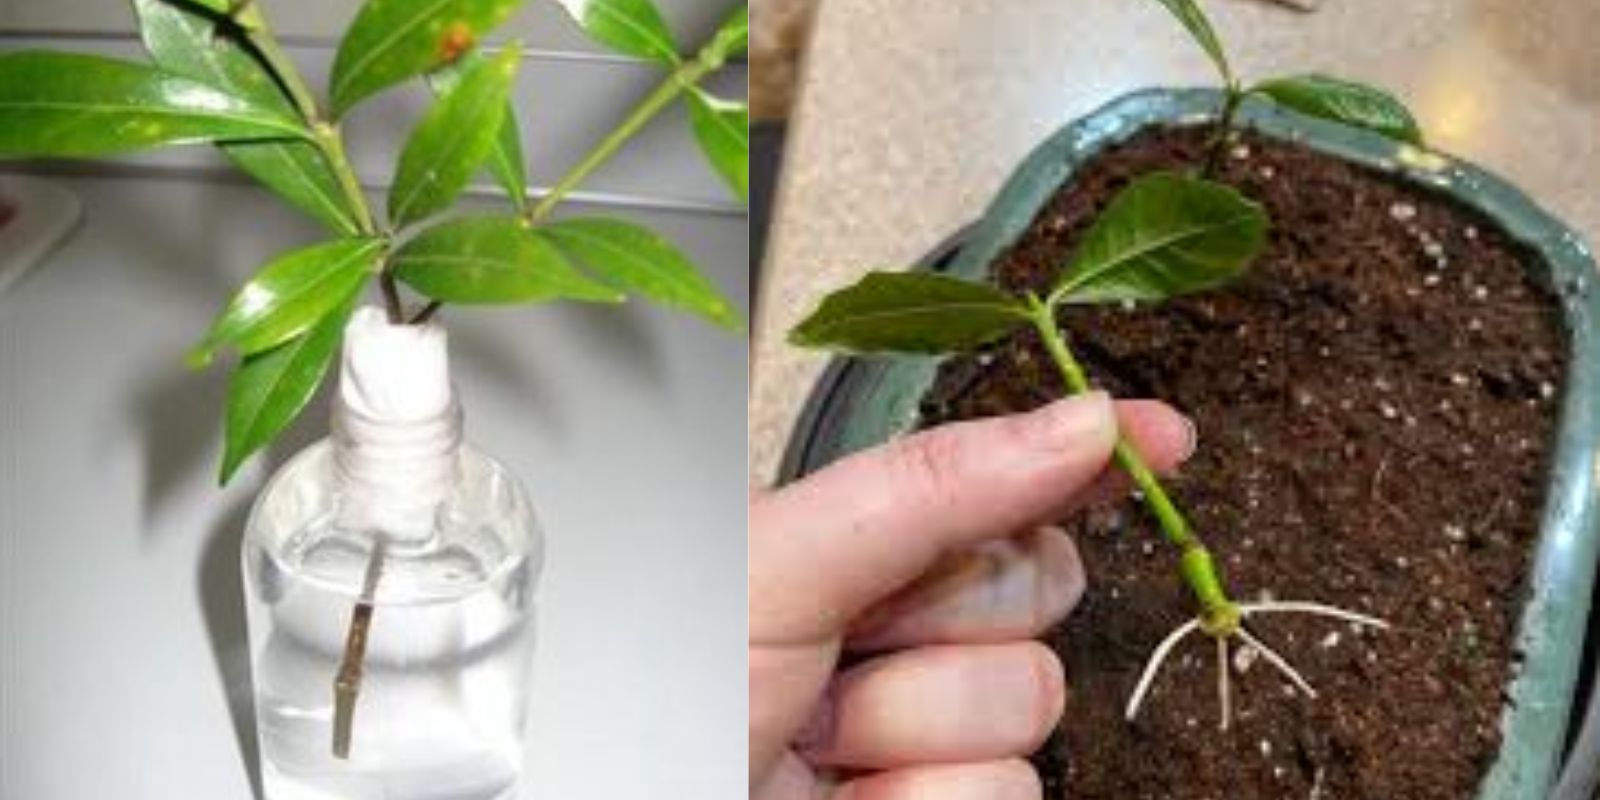
Step 1: Take Cuttings
- Choose a Healthy Parent Plant: Select a healthy gardenia plant from which to take cuttings.
- Cut the Stems: Using your sterilized pruning shears, cut a healthy stem about 4 to 6 inches long. Make the cut just below a leaf node, as this is where new roots will form.
Step 2: Prepare the Cuttings
- Remove Lower Leaves: Trim off any leaves on the lower half of the cutting, leaving only a few at the top. This reduces moisture loss and helps the cutting focus its energy on root development.
- Apply Rooting Hormone: (Optional) Dip the cut end of the stem into rooting hormone. This can significantly enhance the likelihood of successful rooting.
Step 3: Plant the Cuttings
- Prepare the Potting Mix: Fill your small pots or trays with the well-draining potting mix. Moisten the mix slightly before planting.
- Insert the Cuttings: Make a hole in the soil with your finger or a pencil and insert the cutting, burying it about 1 to 2 inches deep. Firm the soil around the cutting to provide stability.
Step 4: Create a Humid Environment
- Cover the Cuttings: To maintain humidity, cover the pots with a plastic bag or a clear plastic dome. This creates a greenhouse effect, helping to keep the environment moist.
- Place in Indirect Light: Position the pots in a warm location with bright, indirect sunlight. Avoid direct sunlight, as it can scorch the cuttings and dry them out.
Step 5: Watering and Maintenance
- Monitor Moisture Levels: Check the soil moisture regularly. It should be kept slightly moist but not soggy. Overwatering can lead to rot, while underwatering can dry out the cuttings.
- Ventilation: If using a plastic cover, occasionally remove it for a short period to allow for ventilation. This helps prevent mold and mildew from forming.
Step 6: Check for Root Development
After about 4 to 6 weeks, gently tug on the cuttings. If you feel resistance, it indicates that roots are forming. This is an exciting moment, as your cuttings are starting to establish themselves!
Step 7: Transplanting
Once the cuttings have developed a healthy root system, they are ready for transplanting:
- Prepare New Pots: Choose pots that are slightly larger than the original ones, filled with well-draining potting mix.
- Transplant Carefully: Gently remove the rooted cuttings from their original pots and transplant them into the new pots, ensuring that the roots are spread out evenly.
- Water Thoroughly: After transplanting, water the new plants thoroughly to help settle the soil around the roots.
Step 8: Care for New Gardenia Plants
- Location: Continue to place the new plants in a spot with bright, indirect sunlight. As they grow, you can gradually acclimate them to more sunlight.
- Watering Routine: Maintain a consistent watering routine. Gardenias prefer evenly moist soil, so monitor moisture levels and water when needed.
- Fertilization: Once your gardenias are established, you can begin fertilizing with a balanced, slow-release fertilizer formulated for flowering plants. This will promote healthy growth and blooming.
Common Challenges and Solutions
While propagating gardenias is generally straightforward, you may encounter some challenges. Here are a few common issues and their solutions:
- Cuttings Not Rooting: If your cuttings fail to root, ensure that you took them at the right time and used healthy, vigorous stems. Also, check that the soil is well-draining and that you provided enough humidity.
- Mold Growth: Excess moisture can lead to mold. To prevent this, ensure proper ventilation and avoid overwatering. If mold does appear, remove the cover and allow the soil to dry out slightly.
- Wilting Leaves: If the leaves of your cuttings start to wilt, it may be a sign of underwatering or excessive heat. Check the moisture levels and adjust the environment accordingly.
Conclusion
Propagating gardenias from cuttings is an enjoyable and fulfilling process that allows you to expand your garden and share the beauty of these stunning plants with others. With a little patience and care, you can successfully grow new gardenias that will thrive and produce fragrant blooms for years to come. By following the steps outlined in this guide, you’ll be well on your way to becoming a gardenia propagation pro. Happy gardening!
As you embark on this propagation journey, don’t hesitate to share your experiences with fellow gardening enthusiasts. Use hashtags like #GardeniaPropagation, #GardeningJoy, and #PlantLovers to connect with others who share your passion for plants. Enjoy the process, and watch your garden flourish!