
Heading out of town and worried about your garden? You’re not alone. Many plant enthusiasts worry that a few days away will mean coming home to dry, wilted plants. The good news is that with a little planning and some simple DIY solutions, you can ensure your garden and indoor plants stay hydrated and happy even while you’re enjoying a vacation. This guide dives into five effective and low-cost methods to keep your plants watered, with tips for setting them up and customizing them to fit your garden’s unique needs.
Why Consistent Watering Matters
Consistent watering is crucial because plants rely on it to transport nutrients, maintain structure, and stay healthy. Missing just a few days of hydration can cause stress, especially for flowering plants and vegetables. Luckily, these five methods create a continuous water source, keeping your garden happy and your stress levels low while you’re away.
Let’s dive into each method and how to set it up for maximum effectiveness.
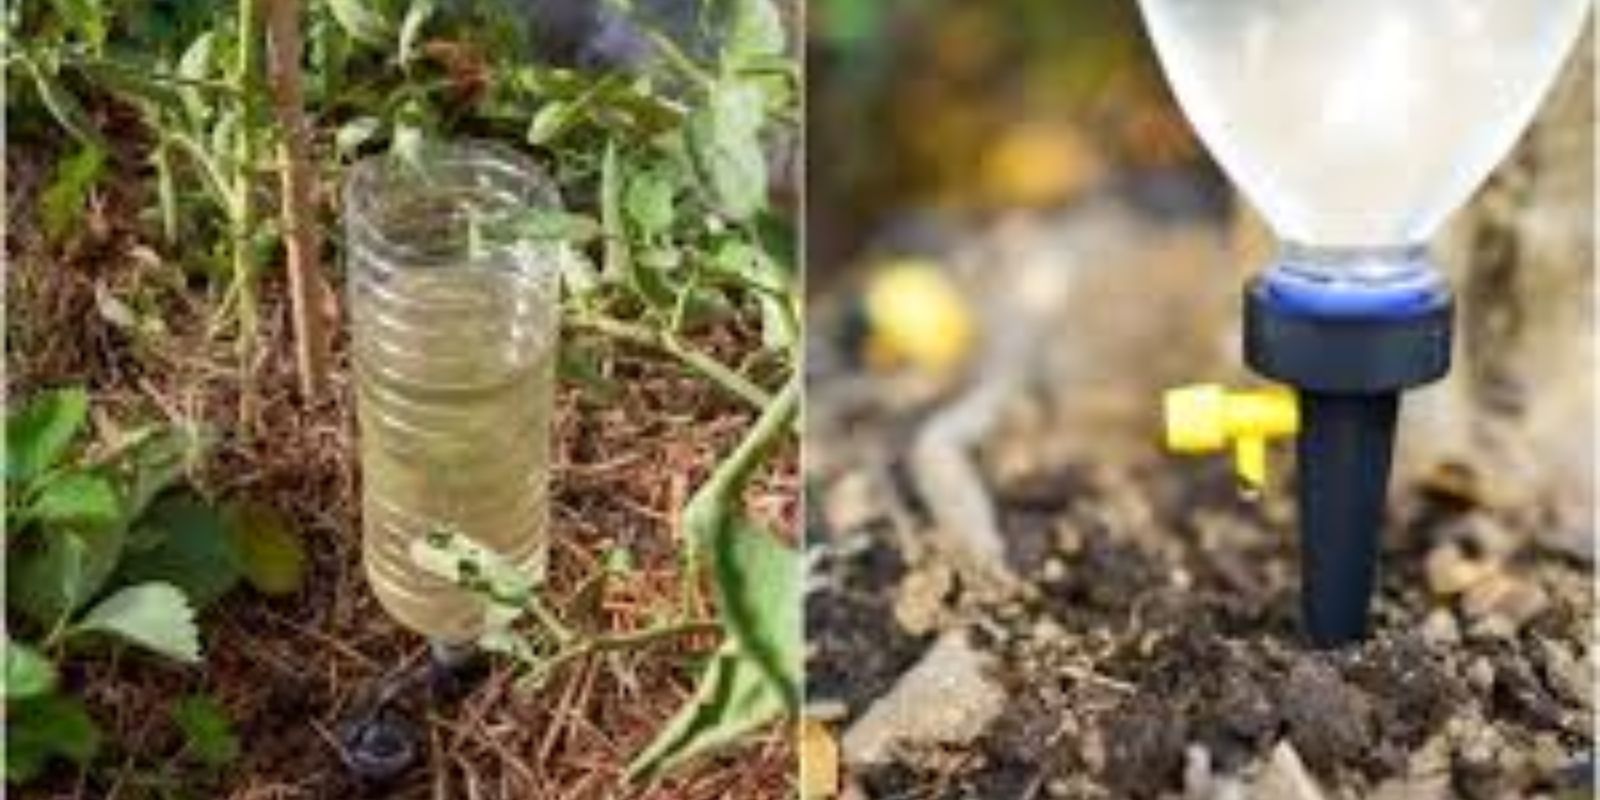
1. DIY Plastic Bottle Drippers
Plastic bottle drippers are a simple and effective way to deliver water slowly to your plants.
Materials Needed:
- Plastic bottle (size depends on plant size and water needs)
- Nail or needle
- Scissors or a knife
Instructions:
- Clean a plastic bottle and use a needle or nail to poke 2-5 small holes in the bottle cap. The more holes you add, the faster the water will drip.
- Fill the bottle with water, tightly screw the cap on, and flip the bottle upside down.
- Insert the bottle neck a few inches into the soil, near the plant’s roots. Over time, water will drip slowly into the soil.
Advantages:
This method provides a continuous, steady drip to keep plants hydrated without over-watering. It’s ideal for outdoor plants or larger pots where the bottle can be fully embedded. For larger plants, use a 2-liter bottle, while small indoor plants can benefit from smaller bottles.
Custom Tips:
If you’re unsure how fast the water will release, test the setup a day or two before leaving to ensure it won’t run out too soon.
2. Water-Wicking System
A water-wicking system is perfect for houseplants and small outdoor pots. It works by using a “wick” to draw water from a nearby reservoir directly into the plant’s soil.
Materials Needed:
- Absorbent material like a cotton rope, strip of cloth, or yarn
- Water container (mason jar, glass, or small bucket)
Instructions:
- Fill your water container with water and place it near the plant.
- Take one end of the cotton rope or cloth strip and insert it into the water container. Place the other end a few inches into the plant’s soil, near the base of the plant.
- Adjust the length so the wick reaches from the water source to the plant pot, ensuring it’s secure on both ends.
Advantages:
The wick draws water from the container to the plant’s soil as it dries out, keeping soil moisture consistent. This technique works well for smaller potted plants and can be customized for several plants using multiple wicks from the same water source.
Custom Tips:
Use this method for indoor plants that are more sensitive to watering changes. You can increase the number of wicks for larger pots if needed.
3. Bathtub or Sink Method
If you have a large collection of indoor plants, the bathtub or sink method is a great way to water them all at once.
Materials Needed:
- Bathtub or kitchen sink
- Towel or rag
Instructions:
- Line the bottom of the bathtub or sink with a towel or rag to prevent slipping.
- Fill the tub or sink with a few inches of water.
- Arrange your plants on the towel in the water, ensuring the pots have drainage holes. The soil will absorb water from the bottom up.
Advantages:
This technique is efficient for watering many plants at once and is ideal for plants that need consistent moisture. The soil will absorb water slowly, preventing over-watering, and keeping plants hydrated for a week or more.
Custom Tips:
Avoid this method for succulents or plants that prefer dry soil. To minimize water waste, use this method for shorter trips since it can be labor-intensive to set up for just a few days.
4. DIY Self-Watering Stakes
Self-watering stakes are another low-maintenance way to hydrate your plants. You can buy ready-made stakes or make your own from basic materials.
Materials Needed:
- Ceramic or terracotta stakes (or plastic bottles if DIY-ing)
- Small water bottle or jar for each stake
Instructions:
- Fill a bottle or jar with water.
- Attach the ceramic stake to the mouth of the bottle and place it in the soil next to your plant.
- The stake will gradually release water into the soil as it dries, creating a self-watering effect.
Advantages:
These stakes are reusable, durable, and work well for indoor and outdoor plants alike. They’re also good for plants with higher water needs, as you can add larger water containers to the stakes.
Custom Tips:
If you’re DIY-ing it with plastic bottles, create holes in the bottle and position it directly into the soil like the plastic dripper bottle method. Test it before leaving to adjust water flow if necessary.
5. Mulching for Moisture Retention
While mulching doesn’t directly provide water, it’s an essential step to lock in soil moisture. Mulching works best in tandem with other methods and is ideal for outdoor garden beds and large pots.
Materials Needed:
- Mulch materials (straw, shredded leaves, wood chips, or compost)
Instructions:
- Spread a 1-2 inch layer of mulch around the base of your plants, ensuring it covers the soil but doesn’t touch the stem or base of the plant.
- For best results, mulch your garden right after a thorough watering to lock in moisture.
Advantages:
Mulch acts as an insulating layer, reducing evaporation and keeping the soil cooler, which helps retain moisture. It’s a low-effort method that works for plants both in-ground and in pots, especially if you’re leaving for a longer period.
Custom Tips:
Combine mulching with one of the other watering methods to extend moisture retention. Organic mulches can add nutrients to the soil as they decompose, providing additional benefits to your garden.
Additional Tips to Prepare Your Plants for Your Absence
Here are a few extra tips to help keep your plants healthy while you’re away:
- Group Plants Together: Grouping plants in a shaded area reduces water loss and creates a mini humidity zone.
- Pre-Water Thoroughly: Give all plants a deep watering the day before you leave.
- Prune Before Leaving: Trim back any leggy or excessive foliage to reduce water consumption.
- Move Potted Plants to Shade: For outdoor pots, moving them out of direct sunlight helps minimize water evaporation.
Choosing the Right Method for Your Plants
Your choice of watering method will depend on your plant collection, their specific water needs, and the length of time you’ll be away. For short trips, a simple method like the plastic bottle drippers or water-wicking system will suffice. For longer vacations, combine techniques, such as using mulch with self-watering stakes, to maximize hydration and extend water retention.
Get Vacation-Ready and Enjoy Peace of Mind
With these five watering techniques, you can keep your garden healthy and hydrated without hassle. They’re all easy to set up and require minimal maintenance, giving you peace of mind and allowing you to relax during your time away. Try them out and share your results!
Which technique will you try first? Let us know your favorite vacation watering hacks! 🌿💧