
Growing carrots can sometimes be challenging, especially when it comes to sowing the seeds. Carrot seeds are tiny and difficult to distribute evenly, which often leads to overcrowding or gaps in rows. Overcrowded carrots struggle to grow properly, while gaps leave wasted space in your garden. One clever solution to this problem is the cornstarch method—a simple and fun experiment that helps you evenly sow carrot seeds with better results.
By using a cornstarch mixture to help distribute the seeds more evenly, you can maximize your carrot harvest and avoid the issues caused by uneven sowing. In this guide, we will explore step-by-step how to perform the “Sowing Carrots in Cornstarch Experiment” and why it’s a beneficial method for growing healthier, well-spaced carrots.
Why Try the Cornstarch Experiment?
Carrots are a delicious and versatile vegetable, rich in vitamins, minerals, and fiber. However, growing them from seed can be a bit tricky due to their size. Carrot seeds are extremely small and light, making it hard to control their placement in the soil. This often leads to dense clusters of seedlings that require thinning later or sparse rows with uneven growth. Thinning is not only labor-intensive, but it can also disturb the remaining plants’ roots, negatively affecting their growth.
The cornstarch experiment offers an easy way to address this issue. By creating a cornstarch mixture and adding your carrot seeds to it, you can pour the mixture into the planting rows, ensuring an even distribution of seeds. The method is simple, effective, and ideal for gardeners of all levels who want to make sowing carrot seeds a breeze.
Now, let’s dive into the step-by-step process of sowing carrots in cornstarch.
Step 1: Prepare the Cornstarch Mixture
The first step in this experiment is to prepare the cornstarch mixture that will carry the carrot seeds. This mixture acts as a gel to hold the seeds together while allowing them to be evenly spread in the planting rows.
How to Make the Cornstarch Mix:
- Take 1 tablespoon of cornstarch and add it to 1 cup of water in a small saucepan.
- Heat the mixture over medium heat, stirring constantly to avoid lumps.
- Continue stirring until the mixture thickens into a gel-like consistency. This should only take a few minutes.
- Once the mixture has thickened, remove it from the heat and let it cool completely.
The consistency of the cornstarch mix is important—too thick, and it will be difficult to pour; too thin, and it won’t hold the seeds properly. A gel-like consistency will allow for easy pouring while ensuring that the seeds remain suspended in the mixture for even distribution.
Step 2: Cool the Mixture and Add the Carrot Seeds
After the cornstarch mixture has cooled, it’s time to add the carrot seeds. You don’t want to add the seeds while the mixture is hot, as this could damage them and reduce their viability.
Once the mixture is cool to the touch, stir in the carrot seeds. Depending on the size of the area you’re planting, you can adjust the number of seeds accordingly. A good rule of thumb is to use about half a packet of carrot seeds for a small garden bed. Make sure the seeds are evenly distributed throughout the cornstarch mixture, so that they spread evenly when poured.
Step 3: Prepare Your Planting Rows
Next, you’ll need to prepare the garden bed or container where you will plant your carrot seeds. Carrots thrive in loose, well-drained soil, so be sure to remove any rocks or debris from the planting area to create an optimal growing environment.
Tips for Preparing the Soil:
- Loosen the soil to a depth of 12-15 inches to allow the carrot roots to grow deep and straight.
- Mix in organic compost or well-rotted manure to improve soil structure and provide nutrients.
- Create shallow rows for planting—about ¼ to ½ inch deep.
Spacing is also essential when planting carrots. For best results, space the rows about 12 inches apart. This gives the carrot plants room to grow without competing for nutrients and sunlight.
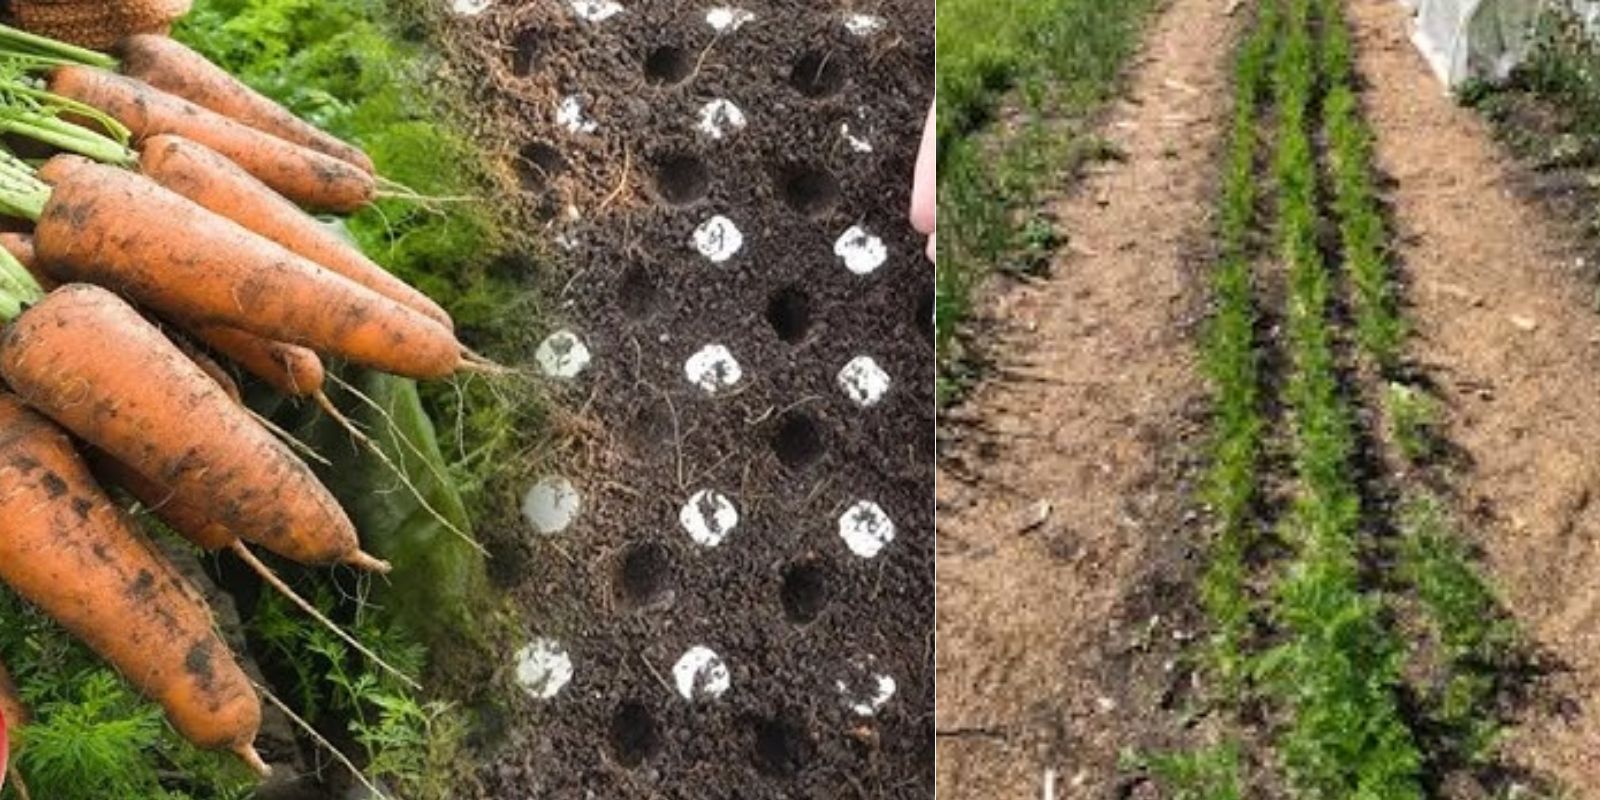
Step 4: Pour the Cornstarch-Seed Mixture Into the Rows
Now comes the fun part! Pour the cornstarch mixture with the suspended carrot seeds directly into the prepared planting rows. The gel will help carry the seeds, allowing them to spread evenly along the length of the row. This is where the magic of the cornstarch experiment happens—the mixture ensures that the seeds don’t clump together, preventing overcrowding and the need for thinning later.
As you pour, try to keep the flow steady and even to ensure uniform seed placement. If you’re working with multiple rows, repeat the process for each row until all the seeds have been distributed.
Step 5: Cover the Seeds Lightly with Soil
After pouring the cornstarch mixture into the rows, cover the seeds lightly with soil. Be careful not to bury them too deeply—carrot seeds only need a thin layer of soil, about ¼ inch deep, to germinate.
Once the seeds are covered, gently press the soil down to ensure good seed-to-soil contact. This is important for germination, as it helps the seeds absorb moisture from the surrounding soil.
Step 6: Water the Rows Gently
Watering is an essential part of successful seed germination, but be careful not to wash the seeds away by watering too forcefully. Use a gentle spray or a watering can with a fine nozzle to moisten the soil. The goal is to keep the soil consistently moist, but not waterlogged.
During the germination period, which can take 1 to 3 weeks, check the soil regularly to ensure it doesn’t dry out. Carrot seeds need consistent moisture to sprout, so avoid letting the top layer of soil become dry.
Step 7: Keep the Soil Moist and Weed-Free
As your carrot seeds begin to germinate, it’s crucial to maintain the right conditions for healthy growth. Keep the soil moist by watering regularly, especially during dry periods. However, be careful not to overwater, as too much moisture can cause the roots to rot.
Weeds can compete with your carrot seedlings for water, nutrients, and sunlight, so keep the area free of weeds by pulling them out as soon as they appear. This will give your carrots the best chance to grow strong and healthy.
Step 8: Harvesting Your Carrots
Carrots typically take 70 to 80 days to mature, depending on the variety. Once they reach the desired size, you can begin harvesting. The leaves will start to yellow slightly as a sign that the carrots are ready.
To harvest, gently loosen the soil around the carrot with a garden fork or your hands, being careful not to damage the roots. Pull the carrots up by their tops, and enjoy the fruits of your labor!
Why This Method Works
The cornstarch experiment is effective because it addresses one of the main challenges of sowing carrot seeds: their small size. By suspending the seeds in the cornstarch mixture, you ensure they are evenly spaced and don’t clump together. This reduces the need for thinning, which can disturb the roots of the remaining plants and slow down growth.
Additionally, this method makes it easier to handle and sow the seeds, especially for beginner gardeners or those with limited dexterity.
Conclusion: Grow Carrots Like a Pro with the Cornstarch Experiment
Sowing carrots in cornstarch is a fun and practical way to improve your carrot-growing success. This simple experiment not only makes it easier to distribute the tiny seeds but also prevents overcrowding, ensuring a healthy and bountiful harvest.
By following these steps, you’ll be well on your way to growing beautiful, delicious carrots at home, with minimal effort. Whether you’re a seasoned gardener or a beginner, the cornstarch experiment offers a fresh and innovative approach to planting carrots.
Ready to Try?
Give this method a go in your garden, and enjoy better carrots with less hassle! 🌱🥕