
Gardening enthusiasts constantly seek innovative and sustainable methods to enhance plant growth while minimizing their environmental impact. One such technique gaining popularity is soil blocking. This method involves creating small blocks of soil to start seeds and grow plants without the use of traditional plastic pots. In this article, we will explore the fundamentals of soil blocking, its benefits, step-by-step instructions on how to implement it, and tips for success, making it a go-to technique for eco-conscious gardeners.
What is Soil Blocking?
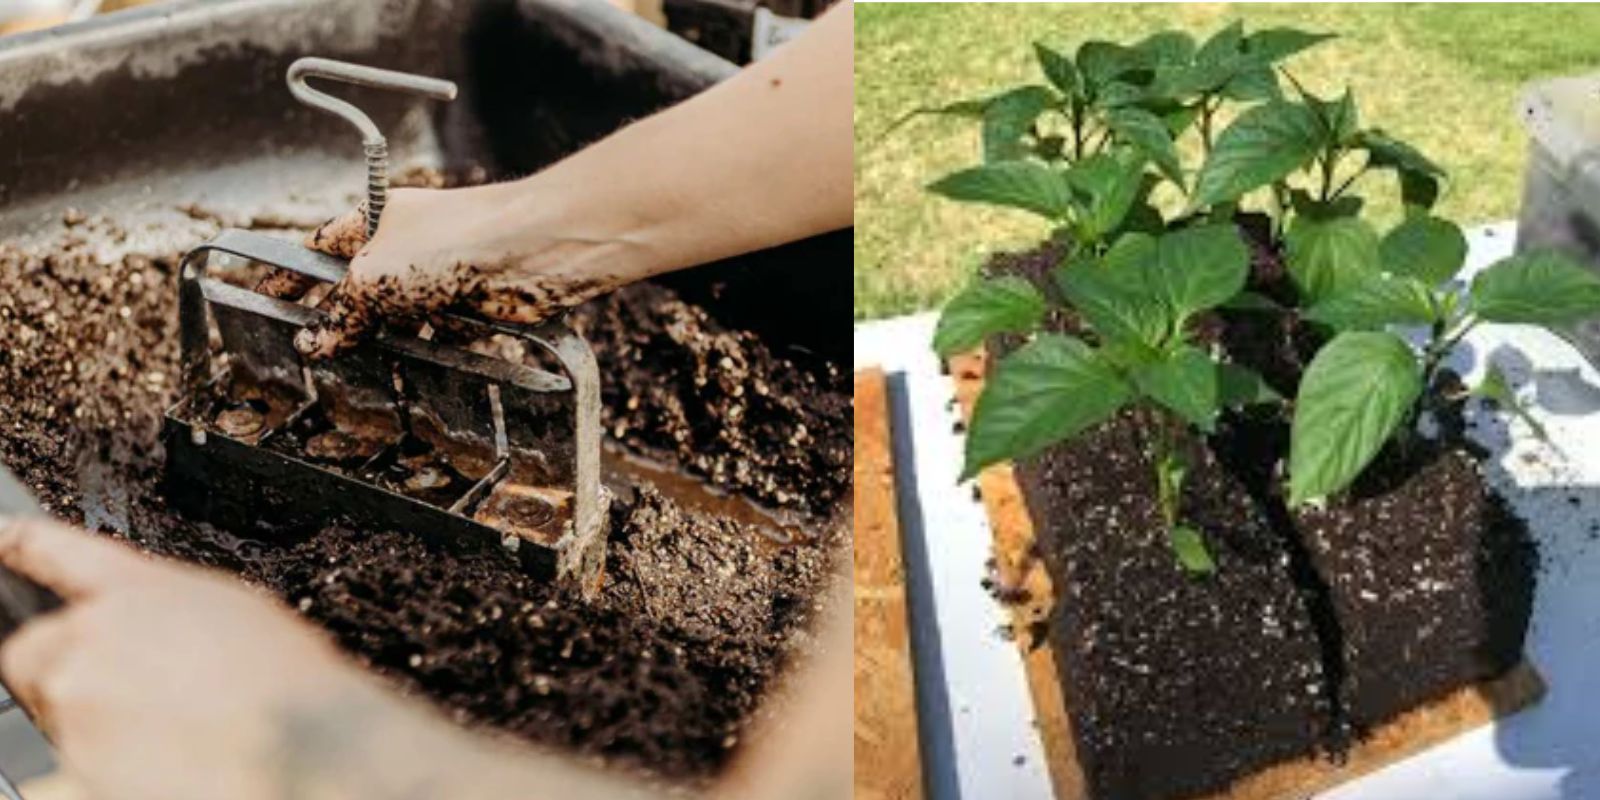
Soil blocking is an eco-friendly seed-starting method that eliminates the need for plastic pots. Instead of transplanting seedlings from small pots, gardeners create compact blocks of soil that can hold seedlings until they are ready to be planted directly into the garden or larger containers. The blocks provide a stable environment for root growth while promoting healthier plants through better aeration and moisture retention.
The Benefits of Soil Blocking
- Reduction of Plastic Waste: One of the most significant advantages of soil blocking is its contribution to reducing plastic waste. By avoiding plastic pots, gardeners can minimize their environmental footprint.
- Enhanced Root Development: Soil blocks encourage healthy root systems. The air pruning effect of the exposed sides of the blocks prevents roots from circling and encourages the growth of strong, fibrous roots.
- Improved Moisture Retention: The soil blocks maintain moisture levels more effectively than plastic pots, reducing the frequency of watering.
- Cost-Effective: While initial investments may be required for soil block makers and soil mix, soil blocking can save money in the long run by reducing the need for plastic containers.
- Space Efficiency: Soil blocks can be arranged closely together, allowing gardeners to maximize their growing space.
- Versatility: Soil blocking is suitable for a variety of plants, including vegetables, herbs, and flowers.
Getting Started with Soil Blocking
Materials Needed
Before diving into the soil blocking process, gather the following materials:
- Soil Block Maker: This tool comes in various sizes and shapes. Choose one that fits your gardening needs, such as a single block maker or a multi-block maker for larger quantities.
- Seed-Starting Mix: Use a quality seed-starting mix that is lightweight, well-draining, and free from chemical fertilizers and pesticides.
- Tray or Flat: A shallow tray or flat is necessary for holding the soil blocks.
- Seeds: Select the seeds you want to grow, keeping in mind that some may require specific conditions for germination.
- Watering Can or Spray Bottle: To mist the soil blocks and keep them moist without overwatering.
Step-by-Step Instructions for Soil Blocking
Now that you have all the necessary materials, follow these steps to start soil blocking successfully:
Step 1: Prepare the Soil Mix
Combine equal parts of the seed-starting mix and water to create a damp, crumbly consistency. The mixture should hold together when squeezed in your hand but not be overly wet. Adjust the moisture level until the soil feels just right.
Step 2: Create the Soil Blocks
Using the soil block maker, fill the mold with the prepared soil mix. Press firmly to ensure the soil holds its shape when removed from the mold. The compression is essential for forming a solid block that won’t crumble.
Step 3: Fill the Tray
Once you have created the soil blocks, carefully place them on your tray or flat, ensuring they are spaced apart to allow for air circulation. Depending on the size of your blocks and the tray, you can fit multiple blocks together efficiently.
Step 4: Sow Your Seeds
Make small indentations in the top of each soil block using your finger or a pencil. Place 1-2 seeds in each indentation, ensuring they are spaced adequately. Lightly cover the seeds with a thin layer of the soil mix to provide them with a protective layer.
Step 5: Water Carefully
Mist the soil blocks with water to keep them moist but not soggy. It’s important to avoid overwatering, as excessive moisture can lead to rot or fungal issues. A gentle spray bottle works well for this purpose.
Step 6: Provide Light and Heat
Place the tray in a location with adequate light and warmth. A sunny windowsill, a grow light setup, or a greenhouse can work well for germination. Most seeds thrive in temperatures between 65°F to 75°F (18°C to 24°C).
Step 7: Monitor and Care for Seedlings
Check the moisture levels regularly, ensuring the soil blocks remain damp but not waterlogged. Once seedlings emerge, they will require light for at least 12-16 hours a day. Consider rotating the tray if you notice uneven growth.
Step 8: Transplant When Ready
Once the seedlings have developed strong roots and are ready for transplanting, you can move them directly into the garden or larger containers. The soil blocks will disintegrate naturally, enriching the surrounding soil.
Tips for Success in Soil Blocking
- Choose the Right Seeds: Some seeds work better in soil blocks than others. Fast-growing crops like lettuce, herbs, and brassicas are great options. Avoid plants with long taproots, as they may not thrive in soil blocks.
- Experiment with Block Sizes: Different plants may benefit from different block sizes. Larger blocks can be created for plants that need more room to grow, while smaller blocks are ideal for smaller seedlings.
- Use Quality Soil Mix: Opt for a high-quality, organic seed-starting mix free from additives. A good mix will ensure proper drainage and aeration for healthy root development.
- Consider Adding Fertilizer: Some gardeners choose to mix in a slow-release organic fertilizer with their soil mix to give seedlings a nutrient boost. Follow the manufacturer’s instructions for the correct amount.
- Maintain Proper Spacing: Ensure sufficient spacing between soil blocks to prevent overcrowding. This helps with air circulation and reduces the risk of disease.
- Keep Records: Keep a gardening journal to track your progress with soil blocking. Document seed varieties, germination rates, and any observations you make along the way.
- Experiment and Adapt: Every garden is unique, so don’t hesitate to experiment with different techniques, block sizes, and crops. Adapt your methods based on what works best in your growing environment.
Conclusion
Soil blocking is an eco-friendly and effective method for starting seeds and nurturing healthy plants. By eliminating plastic waste and promoting robust root development, this technique aligns with sustainable gardening practices while offering gardeners a rewarding experience. With a few simple steps and the right materials, anyone can incorporate soil blocking into their gardening routine.
So why not give it a try? Embrace the art of soil blocking, and enjoy the fruits of your labor while contributing to a healthier planet. Happy gardening!
Join the soil blocking movement today! 🌱✨ Share your experiences and tips with us! #SoilBlocking #EcoFriendlyGardening #SustainableLiving #SeedStarting #GardeningTips