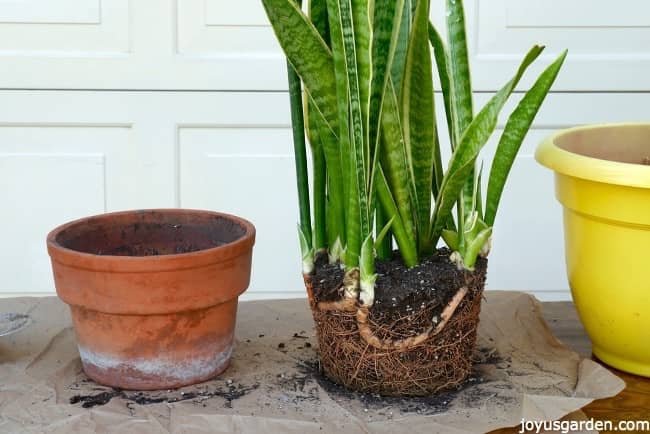
Repotting a snake plant may seem intimidating, especially if you’re new to caring for houseplants, but it’s actually one of the easiest plant-care tasks you can learn. Whether your snake plant (also known as Sansevieria or Dracaena trifasciata) is root-bound, growing pups, or simply needs a fresh start, learning the simple tricks to how to repot a snake plant successfully will keep it healthy, vibrant, and thriving for years. This guide breaks down everything you need to know—materials, timing, techniques, and pro tips—so you can repot with confidence.🌿 Why Repotting Your Snake Plant MattersSnake plants are known for being hardy, slow-growing, and low-maintenance. However, even the toughest plants need occasional attention. Repotting:Prevents roots from becoming compactedAllows room for new growthRefreshes old soil that has lost nutrientsHelps remove rot or diseased rootsLearning the simple tricks to how to repot a snake plant successfully can significantly boost your plant’s health and overall appearance.When Should You Repot a Snake Plant?1. Root Bound IssuesIf roots are growing out of drainage holes or circling the pot, it’s time to repot.2. Slow or Stunted GrowthFresh soil often jumpstarts growth.3. Soil Is Compact or Doesn’t Drain WellOld soil can cause root rot—repotting solves this instantly.4. The Plant Has Outgrown Its PotSnake plants love being slightly snug, but too tight is unhealthy.5. Every 2–3 YearsAs a general guideline, repot every few years to keep your plant thriving.🌱 What You’ll Need Before RepottingTo follow the simple tricks to how to repot a snake plant successfully, gather:A new pot (1–2 inches wider than the old one)Fast-draining soil mixOptional: cactus or succulent mixClean shears or scissorsGlovesA trowel (optional)Choose a pot with drainage holes—this is absolutely essential for snake plants.🪴 How to Repot a Snake Plant (Step-by-Step Guide)Step 1: Prepare Your New PotFill the bottom with a layer of well-draining soil. Snake plants hate sitting in water, so the soil mixture should include:PerliteCoarse sandCoconut coir or potting soilA succulent/cactus mix works perfectly.Step 2: Remove the Snake Plant from Its Old PotGently squeeze the sides to loosen the soil. Tilt the pot and carefully slide the plant out. If it’s stubborn, tap the pot’s sides or use a dull knife around the edges.Tip: Never pull the plant by its leaves—you can damage the root system.Step 3: Inspect the RootsHealthy roots are firm, pale, and spread naturally.Remove any:Mushy sectionsBrown or black rootsRotting piecesThis is a key part of the simple tricks to how to repot a snake plant successfully—healthy roots equal a healthy plant.Step 4: Separate Pups (Optional)Snake plants produce offsets, also known as pups. You can divide them to grow new plants.To propagate pups:Identify a shoot with its own root base.Cut away gently using a clean blade.Pot it separately or keep it with the mother plant.Step 5: Position the Plant in the New PotPlace your snake plant upright in the center. Add soil around the sides, gently pressing it down to remove air pockets.Keep the level slightly below the rim to make watering easier.Step 6: Water LightlySnake plants don’t need immediate heavy watering. After repotting:Let the soil settleWater lightly, just enough to moisten the mixOverwatering right after repotting can cause rot.🌿 Best Soil Mix for Snake PlantsChoosing the right soil mix is crucial for implementing the simple tricks to how to repot a snake plant successfully. Select a soil that drains quickly and never stays soggy.Ideal Mix Includes:50% succulent/cactus mix25% perlite25% coarse sandIf using store-bought mixes, ensure they’re labeled for succulents or desert plants.🪴 Choosing the Right Pot SizeSnake plants prefer slightly snug pots, but here’s how to choose wisely:Size up only 1–2 inches in diameterAvoid overly deep potsTerracotta pots are great—they absorb moisture and prevent rotPlastic and ceramic pots work too, but ensure they have drainage holes.🌞 Caring for Your Snake Plant After RepottingAfter learning the simple tricks to how to repot a snake plant successfully, proper post-care is important.LightPlace your snake plant in bright, indirect sunlight. It tolerates low light but grows faster in brighter conditions.WateringAfter the initial light watering, wait 1–2 weeks before watering again. Snake plants store moisture—overwatering is their biggest enemy.Avoid Fertilizing ImmediatelyWait 4–6 weeks before adding fertilizer so you don’t burn the roots.TemperatureIdeal range:60–85°F (15–29°C)Protect the plant from cold drafts and sudden temperature drops.💡 Practical Tips for SuccessHere are some expert-approved strategies to ensure you’re mastering the simple tricks to how to repot a snake plant successfully!✔️ Use Fresh Soil OnlyOld soil loses nutrients and often compacts over time.✔️ Keep Tools CleanDirty tools can transfer disease from one plant to another.✔️ Don’t Overwater After RepottingA very common mistake—remember, snake plants need less water than most houseplants.✔️ Provide Support for Tall VarietiesTall species like Sansevieria zeylanica may need a temporary stake after repotting.✔️ Rotate the Pot MonthlyThis encourages even growth and prevents leaning.🌿 Common Mistakes to AvoidEven experienced plant owners sometimes slip up. Here’s what to watch out for:❌ Using Regular Potting SoilIt holds too much moisture and can cause rot.❌ Choosing a Pot That’s Too LargeLarge pots keep soil wet longer—dangerous for a succulent plant like this.❌ Removing Too Many RootsOnly prune damaged or rotten roots.❌ Repotting in WinterSnake plants grow slowly in winter—repotting is best done in spring or summer.🌱 Conclusion: You Can Repot with Confidence!Learning the Simple tricks to How to repot a snake plant successfully! is the key to keeping your plant healthy, attractive, and long-lived. With the right soil, a properly sized pot, gentle handling, and thoughtful aftercare, your snake plant will reward you with steady growth, vibrant leaves, and new pups over time.Whether you’re refreshing the soil, dividing pups, or upgrading to a bigger pot, these simple steps make repotting easy and stress-free. With a little practice, you’ll feel like a pro—and your snake plant will thrive in its fresh new home.