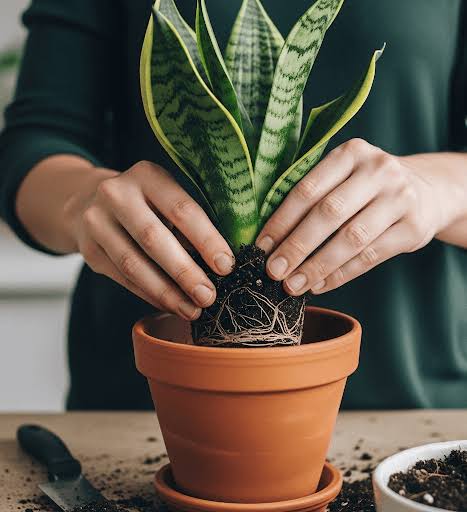
If you’re looking for a simple guide to help you with how to repot a snake plant successfully, you’ve come to the right place! Snake plants (also known as Sansevieria) are popular houseplants because they’re low-maintenance and resilient, but they still need occasional care, including repotting.Repotting a snake plant isn’t as difficult as it might seem, and with a few simple tricks, you can ensure your plant thrives for years to come. Let’s go over the essential steps and tips for repotting your snake plant successfully.Why Should You Repot Your Snake Plant?Before we jump into the steps, here’s why repotting your snake plant is important:More Space: As your snake plant grows, it may outgrow its pot. Repotting gives the roots more space to spread out, encouraging healthy growth.Fresh Soil: Over time, the soil in your pot can become compacted and depleted of nutrients. Repotting refreshes the soil, giving your plant access to fresh nutrients.Prevent Root Rot: If your snake plant is not thriving or showing signs of root rot, repotting can help address the issue by ensuring the plant has adequate drainage and healthier roots.Signs It’s Time to Repot Your Snake PlantHere are a few signs that your snake plant is ready for a new pot:Roots are growing out of the drainage holes.The plant has become top-heavy or is tipping over.The soil seems to dry out too quickly, or water doesn’t seem to be draining properly.Your plant’s growth has slowed down significantly.If you notice any of these signs, it’s a good time to repot your snake plant.Materials You’ll Need to Repot Your Snake Plant SuccessfullyRepotting your snake plant requires only a few simple tools and materials:A new pot (1-2 inches larger in diameter than the current pot)Fresh potting soil (well-draining soil, such as cactus or succulent mix)A small trowel or hand shovel (optional)Gardening gloves (optional, but useful for protection)Watering can (for lightly watering the plant post-repotting)A drainage tray (optional, to catch excess water)Step-by-Step Guide: How to Repot a Snake Plant SuccessfullyStep 1: Choose the Right PotThe first step in how to repot a snake plant successfully is selecting the right pot. When choosing a new pot, keep these tips in mind:Size: Pick a pot that is 1-2 inches larger in diameter than the current pot. This provides extra room for the roots to grow but doesn’t overwhelm the plant with too much space.Drainage: Ensure that the pot has drainage holes to prevent water from accumulating at the bottom, which can lead to root rot.Material: Pots made from terra cotta or ceramic are ideal because they allow for some airflow to the roots. Plastic pots can also work but may not be as breathable.Step 2: Prepare the New PotBefore you begin the actual repotting process:Place a small layer of fresh potting soil at the bottom of the new pot. This will create a base for the roots to sit on and prevent them from sitting directly on the pot’s drainage holes.Ensure the soil is evenly distributed across the bottom of the pot. This will help ensure that the roots are well-supported once you move the plant in.Step 3: Remove the Snake Plant from Its Current PotCarefully remove your snake plant from its current pot:Loosen the soil: Gently tap the sides of the pot or use a small trowel to loosen the soil around the edges.Slide the plant out: Hold the base of the plant and gently tip the pot to slide the plant out. If it’s stuck, you can lightly squeeze the pot to loosen it.Check the roots: Once the plant is out, examine the roots. If the roots are tightly bound in a circle (called root-bound), gently loosen them with your fingers or a small tool.Step 4: Trim Damaged or Excessive RootsIf you see any damaged or rotting roots (usually brown or mushy), trim them off with clean, sharp scissors or pruning shears. You should also trim any excessively long roots to encourage healthy growth in the new pot.Step 5: Place the Snake Plant in the New PotPosition the plant: Place the snake plant in the center of the new pot, making sure it sits at the same depth as it did in the old pot. The soil level should be just below the rim of the pot (leaving about an inch for watering).Fill with soil: Gently add fresh potting soil around the roots, pressing lightly to eliminate air pockets. Ensure the soil is evenly distributed and covers all the roots. Make sure the plant is upright and centered.Step 6: Water the PlantOnce the plant is securely in the new pot:Water lightly: Give your newly repotted snake plant a light watering. Be sure not to overwater, as snake plants are sensitive to excess moisture. You want the soil to be evenly moist, not soggy.Allow the soil to settle: After watering, you may need to add a little more soil if it settles too much. The plant should be stable, and the soil should not be too loose around the roots.Step 7: Place the Snake Plant in a Suitable LocationAfter repotting, place your snake plant in a spot with plenty of indirect sunlight. Snake plants thrive in bright, indirect light but can also tolerate low light.Avoid direct sunlight for a few days after repotting to help the plant acclimate and avoid stress.Step 8: Monitor and Care for the Repotted Snake PlantWatering schedule: After repotting, be careful not to overwater. Let the soil dry out between waterings. Generally, snake plants only need watering once every 2-3 weeks, depending on your home’s humidity levels.Observe the plant’s health: Over the next few weeks, monitor the snake plant for signs of stress, like drooping or yellowing leaves. If this happens, check the soil moisture and adjust your watering schedule.Practical Tips for Repotting a Snake Plant SuccessfullyHere are some additional simple tricks to help you repot your snake plant successfully:1. Repot During the Growing SeasonThe best time to repot a snake plant is during its active growing season in the spring or early summer. Avoid repotting in winter when the plant is dormant, as this can stress it out.2. Don’t OverpotChoose a pot that’s only slightly larger than the previous one. A pot that’s too big can cause the soil to stay too wet for too long, which may lead to root rot.3. Be Gentle with the RootsSnake plants are tough, but their roots can still be damaged if handled roughly. Always treat the roots gently to avoid shocking the plant.4. Keep the Old Soil for CompostIf you’re removing old soil, try not to throw it away. You can mix it into your compost pile, as it still contains valuable nutrients that can enrich your garden soil.Conclusion: How to Repot a Snake Plant SuccessfullyRepotting a snake plant doesn’t have to be difficult. By following these simple steps and tips, you can help your plant grow healthier, stronger, and more vibrant. To recap:Choose a pot that’s just slightly bigger than the current one, with good drainage.Remove the plant carefully, trim any damaged roots, and place it in the new pot.Add fresh soil and water lightly, making sure the soil is moist but not soggy.Place your plant in a sunny spot and allow it to acclimate.