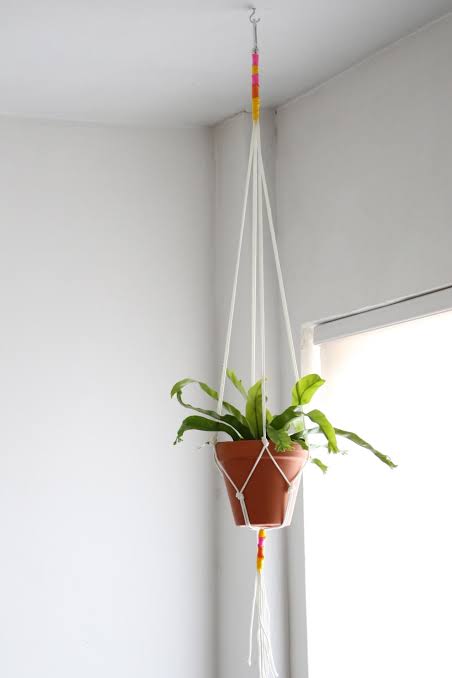
Looking to add a touch of green charm to your home without taking up precious floor space? Then you’ll love these Simple Tricks to How to Make Plant Hangers Successfully!Plant hangers are one of the easiest and most creative ways to display your favorite indoor or outdoor plants. They elevate your décor (literally!), make great use of vertical space, and bring a cozy, natural vibe to any room or patio.Whether you live in a small apartment in the United States, a cozy flat in the United Kingdom, or a spacious home in Canada, learning how to make plant hangers is a fun, affordable, and rewarding DIY project.In this guide, we’ll cover easy step-by-step methods, materials you’ll need, and practical tips to ensure your hanging planters look beautiful and stay sturdy.🌸 Why Make Your Own Plant Hangers?Before diving into the process, let’s explore why creating your own plant hangers is such a great idea:🌿 Cost-effective: DIY hangers are much cheaper than store-bought ones.🎨 Customizable: Choose materials, colors, and designs to match your home décor.🪴 Space-saving: Perfect for small spaces — hang plants near windows, in corners, or even outdoors.💪 Satisfying DIY project: There’s nothing like the pride of displaying a handmade creation.Ready to craft something stylish and sustainable? Let’s get started with Simple Tricks to How to Make Plant Hangers Successfully!🧵 Materials You’ll NeedTo make a classic macramé-style or rope plant hanger, gather the following supplies:Cotton cord, jute, or twine (around 4–5 mm thick)Metal ring or wooden ring (for hanging)ScissorsTape measure or rulerPlant pot (to size your hanger correctly)Beads or decorations (optional)💡 Tip: Natural materials like jute or cotton create a rustic, boho look, while nylon cords give a more modern, polished finish.🪴 Step-by-Step Guide: How to Make a Simple Plant HangerStep 1: Cut the CordCut four long pieces of cord, each about 4 yards (3.5 meters) long.Fold all four cords in half and loop them through the metal or wooden ring. You’ll now have eight strands hanging down.Step 2: Tie the Top KnotJust below the ring, tie all the cords together in a big knot to secure them. This forms the top of your plant hanger.💡 Pro Tip: You can wrap a shorter piece of cord around this knot several times for a neat finish — this is called a “gathering knot.”Step 3: Divide and KnotSeparate your cords into four groups of two strands each.Measure about 10 inches (25 cm) down from the top knot and tie a simple knot in each group. These will be the supports for your pot.Step 4: Create the Net PatternTo form the crisscross pattern that holds your pot:Take one strand from one pair and one from the neighboring pair.Tie these two strands together about 4 inches (10 cm) below the previous knots.Repeat all around until each section connects to form a net-like shape.Step 5: Tie the Bottom KnotOnce your pot fits snugly in the hanger, gather all cords together below it and tie a large knot to secure it.Leave the ends hanging for a fringe effect, or trim them neatly for a cleaner look.Step 6: Hang and Enjoy!Place your plant pot in the hanger, making sure it sits securely. Then hang it from a ceiling hook, curtain rod, or wall bracket — anywhere that gets good natural light.🎍 You’ve done it! You’ve mastered one of the easiest Simple Tricks to How to Make Plant Hangers Successfully!🌼 Creative Variations to TryOnce you’ve made your first basic plant hanger, you can experiment with different styles and materials. Here are some fun variations:1. Beaded Plant HangerThread wooden or colorful beads onto your cords before tying the knots. This adds a bohemian, artistic touch.2. Fabric or T-Shirt Yarn HangerUpcycle old T-shirts by cutting them into long strips. Stretch them slightly — they’ll curl and act like cord. This is perfect for an eco-friendly project.3. Chain or Wire HangerUse lightweight metal chains or sturdy wire for a modern, industrial look. These work beautifully with minimalist or urban-style interiors.4. Crochet Plant HangerIf you enjoy crocheting, use your skills to make intricate designs using cotton yarn. You can create everything from simple slings to elaborate lace-like patterns.5. Twisted Rope HangerTry twisting multiple cords together before knotting for a thicker, rope-style hanger. This design is great for heavier pots.🌿 Choosing the Right Plants for HangingNot every plant thrives in a hanging pot. Here are some top picks that love to dangle and cascade gracefully:Spider Plant: Easy to care for and perfect for beginners.Pothos (Devil’s Ivy): Gorgeous trailing vines that thrive in indirect light.String of Pearls: Adds a sculptural, elegant touch to any space.English Ivy: Hardy and ideal for indoor or outdoor hanging.Boston Fern: Adds lush greenery and texture.Philodendron: Low-maintenance and air-purifying.💧 Tip: Make sure your pots have drainage holes to prevent overwatering.🌸 Placement Ideas for Plant HangersNow that you’ve created your DIY plant hangers, it’s time to show them off!Here are some popular (and stylish) ways to display them:Windows: Hang near bright windows for light-loving plants like succulents or herbs.Corners: Fill empty corners to soften the look of a room.Balconies and Patios: Perfect for cascading plants or flowers.Bathrooms: Add humidity-loving plants like ferns for a spa-like vibe.Bedrooms: Hang calming greenery like pothos for a relaxing touch.🌿 Practical Tips to Make Plant Hangers SuccessfullyFollow these simple tricks to ensure your DIY project lasts and looks amazing:✅ 1. Measure TwiceAlways test your hanger with the plant pot before hanging — you may need to adjust knot spacing for the perfect fit.✅ 2. Choose Sturdy HooksInstall heavy-duty ceiling hooks or wall anchors that can handle the weight of your plant and soil.✅ 3. Protect SurfacesWhen watering hanging plants, use drip trays or hang them outdoors temporarily to prevent messes.✅ 4. Mix HeightsHang multiple plant hangers at varying heights to create depth and interest in your space.✅ 5. Keep It BalancedIf your plant tilts, adjust the knots or cord lengths to even out the weight.🌼 Eco-Friendly Bonus: Upcycling MaterialsPart of the charm of making your own plant hangers is how sustainable it can be. Try using:Old macramé cords or yarn scrapsVintage curtain ringsDriftwood as a natural hanger baseRecycled glass jars or tins as plant potsNot only will you reduce waste, but you’ll also give your home décor a unique, eco-chic personality.🌿 Troubleshooting Common IssuesEven the best DIY projects can have hiccups. Here’s how to fix them:Problem: Hanger twists or tangles.Fix: Make sure cords are laid flat and untangled before tying knots.Problem: Pot slips out.Fix: Tighten bottom knots and use a smaller pot that fits snugly.Problem: Hanger looks uneven.Fix: Hang it temporarily and adjust knot spacing for balance.🌸 ConclusionAnd there you have it — Simple Tricks to How to Make Plant Hangers Successfully! 🌿By following these easy steps, you can transform ordinary cords into stunning, functional art pieces that bring life and personality to your home. Whether you go for a rustic jute look, a colorful boho vibe, or a sleek modern style, your handmade hangers will showcase your creativity and love for plants.Remember: start simple, have fun, and don’t be afraid to experiment. Each hanger you make tells its own story — one knot, one plant, and one beautiful corner at a time.So grab your cords, pick your favorite plant, and let your creativity hang high — literally!