
Roses are the epitome of elegance in any garden, and the thought of propagating them without roots may sound daunting at first. However, with a 100% functional and simple method, you can successfully plant roses from cuttings and watch them thrive. Whether you’re a seasoned gardener or a beginner, this guide will walk you through every step of the process. By the end, you’ll have a flourishing rose garden to admire and enjoy.
Why Propagate Roses Without Roots?
Propagating roses from cuttings is one of the most economical and rewarding ways to expand your garden. Unlike purchasing expensive rose plants, using this method allows you to grow roses from an existing bush, ensuring that the new plant retains the same color, fragrance, and qualities as the parent plant. This method is particularly useful if you have a sentimental rose variety or want to share a beloved rose bush with friends and family.
Step-by-Step Guide to Planting Roses Without Roots
1. Select a Healthy Cutting
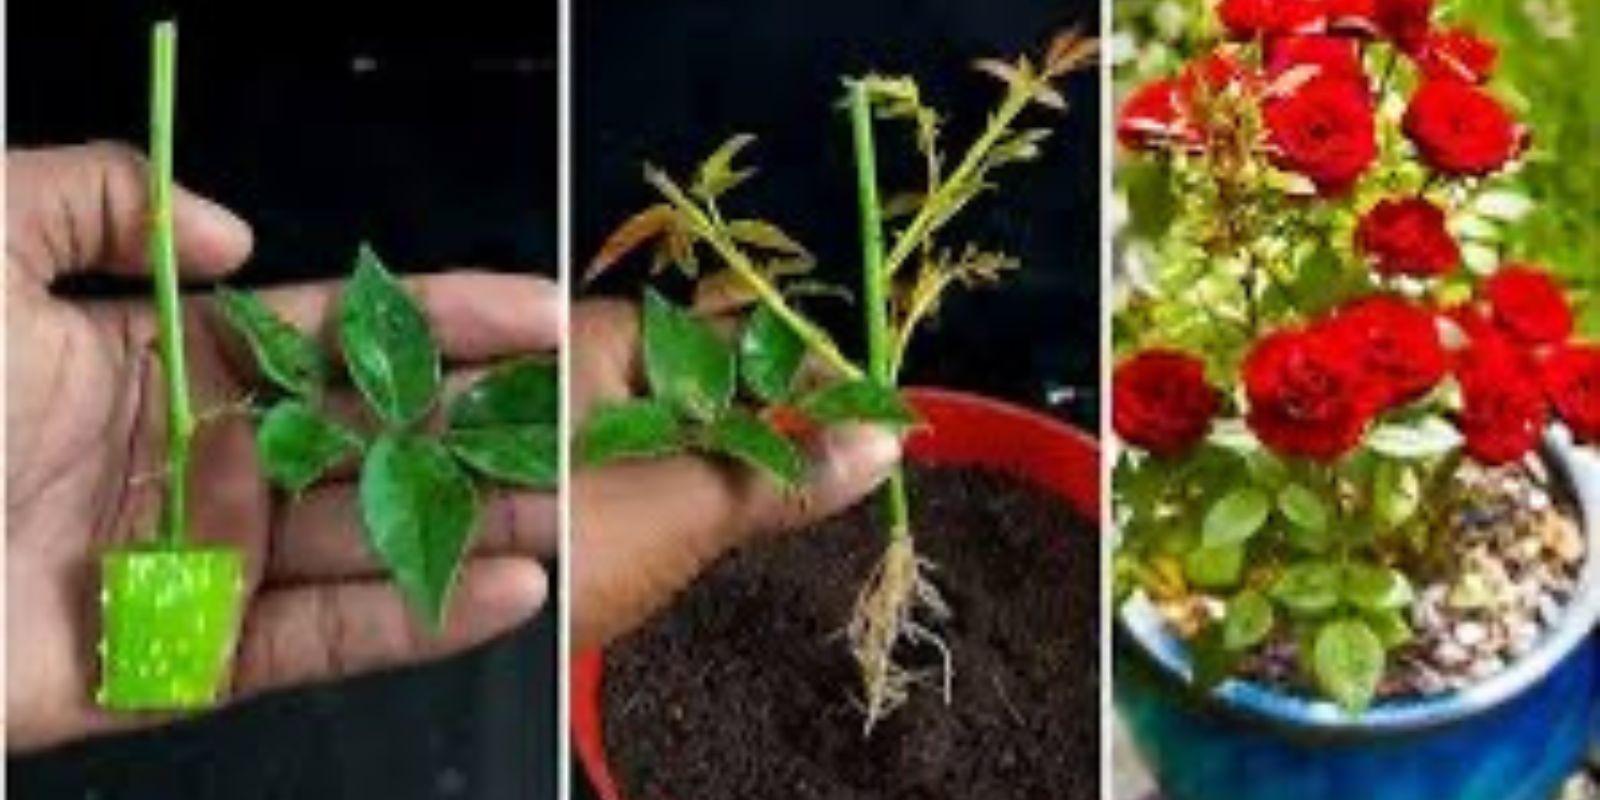
The first and most crucial step in propagating roses is selecting the right stem. Choose a healthy, semi-hardwood stem from an existing rose bush. Ideally, the cutting should:
- Be about 6-8 inches long.
- Contain at least 3-5 leaf nodes.
- Come from a plant free of disease or pests.
Avoid using overly woody stems or stems that are too soft, as these may not root successfully.
2. Prepare the Cutting
Once you’ve selected the cutting, follow these steps to prepare it for planting:
- Remove Leaves and Thorns: Remove all the leaves from the lower half of the stem. Leave one or two leaves at the top to aid in photosynthesis during the rooting process. Carefully trim any thorns on the lower part of the cutting.
- Make a Clean Cut: Using sharp pruning shears or a knife, cut the base of the stem at a 45-degree angle. This angled cut increases the surface area for root formation and allows the cutting to absorb nutrients more efficiently.
3. Dip the Cutting in Rooting Hormone
Rooting hormone is a powerful tool for encouraging root growth in cuttings. Dip the cut end of the stem into a rooting hormone powder or gel. This step is optional but highly recommended, as it significantly boosts the chances of successful propagation.
If you don’t have a commercial rooting hormone, you can use natural alternatives like honey or cinnamon, which have antifungal properties and promote root development.
4. Prepare the Planting Medium
The success of your rose propagation depends heavily on the planting medium. Roses require well-draining soil that retains enough moisture to support root growth. Here’s how to prepare it:
- Mix equal parts sand and compost for a nutrient-rich and well-draining medium.
- Alternatively, use coco peat, which retains moisture while preventing waterlogging.
- Fill a small pot or container with the planting medium, ensuring it has drainage holes to prevent water stagnation.
5. Plant the Cutting
Insert the cutting into the prepared soil, ensuring that at least two nodes are buried beneath the surface. Gently press the soil around the cutting to hold it firmly in place.
6. Create a Mini Greenhouse
To promote a humid environment conducive to rooting, cover the cutting with a plastic bag or a transparent plastic bottle. This mini greenhouse effect helps retain moisture and prevents the cutting from drying out. Ensure the covering does not touch the leaves to avoid fungal infections.
Place the pot in a location with bright, indirect sunlight. Avoid direct sunlight, as it can scorch the cutting or cause it to dry out.
7. Water and Maintain
Water the cutting regularly to keep the soil consistently moist but not soggy. Overwatering can lead to root rot, so be cautious. Within 4-6 weeks, you should start seeing new growth, which is a sign that roots have formed.
8. Transplanting Your New Rose
Once the cutting has established roots and shows significant growth, it’s time to transplant it into your garden or a larger pot. Ensure the new location receives at least six hours of sunlight daily and has well-draining soil. Add organic compost to the soil to provide the young plant with the nutrients it needs to thrive.
Tips for Success
- Timing: The best time to propagate roses is in spring or early summer when the weather is warm and the parent plant is actively growing.
- Hygiene: Always sterilize your cutting tools to prevent the spread of diseases.
- Patience: Not all cuttings will root successfully, so it’s a good idea to propagate multiple cuttings at once.
Why This Method Works
This method is effective because it replicates the natural conditions roses need to root and grow. By providing the cutting with moisture, humidity, and the right nutrients, you’re giving it the best chance to thrive. The mini greenhouse effect, combined with the rooting hormone and nutrient-rich soil, accelerates the rooting process and ensures a healthy start for your rose plant.
Benefits of Growing Roses from Cuttings
- Cost-Effective: Growing roses from cuttings eliminates the need to purchase new plants.
- Preserves Unique Varieties: This method allows you to clone rare or sentimental rose varieties.
- Eco-Friendly: Propagating roses reduces waste and promotes sustainable gardening practices.
Common Problems and Solutions
- Cutting Fails to Root: Ensure the cutting is from a healthy plant and use a rooting hormone to boost success rates.
- Yellowing Leaves: Overwatering or poor drainage can cause yellowing. Adjust your watering schedule and ensure proper soil drainage.
- Fungal Infections: Sterilize your tools and avoid overly humid conditions to prevent fungal issues.
Conclusion
Growing roses from cuttings is a simple and rewarding process that allows you to expand your garden and preserve cherished varieties. With the right technique and a little patience, you can propagate roses without roots and enjoy stunning blooms year after year.
Have you tried propagating roses before? Share your experiences in the comments below, and let us know your favorite rose varieties!
#GrowRoses #RosePropagation #GardeningHacks #PlantLovers #GardenTips #SustainableGardening #ViralGardeningTips