
Introduction
Vines are some of the most versatile plants in gardening, known for their beauty, utility, and ability to climb, trail, or cover spaces. If you’re looking to expand your collection of vines or simply propagate your favorite variety, rooting cuttings is an effective method. Whether you choose to propagate in air or water, this process allows you to grow new plants with ease. In this article, we’ll delve into the step-by-step techniques of rooting vine cuttings, explain the benefits of each method, and offer tips to ensure successful propagation.
Why Propagate Vines from Cuttings?
Propagating vines from cuttings has several advantages. First, it’s a cost-effective way to increase your plant collection without buying new plants. Additionally, it ensures that you can reproduce the exact characteristics of the parent plant. This is particularly useful for gardeners who have specific vine varieties they love and want to replicate. Furthermore, vine cuttings tend to root relatively quickly, making them ideal candidates for propagation experiments, even for beginner gardeners.
The Science Behind Vine Propagation
Before diving into the techniques, it’s essential to understand why vine propagation works. When you cut a section of a vine, the plant is naturally inclined to grow new roots at the cut point. This process happens because the vine wants to continue growing and reaching for nutrients, and it triggers the production of new root cells. The method you choose—air or water rooting—provides a nurturing environment for these roots to form, allowing you to transfer the newly rooted vine into soil eventually.
Rooting Vine Cuttings in Air: A Step-by-Step Guide
Step 1: Choose a Healthy Vine
The first step in successful propagation is selecting the right vine for cutting. Look for a healthy, non-flowering vine with a length of about 4-6 inches. It’s important to avoid flowering stems since they tend to focus more energy on flower production rather than root growth. Choose a vine that looks vibrant and is free from pests or diseases.
Step 2: Make the Cut
Using clean, sharp pruning shears or scissors, cut just below a node (the small bump where leaves or tendrils emerge). Make sure the cut is clean and not jagged, as this will help the vine root more easily.
Step 3: Remove the Lower Leaves
Remove the leaves on the lower part of the cutting, leaving a few at the top. This prevents the leaves from rotting and allows the plant to direct its energy toward root production rather than supporting foliage.
Step 4: Prepare the Vine for Air Layering
Air layering is a method where you encourage roots to grow while the cutting is still attached to the parent plant. To do this, gently wound the vine by making a small cut or scrape on the stem where you want the roots to grow. Wrap the wounded area with moist sphagnum moss to provide a rooting medium.
Step 5: Cover with Plastic Wrap
After wrapping the moss around the stem, cover it with plastic wrap to retain moisture. Secure the plastic at both ends with ties or tape, making sure the moss remains damp but not overly wet. This creates a humid environment that encourages root growth. Check the moss regularly, adding moisture if necessary.
Step 6: Wait for Roots to Form
After about 3-4 weeks, you should see new roots forming inside the moss. Once the roots are well-developed, cut the vine below the rooted area and plant it in potting soil.
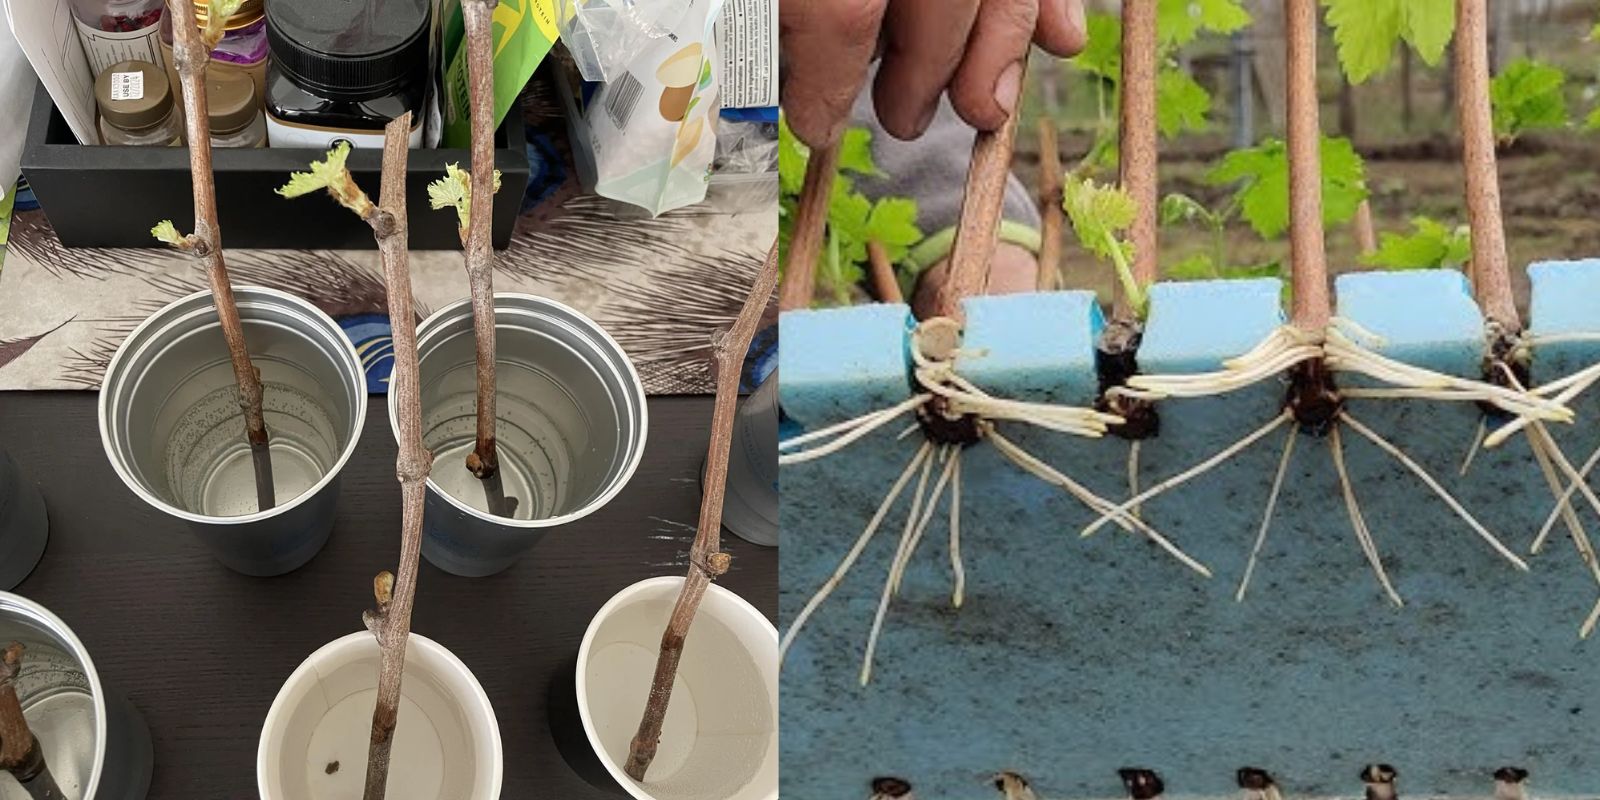
Rooting Vine Cuttings in Water: A Step-by-Step Guide
Step 1: Select a Cutting
Just like with air propagation, select a healthy vine that’s about 4-6 inches long. The cutting should include a few nodes, as this is where the new roots will emerge.
Step 2: Place the Cutting in Water
Place the cut end of the vine into a glass or jar of water, ensuring that the bottom nodes are submerged while the leaves remain above the water. Clear containers work best, as they allow you to monitor root growth without disturbing the plant.
Step 3: Change the Water Regularly
To ensure the vine’s health and prevent rot, change the water every few days. Fresh water provides oxygen and prevents the buildup of harmful bacteria.
Step 4: Monitor Root Growth
Within 1-2 weeks, you should start to see tiny roots forming. Some vines may root faster than others, but generally, roots should develop within this timeframe. Once the roots are about 2 inches long, the vine is ready to be transplanted into soil.
Step 5: Transplanting the Vine into Soil
Once your vine has established strong roots, it’s time to transfer it to a pot filled with potting mix. Be gentle when moving the rooted cutting, as new roots can be delicate. Water the newly transplanted vine thoroughly, ensuring it gets a good start in its new environment.
Advantages of Air Layering vs. Water Propagation
Each propagation method has its own set of advantages. Air layering allows you to root the vine while it’s still attached to the parent plant, giving it access to nutrients during the rooting process. This method is particularly beneficial for vines that are harder to root or require more time to establish. Air layering is also less stressful for the plant, as it doesn’t have to endure being fully separated from the parent until the roots are well-formed.
Water propagation, on the other hand, is an easy and quick method that allows you to observe root growth firsthand. This makes it ideal for beginner gardeners who want to monitor progress. Water propagation is also convenient because it requires minimal materials—just a glass of water and a cutting. Many gardeners enjoy the simplicity of this method, but it’s important to remember that not all vines root well in water.
Tips for Successful Vine Propagation
- Use Clean Tools: Always use sterilized scissors or shears to avoid spreading disease to the cutting.
- Keep Conditions Humid: For both air and water propagation, maintaining humidity is key to encouraging root growth. Use plastic wrap or a humidity dome if needed.
- Be Patient: Rooting vines takes time. Don’t be discouraged if you don’t see results immediately. Some vines take longer than others to root.
- Ensure Good Lighting: Place your cuttings in a location with bright, indirect light. Direct sunlight can scorch the tender vines, while too little light may slow root development.
- Water with Care: When transferring rooted cuttings into soil, make sure the soil remains moist, but not waterlogged, to encourage further root growth.
Common Vines to Propagate from Cuttings
Several vine varieties can be easily propagated using the air and water methods, including:
- Pothos: Known for its ease of rooting in water.
- Philodendron: Thrives in both air and water propagation.
- Ivy (Hedera helix): Fast-growing and easy to propagate.
- Grape Vines: Suitable for air layering.
- Bougainvillea: Best propagated through air layering.
Conclusion
Whether you’re a seasoned gardener or just starting, propagating vines from cuttings is a rewarding way to grow new plants. By using air layering or water propagation, you can expand your garden with minimal effort. Choose the method that suits your vine and enjoy watching new roots take form. Ready to try it out for yourself? Let’s get those vines growing!
🌱🌿 #VinePropagation #PlantPropagation #RootingInWater #AirLayering #GardeningTips #GrowYourOwn #GreenThumb #GardeningHacks #EasyPropagation #PlantLovers