
Growing sweet potatoes is a rewarding endeavor for any gardener, whether you’re a beginner or an experienced green thumb. Not only are sweet potatoes delicious and nutritious, but they also thrive in a variety of climates and soils. One of the easiest ways to start your sweet potato garden is by rooting sweet potatoes from slips. This article will walk you through the entire process, ensuring you have everything you need for a successful harvest.
Introduction
Sweet potatoes (Ipomoea batatas) are not only a staple food in many cultures but also a fantastic addition to any home garden. They are rich in vitamins, minerals, and fiber, making them a healthy choice for your family. By growing them from slips, you can easily propagate your own plants without the need to start from seed.
Benefits of Growing Sweet Potatoes
- Nutritional Value: Sweet potatoes are packed with vitamins A and C, potassium, and antioxidants, making them a healthy addition to your diet.
- Versatility: They can be prepared in a variety of ways—baked, mashed, fried, or added to soups and salads.
- Storage: Sweet potatoes have a long shelf life when stored properly, allowing you to enjoy them throughout the year.
- Sustainable Gardening: Growing your own sweet potatoes is a sustainable practice, reducing the carbon footprint associated with store-bought produce.
- Beautiful Vines: Sweet potato plants produce attractive foliage and can be used as ornamental plants in your garden.
Getting Started: Choosing the Right Sweet Potatoes
To successfully root sweet potatoes, start by selecting healthy, organic sweet potatoes. Look for tubers that are firm, smooth, and free from blemishes. Choosing organic sweet potatoes ensures that you’re starting with disease-free stock, which is essential for healthy plant growth.
Step 1: Preparing to Root Sweet Potatoes
Materials Needed
- Healthy sweet potatoes
- Toothpicks (if rooting in water)
- Glass jars or pots (if rooting in water or soil)
- Well-draining potting soil (if rooting in soil)
- Water (if rooting in water)
Rooting Methods
You can root sweet potatoes using two methods: in water or in soil. Both methods are effective, but each has its advantages.
Rooting in Water: This method allows you to easily observe the growth of the slips.
Rooting in Soil: This method provides a more natural environment for the roots to develop and may help establish stronger plants.
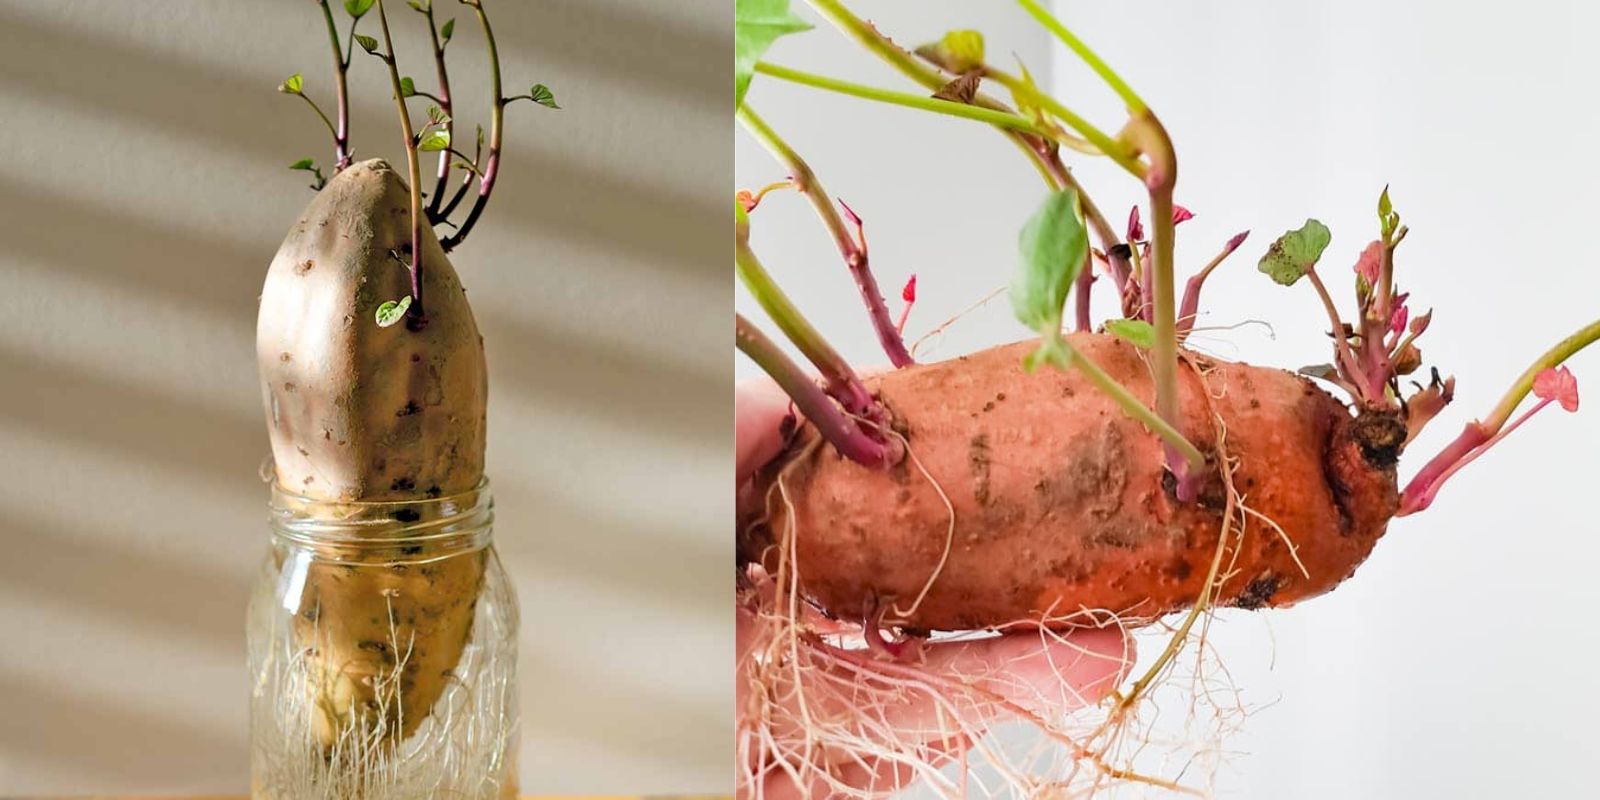
Step 2: Rooting Sweet Potatoes in Water
- Prepare the Sweet Potato: Use a healthy sweet potato and rinse it under cool water to remove any dirt. Pat it dry with a clean towel.
- Insert Toothpicks: Take a few toothpicks and insert them into the middle of the sweet potato. This will allow the bottom half to be submerged in water while the top remains exposed.
- Fill a Glass Jar with Water: Place the sweet potato in a glass jar, ensuring that the bottom half is submerged in water. Use enough water to cover the bottom half, but be careful not to submerge the entire tuber.
- Place in a Bright Spot: Set the jar in a warm location with indirect sunlight. A temperature of around 70°F (21°C) is ideal for sprouting.
- Wait for Sprouts: In about 2-4 weeks, you should see slips (sprouts) emerging from the sweet potato. Be patient; this is part of the process!
Step 3: Rooting Sweet Potatoes in Soil
- Prepare the Potting Mix: Choose a well-draining potting mix that retains moisture without becoming waterlogged. You can also use a mixture of potting soil and perlite for better drainage.
- Plant the Sweet Potato: Fill a pot with the potting mix and bury the sweet potato halfway, leaving the top exposed. This method allows the slips to grow directly from the tuber.
- Water Thoroughly: Water the soil well after planting to ensure moisture is evenly distributed. Avoid overwatering, as this can lead to rot.
- Provide Light and Warmth: Place the pot in a warm, sunny location. Sweet potatoes thrive in bright, indirect light.
- Observe Growth: Within a few weeks, you should see slips emerging from the sweet potato.
Step 4: Caring for the Slips
Once the slips reach a height of about 4-6 inches, it’s time to prepare them for planting.
- Remove the Slips: Gently twist or cut the slips from the sweet potato, being careful not to damage the main tuber.
- Rooting the Slips: If you rooted in water, you can plant the slips directly into the soil. If you rooted in soil, you can transplant them when they reach the same height.
- Planting the Slips: Plant each slip in its own pot filled with well-draining potting mix. Bury them about 2-3 inches deep and water thoroughly.
- Provide Adequate Light: Ensure that the newly planted slips receive plenty of light. A south-facing window or grow light can be beneficial.
- Maintain Moisture: Keep the soil consistently moist but not soggy. Monitor the plants for signs of wilting or yellowing leaves, which may indicate over or underwatering.
Step 5: Transplanting Sweet Potatoes Outdoors
After about 4-6 weeks of growth, when the slips have developed a healthy root system, they are ready to be transplanted into your garden.
- Choose the Right Time: Wait until after the last frost date in your area to transplant. Sweet potatoes thrive in warm weather and should be planted when soil temperatures are consistently above 60°F (15°C).
- Select a Suitable Location: Choose a sunny location in your garden with well-draining soil. Sweet potatoes prefer sandy loam but can adapt to various soil types.
- Prepare the Soil: Loosen the soil in your planting area and mix in organic compost to improve soil fertility and drainage.
- Transplant the Slips: Dig holes for each slip, spacing them about 12-18 inches apart. Gently place each slip in the hole and cover the roots with soil, firming it gently around the base.
- Water Immediately: Water the transplants thoroughly after planting to help them establish roots in their new environment.
Step 6: Ongoing Care and Maintenance
Once your sweet potato plants are in the ground, it’s essential to provide them with the care they need to thrive.
- Watering: Keep the soil consistently moist, especially during dry spells. However, avoid overwatering, which can lead to root rot.
- Mulching: Apply a layer of mulch around the plants to help retain moisture, suppress weeds, and maintain soil temperature.
- Fertilizing: Sweet potatoes benefit from balanced fertilizers. Apply a slow-release organic fertilizer in early spring and again in mid-summer to support healthy growth.
- Pest and Disease Management: Monitor your plants for pests like aphids or sweet potato weevils. Remove any affected leaves and consider using organic pest control methods if necessary.
- Harvesting: Sweet potatoes are typically ready for harvest in 90-150 days, depending on the variety. Look for yellowing leaves and a drop in foliage as signs that your tubers are ready. Carefully dig around the plants to avoid damaging the roots.
Conclusion
Rooting sweet potatoes from slips is a simple and rewarding process that can lead to a bountiful harvest. By following these steps, you can enjoy the satisfaction of growing your own nutritious sweet potatoes right from your home. Whether you use them in your favorite recipes or simply enjoy their beauty in your garden, sweet potatoes are a fantastic addition to any gardening endeavor.
Motivation to Get Started
Now that you have all the information you need, it’s time to roll up your sleeves and get started on your sweet potato journey! There’s nothing quite like the taste of homegrown sweet potatoes, so dive into the wonderful world of gardening today! Happy planting! 🌱🥔✨ #SweetPotatoes #GardeningGoals #HomeGrown #SustainableGardening #GrowYourOwn #HealthyEating