
Introduction:
Anthuriums, renowned for their striking, heart-shaped flowers and glossy green foliage, are a favorite among indoor plant enthusiasts. While propagating Anthuriums from seeds or stem cuttings is common, using leaves and eggs for propagation offers a novel approach with impressive success rates. This method not only ensures a high success rate but also adds a touch of creativity to your gardening practices. In this article, we’ll delve into the step-by-step process of propagating Anthurium from leaves using eggshells and provide you with all the tips you need to achieve thriving new plants.
Why Use Eggs for Propagation?
Eggshells are an excellent choice for propagating Anthuriums for several reasons:
- Ideal Size: The small size of eggshells makes them perfect for starting new plants without taking up too much space.
- Natural Nutrients: Eggshells contain calcium, which is beneficial for plant growth and can help strengthen the plant’s root system.
- Sustainability: Using eggshells for propagation is an eco-friendly option, reducing waste and making use of common kitchen scraps.
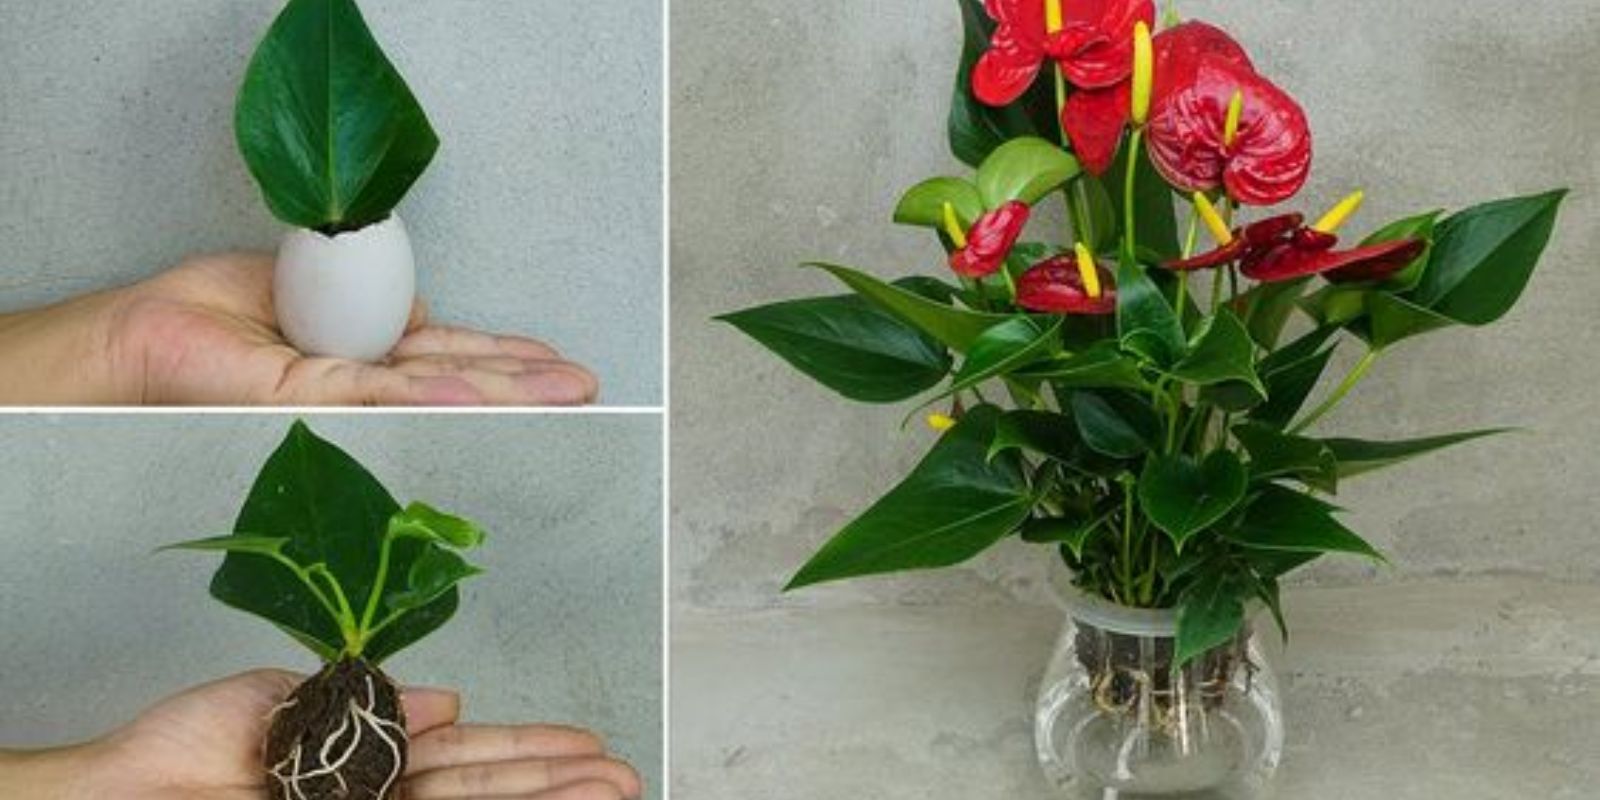
Steps for Propagating Anthurium from Leaves Using Eggs:
- Prepare the Eggs:
- Collect and Clean: Start by collecting eggshells from your kitchen. Clean them thoroughly to remove any residual egg white or yolk. This prevents any potential fungal or bacterial issues.
- Create Drainage Holes: Gently tap a small hole at the top of each eggshell using a pin or a needle. This hole will serve as a drainage point for excess water and prevent root rot.
- Cut the Anthurium Leaves:
- Select Healthy Leaves: Choose healthy, mature leaves from your Anthurium plant. Look for leaves that are free from disease, pests, or damage. The leaves should be robust and not overly mature.
- Prepare the Cuttings: Cut the selected leaves into sections, making sure each piece has a small segment of the petiole (the stem-like structure that attaches the leaf to the plant). Ideally, each cutting should be around 3-4 inches long.
- Insert the Leaves into the Eggshells:
- Fill with Potting Mix: Prepare a well-draining potting mix suitable for Anthuriums. You can use a mix of peat, perlite, and sand or a specialized potting mix for orchids. Gently fill each eggshell with this potting mix.
- Place the Cuttings: Insert the leaf sections into the soil, burying the petiole segment about 1 inch deep. Ensure the leaves are not overcrowded in the eggshells. Leave some space for air circulation around each cutting.
- Water Lightly and Maintain Conditions:
- Moisten the Soil: Lightly water the soil in each eggshell. The soil should be moist but not soggy. Overwatering can lead to fungal growth or root rot.
- Provide Indirect Light: Place the eggshells in a warm, bright location with indirect light. Direct sunlight can cause the soil to dry out too quickly or damage the cuttings.
- Monitor and Care for the Cuttings:
- Keep Soil Moist: Check the soil regularly to ensure it remains slightly damp. Water as needed, but avoid making the soil too wet.
- Temperature and Humidity: Maintain a consistent temperature between 70-80°F (21-27°C) and a high humidity level. You can use a humidity tray or a clear plastic dome to help retain moisture around the cuttings.
- Observe Growth: Over the next few weeks, watch for signs of root and leaf development. You may notice small roots emerging from the base of the cuttings.
- Transplanting New Plants:
- Check Root Development: Once the cuttings have developed a sufficient root system (usually in 6-8 weeks), they are ready to be transplanted into larger pots.
- Prepare New Pots: Choose pots with drainage holes and fill them with a well-draining potting mix suitable for Anthuriums.
- Transplant Carefully: Gently remove the young plants from the eggshells, being careful not to damage the roots. Plant them in the new pots and water lightly.
Additional Tips for Success:
- Clean and Sterilize Tools: Always use clean, sterilized tools when handling cuttings to prevent the spread of disease.
- Fertilization: After transplanting, wait a few weeks before applying a balanced, water-soluble fertilizer. Follow the recommended dosage to avoid over-fertilization.
- Avoid Stress: Minimize any sudden changes in light, temperature, or watering routines, as these can stress the young plants and hinder their growth.
Creative Uses for Eggshell Propagation:
In addition to propagating Anthuriums, eggshells can be used creatively in other gardening projects:
- Miniature Gardens: Use eggshells to create miniature garden scenes or fairy gardens. Their small size makes them perfect for tiny plant arrangements.
- Seed Starters: Use eggshells as seed starters for other small plants or herbs. Their natural calcium content benefits young seedlings.
- Decorative Planters: Decorate eggshells with paint or markers and use them as decorative planters for small succulents or cacti.
Conclusion:
Propagation of Anthurium from leaves using eggs is a creative and effective method that offers a high success rate. This technique not only allows you to grow new plants from your existing Anthurium but also provides an eco-friendly and sustainable approach to gardening. By following the steps outlined and incorporating additional care tips, you can enjoy a thriving collection of Anthuriums and add a touch of natural beauty to your home. Ready to give this unique propagation method a try? Start today and experience the joy of growing beautiful Anthuriums with just a slice of innovation! 🌿🥚🌸