
Propagating plants by cuttings is one of the most rewarding and cost-effective methods for gardeners. Not only does it allow you to expand your plant collection, but it also provides an opportunity to share your green thumb with friends and family. Whether you’re an experienced gardener or just starting out, propagating by cuttings can be a fun and successful way to cultivate your favorite plants. This article will explore the benefits, techniques, and tips for propagating plants from cuttings, ensuring you have all the information you need to succeed.
What Is Plant Propagation?
Plant propagation is the process of creating new plants from existing ones. There are several methods of propagation, including seed sowing, division, layering, and cutting. Among these, propagating by cuttings is one of the most popular methods. It involves taking a part of a plant, usually a stem or leaf, and encouraging it to develop roots and grow into a new plant.
Benefits of Propagating by Cuttings
- Cost-Effective: Propagating plants from cuttings is much cheaper than purchasing new plants from a nursery. You can expand your garden or indoor plant collection without spending a lot of money.
- Saves Time: Instead of starting from seeds, which can take weeks or months to germinate and grow, cuttings can develop roots in just a few weeks, allowing you to enjoy new plants faster.
- Preserves Varieties: If you have a particular plant variety that you love, propagating from cuttings ensures that you maintain its specific traits. This is especially important for hybrid plants that may not produce true-to-type seeds.
- Sustainable Gardening: Propagation is an eco-friendly practice that reduces waste. You can use cuttings from plants you already have rather than buying new plants, contributing to a more sustainable gardening approach.
- Fun and Rewarding: Watching a cutting grow into a new plant can be incredibly satisfying. It gives you a sense of accomplishment and enhances your connection to nature.
Types of Cuttings
Before you start propagating, it’s essential to understand the different types of cuttings you can take. There are three primary types:
- Stem Cuttings: This is the most common type of cutting. It involves taking a section of a stem, usually with a few leaves attached. Stem cuttings can be taken from softwood, semi-hardwood, or hardwood stems, depending on the plant type.
- Leaf Cuttings: Some plants can be propagated from just a leaf. In this method, a healthy leaf is cut and placed in soil or water to encourage root growth.
- Root Cuttings: This method involves taking a section of the root and planting it to grow a new plant. Root cuttings are typically used for plants like horseradish and some perennials.
Step-by-Step Guide to Propagating Plants by Cuttings
Step 1: Select the Right Plant
The first step in propagating plants from cuttings is selecting a healthy, vigorous plant. Look for plants that show no signs of disease or pest damage. Some great candidates for propagation include:
- Pothos
- Spider plants
- Snake plants
- Succulents (like jade plants)
- Herbs (such as basil, mint, or rosemary)
- Roses
Step 2: Gather Your Tools
Having the right tools on hand will make the process smoother. Here’s what you’ll need:
- Sharp Scissors or Pruning Shears: To take clean cuts without damaging the plant.
- Small Pots: For planting the cuttings. Ensure they have drainage holes.
- Potting Soil: A well-draining mix is ideal for rooting cuttings.
- Rooting Hormone (Optional): This can help stimulate root growth, but it is not always necessary.
- Water: For hydration and to prepare the soil.
Step 3: Take the Cutting
- Choose a Healthy Stem: Look for a stem that is healthy, firm, and free from disease or damage.
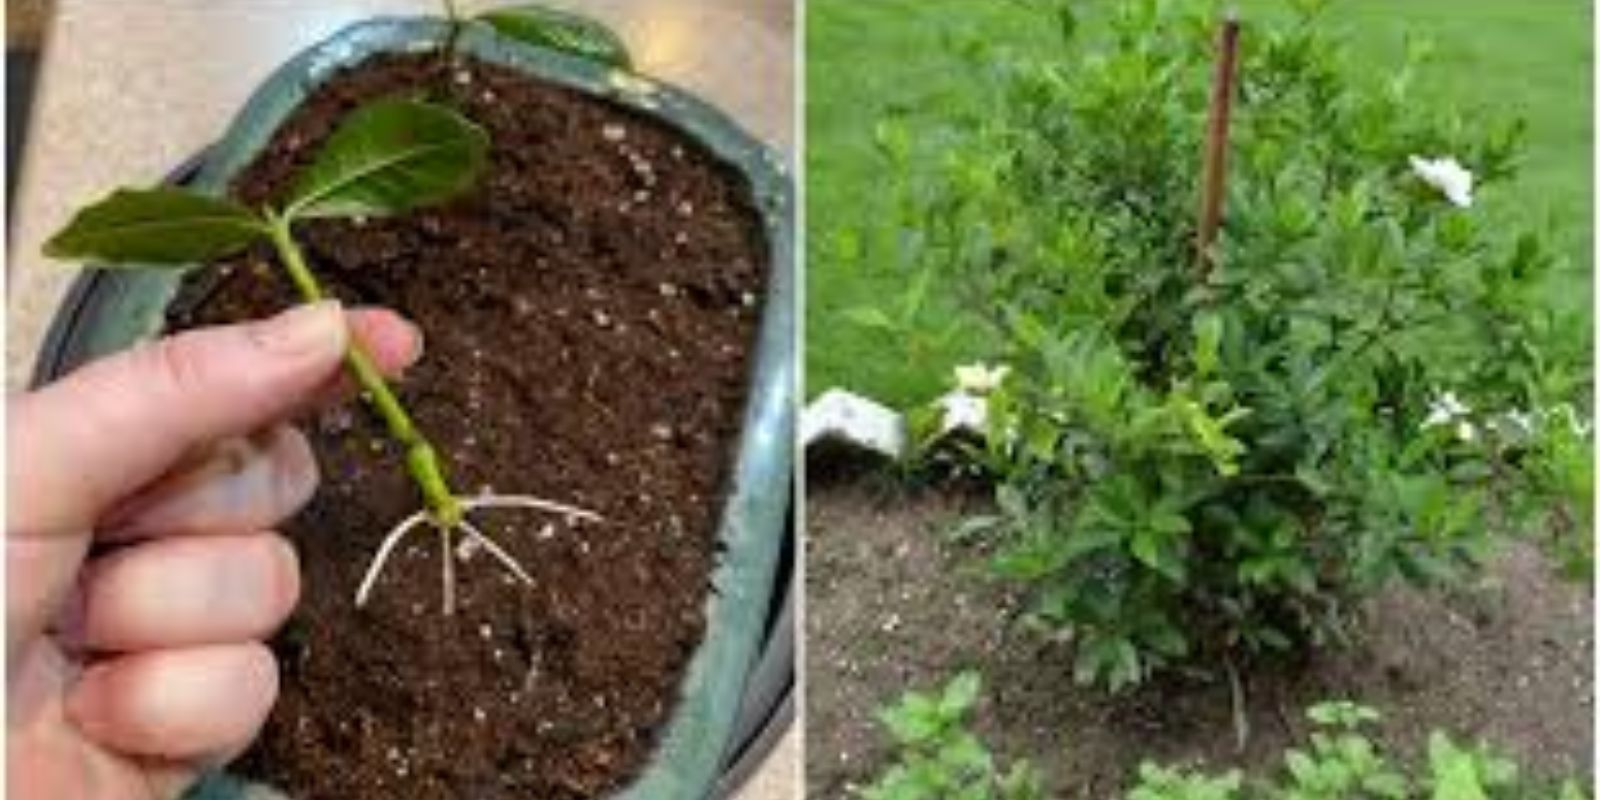
- Make the Cut: Use your sharp scissors to cut a 4-6 inch section of the stem just below a leaf node (the area where leaves attach to the stem).
- Remove Lower Leaves: Trim any leaves from the bottom half of the cutting, leaving a few leaves at the top. This helps reduce moisture loss while the cutting is developing roots.
Step 4: Prepare the Cutting
- Optional Rooting Hormone: If you choose to use rooting hormone, dip the cut end of the stem into the powder before planting. This step can enhance the chances of successful rooting.
- Let It Callus: Allow the cut end to dry and callus for a few hours or overnight before planting. This helps prevent rot.
Step 5: Plant the Cutting
- Choose Your Medium: Fill your pot with moist potting soil or a combination of soil and perlite for better drainage.
- Make a Hole: Use your finger or a stick to make a hole in the soil for the cutting.
- Insert the Cutting: Place the cutting in the hole, ensuring that the cut end is buried at least 1-2 inches deep. Firm the soil around the cutting to hold it in place.
- Water Lightly: Give the cutting a gentle watering to settle the soil.
Step 6: Provide Care
- Light Conditions: Place the pot in a location with bright, indirect sunlight. Avoid direct sunlight, which can scorch the cutting.
- Humidity: To maintain humidity, you can cover the pot with a plastic bag or a clear plastic dome. Make sure to ventilate the environment to prevent mold growth.
- Watering: Keep the soil lightly moist but not soggy. Overwatering can lead to rot.
Step 7: Monitor Growth
After a few weeks, check for root development by gently tugging on the cutting. If you feel resistance, roots are forming. Depending on the plant type, it can take anywhere from a few weeks to a couple of months for roots to develop.
Step 8: Transplant if Necessary
Once the cutting has established a healthy root system, you can transplant it into a larger pot or your garden. Choose a well-draining soil mix and continue to provide appropriate light and water conditions.
Tips for Successful Plant Propagation
- Timing Matters: The best time to take cuttings is during the growing season (spring and summer) when plants are actively growing.
- Keep It Clean: Always use clean tools to prevent disease transmission.
- Experiment: Don’t be afraid to try propagating different types of plants. You may be surprised at what takes root!
- Patience is Key: Not all cuttings will succeed, and that’s okay. Learn from the experience and keep trying!
Common Mistakes to Avoid
- Overwatering: This is the most common mistake. Make sure the soil is well-draining and only water when necessary.
- Too Much Sunlight: Direct sunlight can harm young cuttings. Stick to bright, indirect light.
- Neglecting Humidity: Cuttings need humidity to thrive. Use a plastic cover to help maintain moisture.
- Using Old Soil: Always use fresh potting mix to prevent diseases and pests.
Conclusion
Propagating plants by cuttings is an enjoyable and satisfying gardening technique that can expand your collection and help you cultivate a deeper connection with your plants. By following the steps outlined above and avoiding common pitfalls, you can successfully grow new plants from cuttings. So gather your tools, choose your favorite plants, and start propagating today! You’ll be amazed at the joy of watching your cuttings grow into thriving new plants.
Happy Gardening!
If you found this guide helpful, share your plant propagation journey with us using the hashtags below!
#PlantPropagation #Gardening #GrowYourOwn #GreenThumb #SustainableGardening #PlantLovers #DIYGardening #GardeningTips