
Camellias are a popular choice for gardeners, known for their stunning, rose-like flowers and evergreen leaves. They add color and elegance to gardens and are highly prized in landscapes around the world. But did you know that you can expand your collection without buying new plants? Propagating camellias from cuttings is an effective, budget-friendly way to grow these beauties at home.
In this guide, we’ll walk through the step-by-step process of propagating camellia cuttings, from choosing the perfect branch to planting and caring for new cuttings. Whether you’re a beginner gardener or an experienced plant lover, you’ll find that propagating camellias is a rewarding and straightforward process.
Why Propagate Camellias?
Camellias are slow-growing plants that can be expensive when purchased from nurseries. Growing them from cuttings saves money and allows you to produce plants that are exact replicas of the parent, preserving specific flower colors, shapes, and growth habits. Plus, propagating camellias is a satisfying gardening project that deepens your connection to these beautiful shrubs.
Step 1: Choosing the Right Time
Camellias should be propagated when they’re in a semi-hardwood stage, typically in late summer to early fall. Semi-hardwood cuttings are mature enough to root but young enough to be flexible, giving them the best chance to grow new roots successfully. Avoid taking cuttings in winter or spring when growth is slower and the plant’s energy is directed toward flowering.
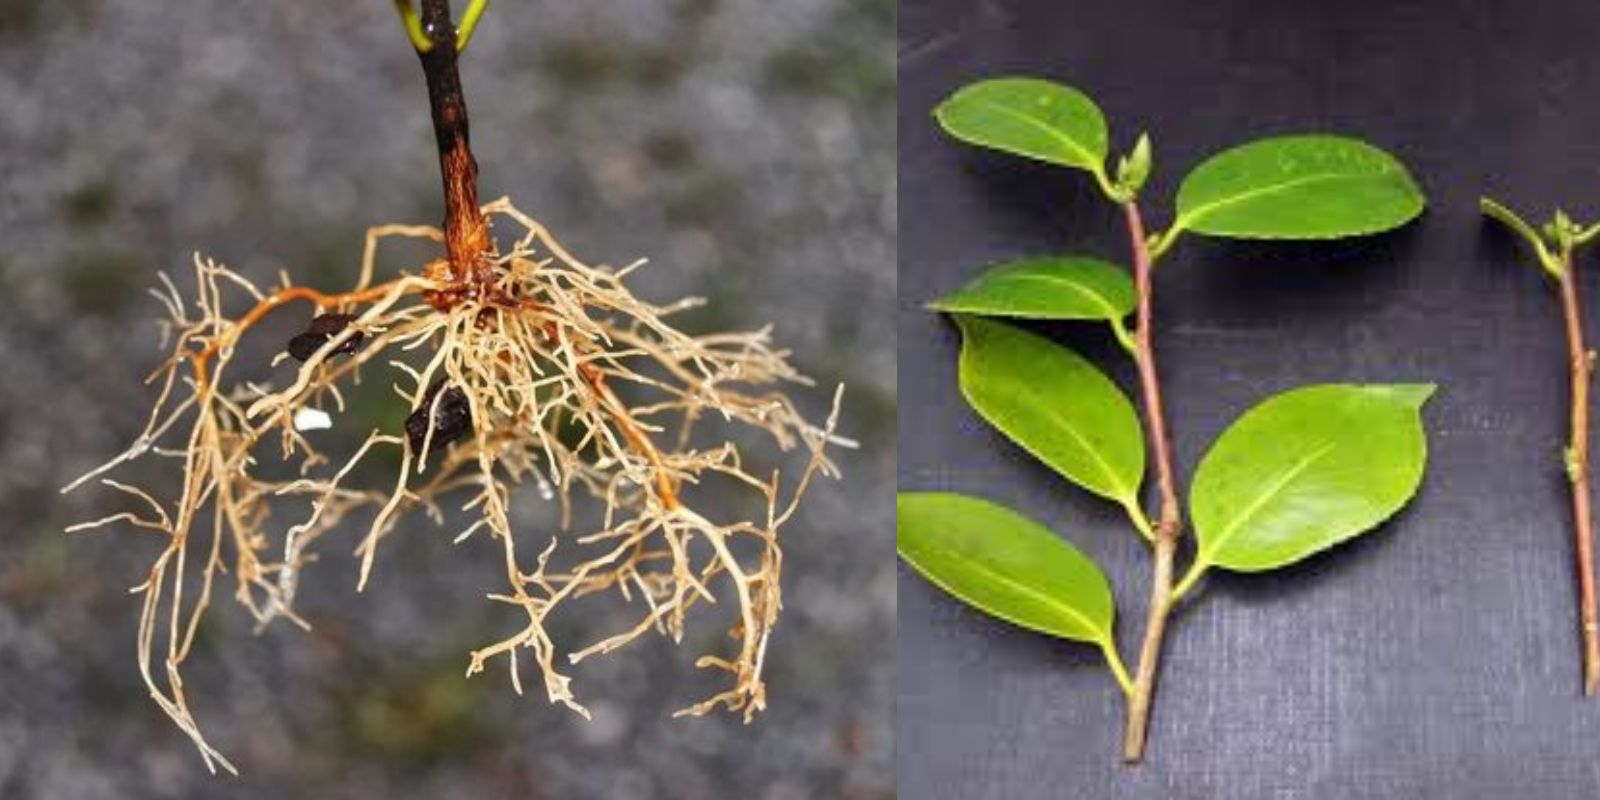
Step 2: Selecting a Healthy Cutting
Look for a healthy branch on a mature camellia plant. Choose a branch that’s about 6 inches long, has a few leaves, and is free from any diseases or pest damage. It’s best to pick a section without flowers, as flowering stems drain energy needed for rooting.
Step 3: Making the Cut
Using a clean, sharp pair of pruning shears or scissors, make a cut at a 45-degree angle just below a leaf node (the point where the leaf attaches to the stem). The angled cut increases the surface area for rooting and encourages new root growth.
Step 4: Preparing the Cutting
Once you’ve cut the branch, remove leaves from the lower half of the cutting. This helps reduce moisture loss through the leaves and allows the plant to focus energy on root development. Leave a few leaves at the top to support photosynthesis, but trim any overly large leaves by half to further reduce water loss.
Step 5: Applying Rooting Hormone
Rooting hormone is optional but highly recommended for camellia cuttings, as it increases the chances of successful rooting. Dip the cut end of the camellia into rooting hormone powder or gel. Tap off any excess before moving to the next step. Rooting hormone is available at most garden centers and helps stimulate root growth on more challenging plants.
Step 6: Planting the Cutting
Prepare a small pot with a well-draining potting mix. Camellias prefer acidic, well-aerated soil, so a mixture designed for azaleas or rhododendrons works well. Insert the cutting about 2–3 inches into the soil, making sure it’s secure and upright.
After planting, lightly press the soil around the base of the cutting to ensure good contact between the stem and soil, which is crucial for rooting.
Step 7: Creating a Humid Environment
Humidity is essential for camellia cuttings, as it helps prevent the cutting from drying out. Cover the pot with a plastic bag or place it in a propagation dome or mini greenhouse to create a humid environment. Make sure the plastic doesn’t touch the leaves, as condensation can lead to fungal issues.
Poke a few small holes in the plastic bag for ventilation to allow some airflow, which helps prevent mold growth.
Step 8: Providing the Right Light and Temperature
Place the pot in a warm area with bright, indirect sunlight. Direct sunlight can be too harsh for cuttings and may cause them to dry out or burn. A windowsill that receives filtered light or a spot under grow lights is ideal. Maintain a temperature around 70°F (21°C), as camellia cuttings root best in moderate warmth.
Step 9: Maintaining Moisture
Keep the soil consistently moist, but avoid overwatering. The soil should feel damp to the touch, not soggy. Overwatering can cause the cutting to rot before it has a chance to root. Check the soil every few days, and mist the cutting with water to maintain humidity if needed.
Step 10: Waiting for Roots to Develop
Patience is key when propagating camellias. It can take several months for roots to form, typically around 8–12 weeks. During this time, watch for new leaf growth, as this is a good indicator that roots are developing below the soil. Avoid disturbing the cutting, as movement can damage tender roots.
Step 11: Transplanting to a Larger Pot or Garden
Once the cutting has established roots, it’s time to move it to a larger pot or garden bed. Gently remove the cutting from the pot, being careful not to damage the new roots. Transplant into a pot with fresh potting mix or into a partially shaded area in your garden. Keep the plant well-watered as it adjusts to its new environment.
Caring for Your New Camellia Plant
Camellias thrive in acidic, well-draining soil with a pH between 5.5 and 6.5. They prefer a partially shaded area with protection from intense afternoon sun. Keep the soil consistently moist, especially during the first year as the plant establishes itself. Mulching around the base helps retain moisture and keeps the roots cool.
Fertilize sparingly with an acidic fertilizer, such as one designed for azaleas, and avoid fertilizing during the first few months after planting to give the roots time to establish.
Common Challenges and Solutions
1. Leaf Drop or Yellowing
This can be a sign of overwatering. Make sure the soil is well-draining and adjust your watering routine if needed.
2. Fungal Issues
High humidity can sometimes lead to mold or mildew on the leaves. If you notice fungal growth, remove the plastic cover briefly each day to increase airflow.
3. Root Rot
If the cutting turns black or mushy at the base, it may have root rot. In this case, discard the cutting, adjust the watering, and try again with a fresh cutting.
Benefits of Propagating Camellias
Growing camellias from cuttings has several advantages. First, it allows you to replicate plants with desirable traits, such as unique flower colors or growth habits. It’s also cost-effective, as you can grow new plants from your existing camellias without purchasing new ones. Finally, propagation is a valuable skill that connects you more closely to your garden and plants, enriching your gardening experience.
Final Thoughts
Propagating camellias from cuttings is a rewarding project that requires some patience but is relatively straightforward with the right steps. With care and attention, you can grow healthy new camellia plants to brighten your garden or share with friends and family. Give it a try this season and discover the joy of nurturing your own camellia cuttings!
Join the Conversation!
Have you tried propagating camellias from cuttings? Share your experience and tips below! 🌸🌿 #CamelliaPropagation #GardeningTips #GardenLove #GrowYourOwn