
Mulberry trees are beloved not just for their shade and beauty but also for their delectable fruits. Whether you’re a seasoned gardener or just starting out, understanding the art of pollarding and the methods of propagating mulberries can help you maintain healthy trees and increase your garden’s bounty. This guide will delve into the process of pollarding mulberries, the best techniques for propagation, and tips for ensuring your efforts lead to thriving new plants.
Understanding Mulberry Trees
The Benefits of Mulberries
Mulberries (Morus spp.) are deciduous trees that can grow quite large, providing ample shade and bearing sweet, nutritious fruits. Here are some benefits of growing mulberries:
- Edible Fruits: Mulberries are not only tasty but also packed with vitamins and antioxidants.
- Wildlife Attraction: These trees attract birds and beneficial insects, supporting a healthy garden ecosystem.
- Soil Improvement: The fallen leaves and fruit can enhance soil quality, providing natural nutrients.
- Versatile Uses: Mulberries can be used in jams, desserts, and even wines.
Choosing the Right Mulberry Variety
There are several varieties of mulberries, each with unique characteristics. The most common types include:
- Black Mulberry (Morus nigra): Known for its rich flavor and dark color, this variety is often preferred for culinary uses.
- White Mulberry (Morus alba): This variety is commonly used for silk production, as it is the preferred food of silkworms.
- Red Mulberry (Morus rubra): A native species in North America, it produces sweet, juicy berries.
When selecting a variety, consider your climate, intended use, and growth habits.
The Art of Pollarding
What Is Pollarding?
Pollarding is a traditional pruning technique that involves cutting back the upper branches of a tree to encourage new growth. This method not only helps manage the size of the tree but also promotes denser foliage and can lead to more abundant fruit production.
Benefits of Pollarding Mulberries
- Improved Health: Pollarding encourages new growth, leading to healthier trees and fruit.
- Size Control: Keeping mulberries at a manageable height can make harvesting easier and reduce the risk of damage from storms.
- Increased Yield: By encouraging bushier growth, pollarding can lead to more fruit-bearing branches.
When to Pollard
The best time to pollard mulberries is late winter or early spring, just before the tree starts to leaf out. This timing allows the tree to heal quickly and promotes vigorous new growth.
How to Pollard Mulberries
- Gather Your Tools: You’ll need sharp pruning shears or a saw, gloves, and a sterilizing solution (like rubbing alcohol) for your tools.
- Identify the Main Branches: Look for the main branches of the tree. Ideally, you want to leave some buds for new growth.
- Make the Cuts: Cut back the branches to about 6-8 feet high, ensuring that you make clean cuts to avoid damaging the tree. Aim to leave a few healthy buds on each branch to promote regrowth.
- Clean Up: Remove any debris and fallen branches to prevent disease and pests from taking hold.
- Monitor Growth: After pollarding, keep an eye on the tree as it begins to sprout new growth. You may need to thin out some of the new shoots later on.
Propagating Mulberries
Why Propagate?
Propagation allows gardeners to create new plants from existing ones, effectively expanding their garden without purchasing new trees. Mulberries can be propagated through several methods, including cuttings, layering, and seeds. This guide will focus on propagating through cuttings, as it’s one of the most straightforward methods.
When to Propagate
The best time to take cuttings from a mulberry tree is in late spring when the new growth is still flexible but has hardened off slightly.
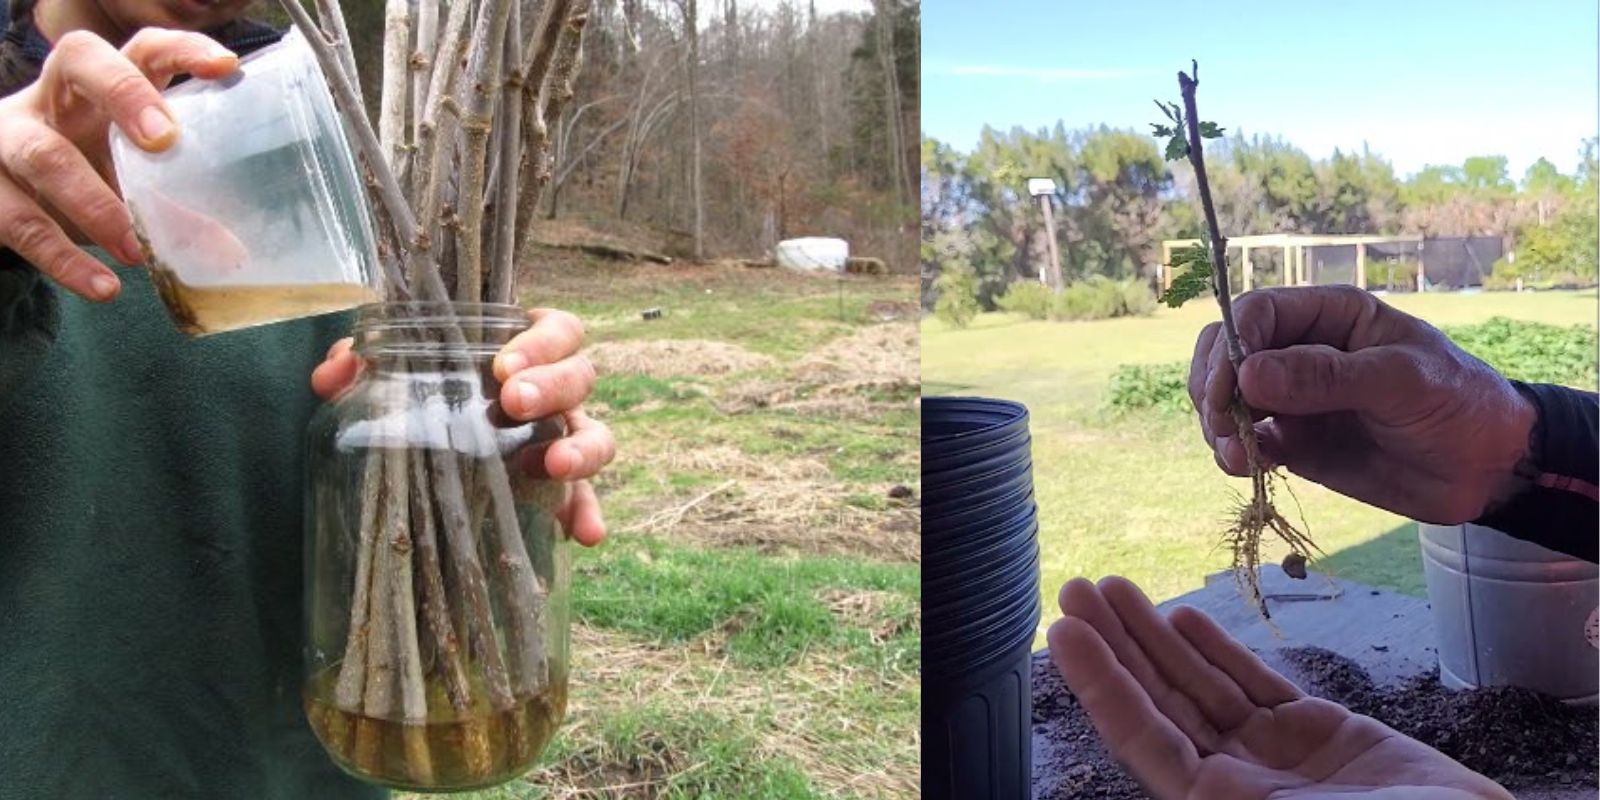
How to Take Cuttings
- Select Healthy Growth: Choose healthy, non-flowering shoots from the current year’s growth. Aim for cuttings that are about 6-12 inches long.
- Make the Cuts: Using sharp, sterilized pruning shears, cut just below a node (the point where leaves grow). This is where roots are most likely to develop.
- Prepare the Cuttings: Remove leaves from the lower half of each cutting to prevent rot and encourage root growth.
- Optional – Use Rooting Hormone: Dip the cut end of each cutting into rooting hormone. This can help speed up root development, although many mulberry cuttings will root without it.
Planting the Cuttings
- Choose a Potting Medium: Use a well-draining potting mix, ideally one that retains some moisture but allows for drainage.
- Plant the Cuttings: Make a hole in the soil with a pencil or your finger and insert the cutting. Gently firm the soil around it to ensure good contact.
- Water: Give the cuttings a thorough watering, ensuring that the soil is moist but not soggy.
Providing Care for Cuttings
- Humidity and Light: Place the pots in a warm, bright location but out of direct sunlight. To maintain humidity, you can cover the pots with a plastic bag or a clear plastic dome, but ensure good air circulation to prevent mold.
- Watering: Keep the soil consistently moist but not overly wet. Check regularly and water as needed.
- Monitoring Root Growth: After a few weeks, gently tug on the cuttings to check for resistance, which indicates root growth.
Transplanting Your New Mulberry Plants
When to Transplant
Once the cuttings have developed a strong root system, they can be transplanted into larger pots or directly into your garden. This typically occurs in late spring or early summer.
How to Transplant
- Prepare the New Location: Choose a well-draining site that receives full sun to partial shade. Mulberries prefer slightly acidic to neutral soil.
- Dig a Hole: Make a hole in the new location that’s slightly larger than the root ball of your cutting.
- Transplant: Gently remove the cutting from its pot, being careful not to disturb the roots too much. Place it in the hole and backfill with soil, firming it gently around the base.
- Water: After transplanting, water the new plants thoroughly to help settle the soil around the roots.
Providing Ongoing Care
- Watering: Keep the soil moist but not waterlogged, especially during the first few weeks after transplanting.
- Mulching: Apply a layer of mulch around the base of the plants to help retain moisture and suppress weeds.
- Fertilization: Once established, you can feed your new mulberry trees with a balanced fertilizer in early spring to promote healthy growth.
- Monitoring: Keep an eye out for pests and diseases, and address any issues promptly to ensure healthy growth.
Conclusion
Pollarding and propagating mulberries can be a rewarding endeavor for any gardener. By mastering these techniques, you not only enhance the health and productivity of your existing trees but also create new plants that can thrive in your garden. With their delicious fruits, beautiful foliage, and ability to attract wildlife, mulberries are a fantastic addition to any landscape.
So gather your tools, embrace the art of pollarding, and start propagating! Your garden will thank you with a bountiful harvest of sweet, succulent mulberries. Happy gardening! 🍇✂️🌳
Feel free to share your experiences with pollarding and propagating mulberries or any tips you have for fellow gardeners! #MulberryMagic #PlantPropagation #GardeningTips #TreeCare #SustainableGardening