
When it comes to plant care, watering can be one of the most tedious tasks. It’s easy to forget, overdo, or neglect, leading to unhappy plants or even plant loss. Enter the DIY water reservoir—a simple yet effective solution for keeping your greenery hydrated. Whether you’re a seasoned gardener or a beginner, this self-watering hack will revolutionize your approach to gardening.
In this article, we’ll explore how to make a planter DIY water reservoir, the science behind its effectiveness, and the benefits it brings to your plants and lifestyle. By the end, you’ll have all the tools you need to create a sustainable and low-maintenance watering system that keeps your plants thriving.
Why Create a DIY Water Reservoir?
A water reservoir at the base of a planter functions as a storage system that slowly delivers moisture to the soil. Here’s why this method stands out:
- Consistent Hydration: The reservoir ensures even watering, reducing the risk of overwatering or underwatering.
- Time-Saving: Ideal for busy gardeners, it reduces the frequency of manual watering.
- Eco-Friendly: Minimizes water waste by delivering it directly to the plant roots.
- Travel-Friendly: Keeps plants hydrated even when you’re away for a few days.
- Healthy Roots: Encourages deeper root growth by drawing water upwards.
Materials Needed for Your DIY Water Reservoir
You’ll need a few basic materials, many of which are likely already in your home:
- A large planter
- A plastic bottle or small container (to act as the reservoir)
- A sharp knife or scissors
- A piece of mesh, fabric, or weed barrier
- Pebbles or gravel
- Potting soil
- Your chosen plant
Step-by-Step Guide to Making a Planter Water Reservoir
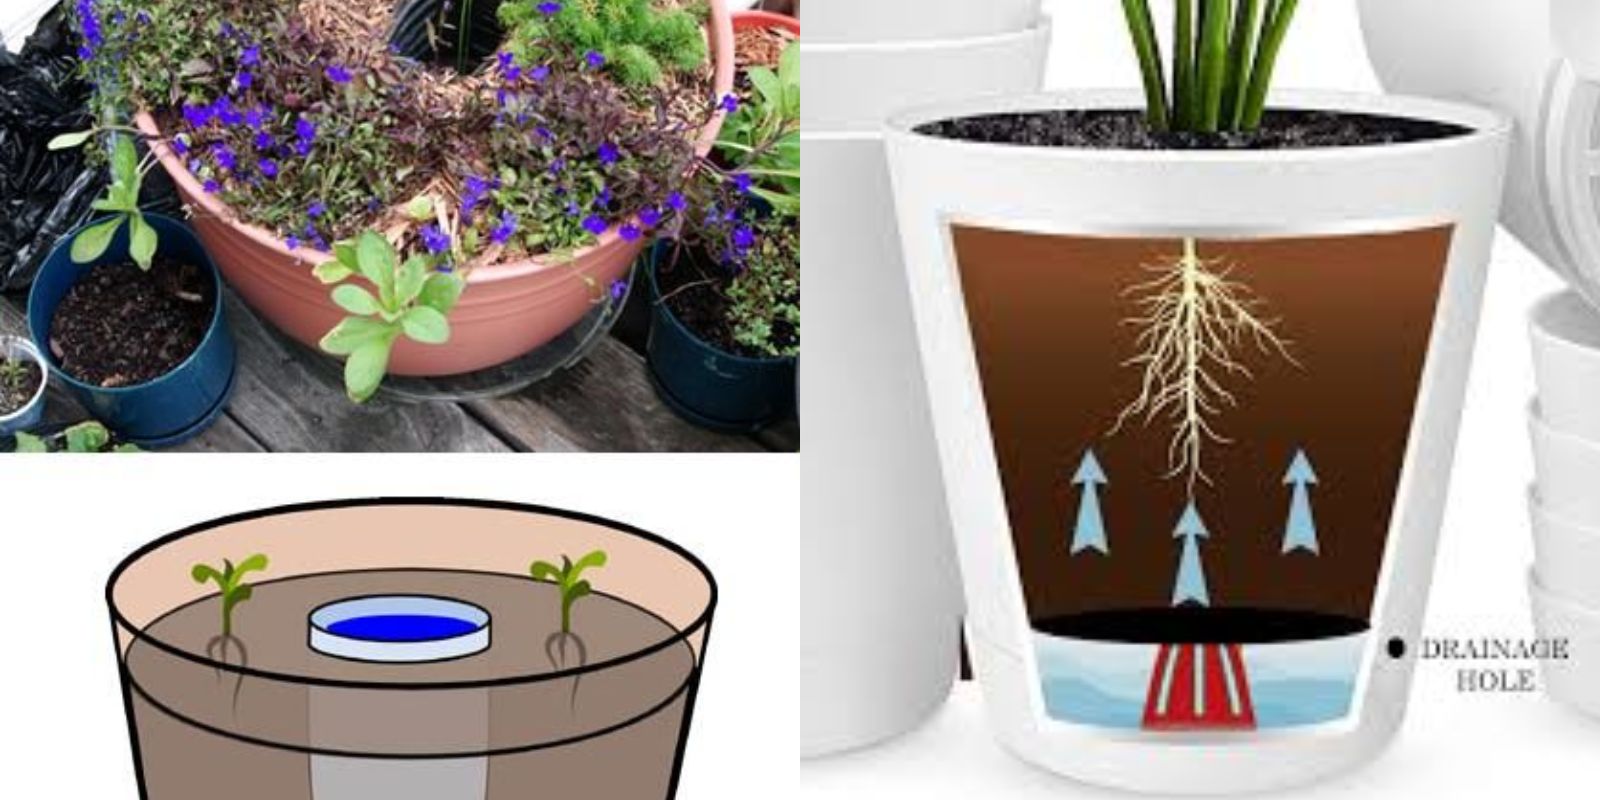
Step 1: Prepare the Reservoir
The first step is to create the water storage unit:
- Take a plastic bottle or small container and cut the top off.
- Puncture several small holes around its sides, ensuring they are large enough to allow water to seep out but small enough to prevent soil from clogging them.
Step 2: Layer the Planter
Create a sturdy foundation for your reservoir:
- Place a layer of pebbles or gravel at the base of your large planter. This provides stability and promotes drainage.
- Position the prepared reservoir at the center of the planter.
Step 3: Cover the Reservoir
To prevent soil from clogging the reservoir holes:
- Cover the reservoir with a piece of mesh, fabric, or weed barrier.
- Secure the fabric tightly around the reservoir to ensure the water can flow freely into the soil.
Step 4: Fill the Planter with Soil
Add potting soil around and above the reservoir, being careful not to shift its position.
- Fill the planter to about two-thirds full.
- Ensure the reservoir’s top remains exposed for easy refilling.
Step 5: Plant and Finalize
Plant your desired greenery:
- Make a hole in the soil for your plant, ensuring its roots have adequate room.
- Add more soil around the plant base, leaving a small gap at the top of the planter for watering.
Step 6: Test Your Reservoir
To ensure functionality:
- Pour water directly into the reservoir.
- Observe how the water slowly hydrates the surrounding soil over time.
How It Works: The Science Behind the Reservoir
The DIY reservoir system relies on capillary action, the process by which water moves through the soil to reach the plant’s roots. This gradual hydration is ideal for plants, mimicking the natural moisture cycles found in the ground.
The fabric or mesh layer acts as a filter, preventing soil from clogging the reservoir while still allowing water to pass through. Meanwhile, the gravel base promotes proper drainage and prevents root rot.
Benefits of Using a Water Reservoir System
1. Saves Time and Effort
With a reservoir, you don’t have to water your plants daily. This is especially useful for those with busy schedules or multiple plants to care for.
2. Reduces Water Waste
Traditional watering methods often lead to runoff and wasted water. The reservoir system delivers water directly to the roots, ensuring efficient usage.
3. Promotes Healthier Plants
Plants thrive on consistent moisture levels. A reservoir prevents the stress caused by irregular watering, leading to stronger, healthier growth.
4. Travel-Friendly
Heading out of town? No worries. The reservoir can keep your plants hydrated for several days, depending on the size of the container and the plant’s water needs.
5. Perfect for All Plant Types
This system works well for a variety of plants, from flowers and vegetables to herbs and shrubs.
Tips for Optimizing Your DIY Water Reservoir
- Choose the Right Planter: Ensure the planter is deep enough to accommodate both the reservoir and the plant’s root system.
- Monitor Water Levels: Check the reservoir periodically to ensure it hasn’t run dry.
- Adapt for Different Plants: Adjust the size of the reservoir based on the plant’s water requirements.
- Use Quality Soil: Opt for potting soil that retains moisture without becoming waterlogged.
- Clean the Reservoir: Over time, debris may accumulate. Clean the reservoir as needed to maintain proper function.
Common Mistakes to Avoid
- Overfilling the Reservoir
Adding too much water can cause oversaturation, leading to root rot. Always fill the reservoir to an appropriate level. - Neglecting Drainage
A reservoir system doesn’t eliminate the need for drainage holes in your planter. Without proper drainage, excess water can accumulate and harm your plant. - Using the Wrong Materials
Ensure the fabric or mesh you use is breathable and allows water to pass through while blocking soil particles.
Popular Plants for DIY Water Reservoir Planters
Certain plants thrive exceptionally well with this system:
- Tomatoes: Benefit from consistent hydration, especially during fruiting.
- Herbs: Basil, mint, and parsley love steady moisture levels.
- Tropical Plants: Peace lilies and ferns appreciate the humidity provided by a reservoir.
Take Your Gardening to the Next Level
Adding a water reservoir to your planter is a simple yet transformative gardening hack. It saves time, conserves water, and keeps your plants thriving with minimal effort. Whether you’re a beginner or an experienced gardener, this DIY project is a must-try.
💧 Give it a go! Have you tried self-watering planters before? Share your tips or photos below! 🌿
✨ #PlanterDIY #GardeningHacks #SelfWateringPlanter #SmartGardening #EcoFriendlyGardening