
Growing celery at home is a delightful and rewarding endeavor that requires minimal space and effort. Whether you live in a tiny apartment or a spacious house, you can cultivate fresh, crunchy celery right in your kitchen or on your balcony. This article will walk you through everything you need to know about growing celery, from starting with kitchen scraps to nurturing seeds in containers. By the end, you’ll be equipped with the knowledge to enjoy homegrown celery in your meals.
Introduction to Celery
Celery (Apium graveolens) is a nutritious, low-calorie vegetable that is rich in vitamins and minerals, particularly vitamin K, vitamin C, potassium, and folate. It has a crisp texture and a mildly peppery flavor, making it a versatile addition to salads, soups, stir-fries, and snacks. Growing celery at home not only provides you with fresh produce but also gives you the satisfaction of nurturing your plants from seed or scrap.
Why Grow Celery at Home?
- Convenience: Having fresh celery at your fingertips means you can easily add it to your meals whenever you want.
- Cost-Effective: Growing your own celery can save you money compared to purchasing it from the store.
- Flavor: Homegrown celery often tastes better than store-bought varieties, as you can harvest it at its peak freshness.
- Sustainability: Growing your own food reduces your carbon footprint and supports a sustainable lifestyle.
Types of Celery
Before you start growing, it’s essential to know the different types of celery available:
- Pascal Celery: The most common variety, known for its tall, thick stalks and rich flavor.
- Celery Hearts: The inner stalks of Pascal celery, prized for their tenderness and mild taste.
- Celeriac: Also known as celery root, it’s grown for its bulbous root rather than its stalks.
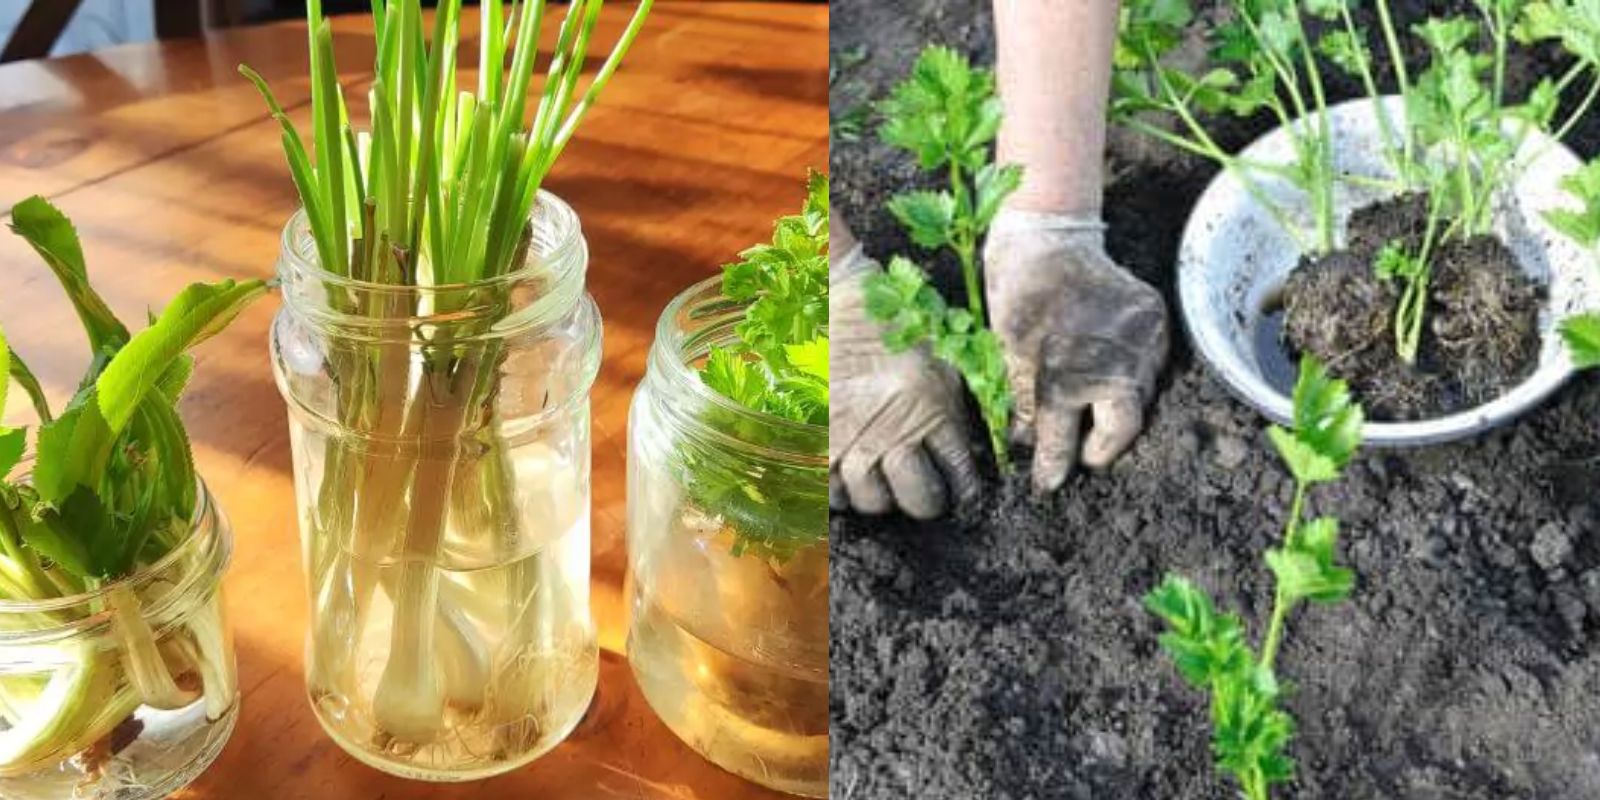
Growing Celery from Kitchen Scraps
One of the easiest ways to start growing celery is by using kitchen scraps. Here’s how to do it:
Step 1: Choosing Celery Stalks
Select fresh, healthy celery stalks from the grocery store. Look for stalks with firm, crisp leaves and no signs of wilting or discoloration.
Step 2: Preparing the Celery Base
- Cut off the bottom of the celery stalk, about 2-3 inches from the base.
- Place the cut end in a shallow dish or bowl with enough water to cover the bottom but not submerge the entire stalk.
Step 3: Providing Proper Conditions
- Sunlight: Place the dish in a sunny area, such as a windowsill that receives at least 6 hours of sunlight a day.
- Water: Change the water every few days to keep it fresh and prevent mold.
Step 4: Watching for Growth
After about a week, you should start to see roots developing from the bottom of the celery base. New green leaves will also begin to sprout from the top.
Step 5: Transplanting to Soil
Once the roots are about 2-3 inches long, it’s time to transplant the celery base into soil:
- Choose a container that is at least 6-8 inches deep with good drainage.
- Fill the container with quality potting soil and make a small hole in the center.
- Gently place the celery base in the hole, covering the roots with soil, and water lightly.
Growing Celery from Seeds
If you prefer to start from seeds, follow these steps:
Step 1: Selecting Celery Seeds
Choose a variety of celery seeds that suit your taste and growing conditions. Pascal celery is a popular choice for its flavor and stalk quality.
Step 2: Preparing the Container
- Select a container with drainage holes that is at least 12 inches deep and wide.
- Fill the container with a mixture of potting soil and compost for added nutrients.
Step 3: Sowing the Seeds
- Celery seeds are tiny, so scatter them evenly over the soil surface.
- Lightly press the seeds into the soil and cover them with a thin layer of soil (about ¼ inch).
- Water the soil gently to avoid displacing the seeds.
Step 4: Providing Optimal Growing Conditions
- Temperature: Celery seeds germinate best in temperatures between 70-75°F (21-24°C).
- Light: Once seedlings emerge, they need 12-16 hours of bright light each day. If natural light is insufficient, consider using grow lights.
- Moisture: Keep the soil consistently moist but not soggy. Mist the surface if needed to prevent the soil from drying out.
Step 5: Thinning Seedlings
Once your seedlings develop their first true leaves (about 3-4 inches tall), thin them out to prevent overcrowding. Leave the healthiest plants spaced about 6 inches apart.
Caring for Your Celery Plants
Watering
Celery requires consistent moisture to thrive, as it has a high water content (about 95%). Water your plants regularly, ensuring the soil stays moist but not waterlogged. During hot weather, you may need to water daily.
Fertilizing
Feed your celery plants with a balanced, water-soluble fertilizer every 4-6 weeks. A fertilizer with a higher phosphorus content will encourage strong root development and overall plant health.
Sunlight and Temperature
Celery prefers full sun, but it can benefit from some afternoon shade, especially in warmer climates. If you notice your plants wilting in the heat, consider providing some shade to protect them.
Mulching
Applying a layer of mulch around your celery plants can help retain soil moisture, suppress weeds, and regulate soil temperature.
Pest and Disease Management
Monitor your plants for common pests such as aphids, spider mites, and slugs. If you notice an infestation, consider using insecticidal soap or neem oil as a natural treatment. Additionally, ensure good air circulation around your plants to prevent fungal diseases.
Harvesting Celery
Celery is ready to harvest when the stalks are thick and firm, typically around 3-4 months after planting. Here’s how to harvest:
- Cutting the Stalks: Use a sharp knife to cut the stalks at the base, leaving some leaves on the plant for continued growth.
- Harvesting Time: Harvest celery in the morning when the stalks are crisp and full of moisture.
Storing Celery
After harvesting, store celery in the refrigerator in a perforated plastic bag. Properly stored, it can last for up to two weeks.
Benefits of Growing Celery at Home
- Freshness: Homegrown celery is fresher and tastier than store-bought.
- Nutritional Value: Growing your own vegetables allows you to enjoy organic produce without pesticides.
- Satisfaction: There’s immense satisfaction in growing your food from seed or scrap to harvest.
Conclusion: Start Your Celery Growing Journey Today!
Growing celery at home, whether from kitchen scraps or seeds, is an accessible and rewarding way to enjoy fresh produce. With a bit of care and attention, you can cultivate healthy, flavorful celery in containers, no garden required.
So why wait? Gather your supplies, choose your method, and embark on your celery-growing journey today. Experience the joy of home gardening and savor the delicious taste of fresh celery in your meals! 🌱🥬 #HomeGardening #GrowYourOwnFood #Celery #KitchenGarden #UrbanGardening