
Growing potatoes is one of the most rewarding gardening experiences, and hilling your potato plants is the key to achieving a bountiful harvest. This essential gardening technique not only protects your growing tubers but also encourages more robust yields. In this article, we’ll dive into the step-by-step process of hilling, explain why it’s critical, and share expert tips to help you grow the best potatoes possible.
Understanding the Importance of Hilling Potato Plants
Hilling, or mounding soil around the base of potato plants, is a simple yet powerful gardening method. Potatoes grow underground, and if exposed to sunlight, the tubers turn green and develop solanine—a compound that makes them bitter and toxic. Hilling prevents this by keeping the tubers well-covered, while also promoting new root growth and creating an optimal environment for your plants to thrive.
Here’s why hilling is vital:
- Prevents Green Potatoes: Shields tubers from sunlight exposure.
- Boosts Tuber Production: Encourages the plant to grow more potatoes along its buried stem.
- Improves Drainage: Keeps the soil loose and well-aerated.
- Protects Against Pests: Reduces the risk of tuber damage from pests.
With these benefits in mind, let’s move on to the practical steps of hilling your potato plants.
Step-by-Step Guide to Hilling Potato Plants
1. Plant and Observe Growth
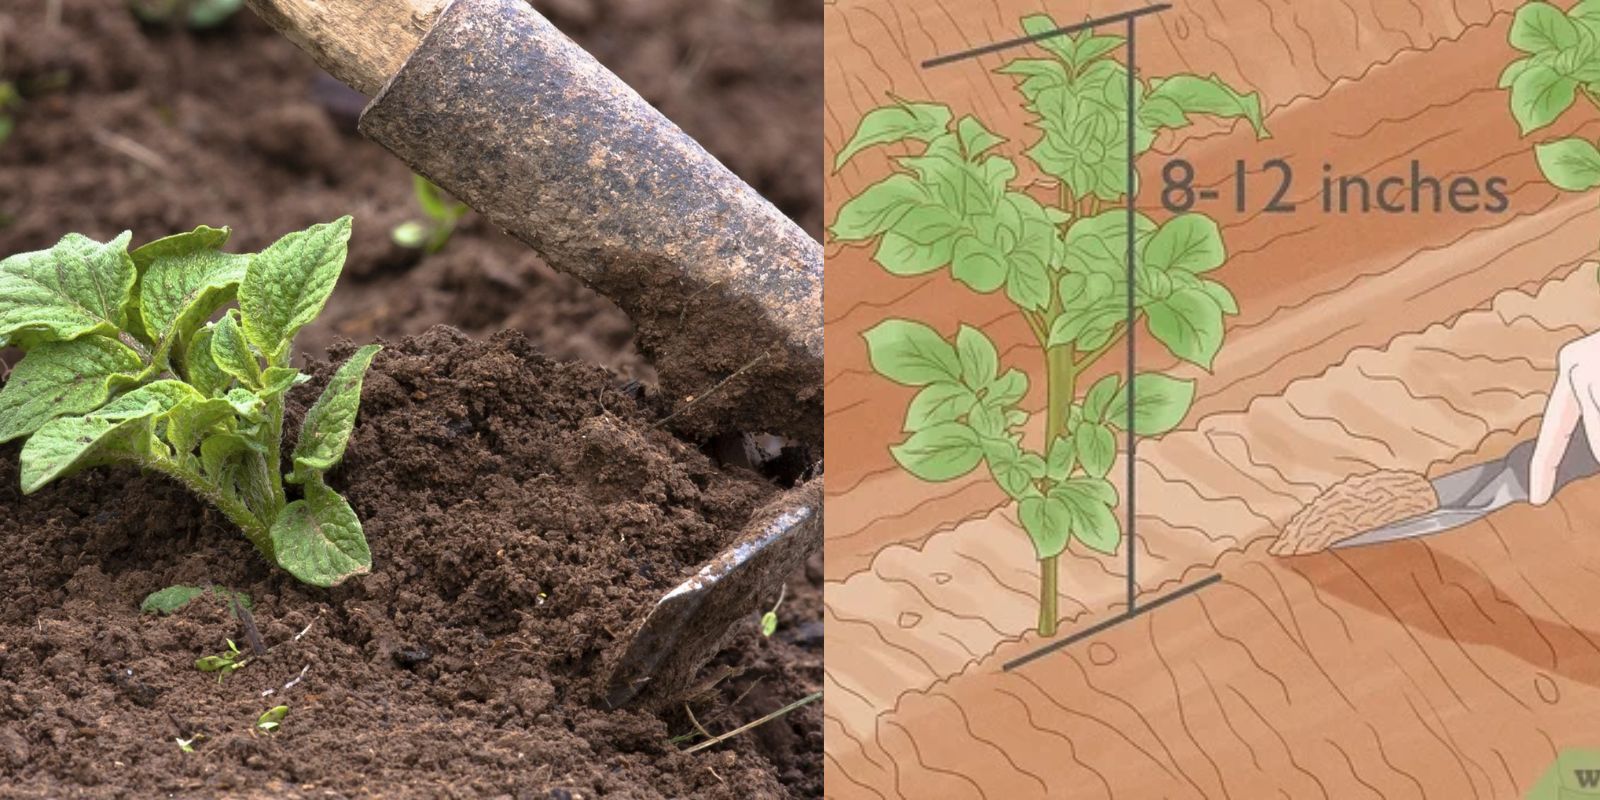
Begin by planting your seed potatoes in well-draining soil with plenty of organic matter. Plant them 4–6 inches deep and ensure they’re spaced about 12 inches apart. Once the plants have grown to about 6–8 inches tall, it’s time to start hilling.
2. Loosen the Soil Around Plants
Before you begin hilling, prepare the soil by loosening it around the base of each plant. Use a hoe, rake, or garden fork to break up any clumps. This makes it easier to mound the soil and reduces the risk of damaging roots or stems.
3. Pull Soil Up the Stems
Gently mound soil up and around the base of the plant, covering the bottom 4–6 inches of the stem. Be careful not to bury any leaves, as this can harm the plant’s ability to photosynthesize.
4. Repeat Every Two Weeks
As your potato plants grow taller, continue hilling every 2–3 weeks. Each time, add more soil until the mound around each plant reaches a height of 10–12 inches. Consistent hilling encourages the plant to develop more tubers along the stem.
5. Use Mulch for Extra Protection
For an added layer of protection, consider covering the mounds with organic mulch, such as straw or grass clippings. Mulch helps retain soil moisture, suppress weeds, and further shields tubers from sunlight.
6. Water Consistently
Keep the mounded soil moist but not waterlogged. Potatoes need regular watering to develop properly, especially during the tuber formation stage. Deep watering once or twice a week is usually sufficient.
7. Monitor for Pests and Diseases
As the plants grow, keep an eye out for common potato pests like Colorado potato beetles and aphids. Inspect the plants regularly, and take action promptly if you notice any signs of infestation or disease.
Expert Tips for Successful Potato Hilling
- Start Early: Begin hilling as soon as the plants are tall enough. Waiting too long can expose the tubers to sunlight and pests.
- Avoid Compacting the Soil: Use light, loose soil for hilling to ensure good aeration and root growth.
- Add Fertilizer: Mix a balanced organic fertilizer into the soil as you hill to provide extra nutrients for the plants.
- Use Raised Beds: If you’re gardening in a small space, raised beds make hilling easier and more efficient.
Common Mistakes to Avoid
- Burying the Leaves: Always leave the top leaves exposed to sunlight. Burying them can stunt the plant’s growth.
- Over-Hilling: Adding too much soil at once can smother the plant. Hill gradually as the plant grows taller.
- Neglecting to Water: Dry soil can hinder tuber development. Ensure the soil stays consistently moist.
- Skipping Hilling: Forgetting to hill can result in exposed, green, and inedible potatoes.
Benefits of Hilling for Your Potato Crop
Hilling isn’t just about keeping your potatoes safe from sunlight—it also maximizes your harvest potential. By burying part of the stem, you’re giving the plant the opportunity to produce more tubers along its length. This simple process leads to larger yields and healthier plants.
Additionally, hilling helps prevent weeds from competing with your potatoes for nutrients and water. It’s a natural way to ensure your plants get the resources they need to grow strong and productive.
When to Stop Hilling
You can stop hilling once the plants begin to flower, which is a sign that the tubers are forming. At this point, the mounds should be tall enough to protect the developing potatoes. Focus on watering and maintaining the plants until harvest time.
Harvesting Your Potatoes
After the plants have flowered and the foliage begins to yellow and die back, it’s time to harvest your potatoes. Gently dig into the mounds with a garden fork or your hands, being careful not to damage the tubers. You’ll be rewarded with a crop of fresh, homegrown potatoes!
Conclusion
Hilling is a simple yet powerful technique that can dramatically improve the health and productivity of your potato plants. By taking the time to cover the stems with loose soil, you’re creating an ideal environment for tuber growth and protecting your crop from common issues.
Whether you’re a seasoned gardener or just starting out, mastering the art of hilling will help you achieve a thriving potato harvest. Give it a try, and watch your plants—and your yields—flourish!
💬 “Do you have any hilling tips or tricks? Share your potato-growing experiences in the comments below!”
#PotatoHilling #GrowYourOwnFood #GardeningTips #PotatoHarvest #HomeGardening #VegetableGardening #GardenHacks