
Introduction Grafting grape vines is a centuries-old technique that allows gardeners and vineyard owners to cultivate stronger, disease-resistant plants while enhancing fruit quality. By grafting a scion (a cutting from a desired grape variety) onto a rootstock (a well-adapted, disease-resistant vine), you can combine the best traits of both plants. This process is especially valuable for improving yield, adapting to different soil conditions, and maintaining heritage grape varieties.
This comprehensive guide will walk you through the step-by-step process of grafting grape vines successfully, ensuring that your vineyard thrives for years to come.
Why Graft Grape Vines?
Grafting is widely practiced in vineyards across the world because of its many benefits:
- Disease Resistance – Rootstocks from resistant grape varieties help prevent common diseases like phylloxera and nematodes.
- Adaptation to Soil Conditions – Some rootstocks can tolerate poor soil conditions, making it easier to grow grapes in challenging environments.
- Increased Productivity – Grafted vines often produce better yields compared to self-rooted vines.
- Preserving Heritage Varieties – Some grape varieties may be delicate or prone to disease but can be preserved through grafting onto hardy rootstocks.
Best Time for Grafting
Grafting should be done during early spring, just before the vine starts actively growing. The ideal temperature for successful grafting is between 60-75°F (15-24°C). The vine should be dormant but ready to push out new growth soon.
Step-by-Step Guide to Grafting Grape Vines
1. Selecting the Right Rootstock and Scion
- Choose a rootstock that is disease-resistant and suitable for your soil type.
- Select a scion from a healthy, productive grape vine with desirable characteristics.
- Ensure both the rootstock and scion are of similar diameter to allow proper alignment.
2. Preparing the Grafting Tools
Gather the necessary tools for grafting:
- Sharp grafting knife
- Pruning shears
- Grafting tape or rubber bands
- Wax or grafting sealant (optional)
- Rooting hormone (for some methods)
3. Making the Cuts
There are several grafting techniques, but the two most commonly used for grape vines are:
A. Cleft Grafting (Best for Older Vines)
- Cut the rootstock straight across and split it down the center (about 1-2 inches deep).
- Trim the scion into a wedge shape with two smooth cuts to fit into the split rootstock.
- Insert the scion into the cleft, ensuring the cambium layers of both pieces align.
- Secure with grafting tape and seal the cut with wax or grafting compound to prevent drying.
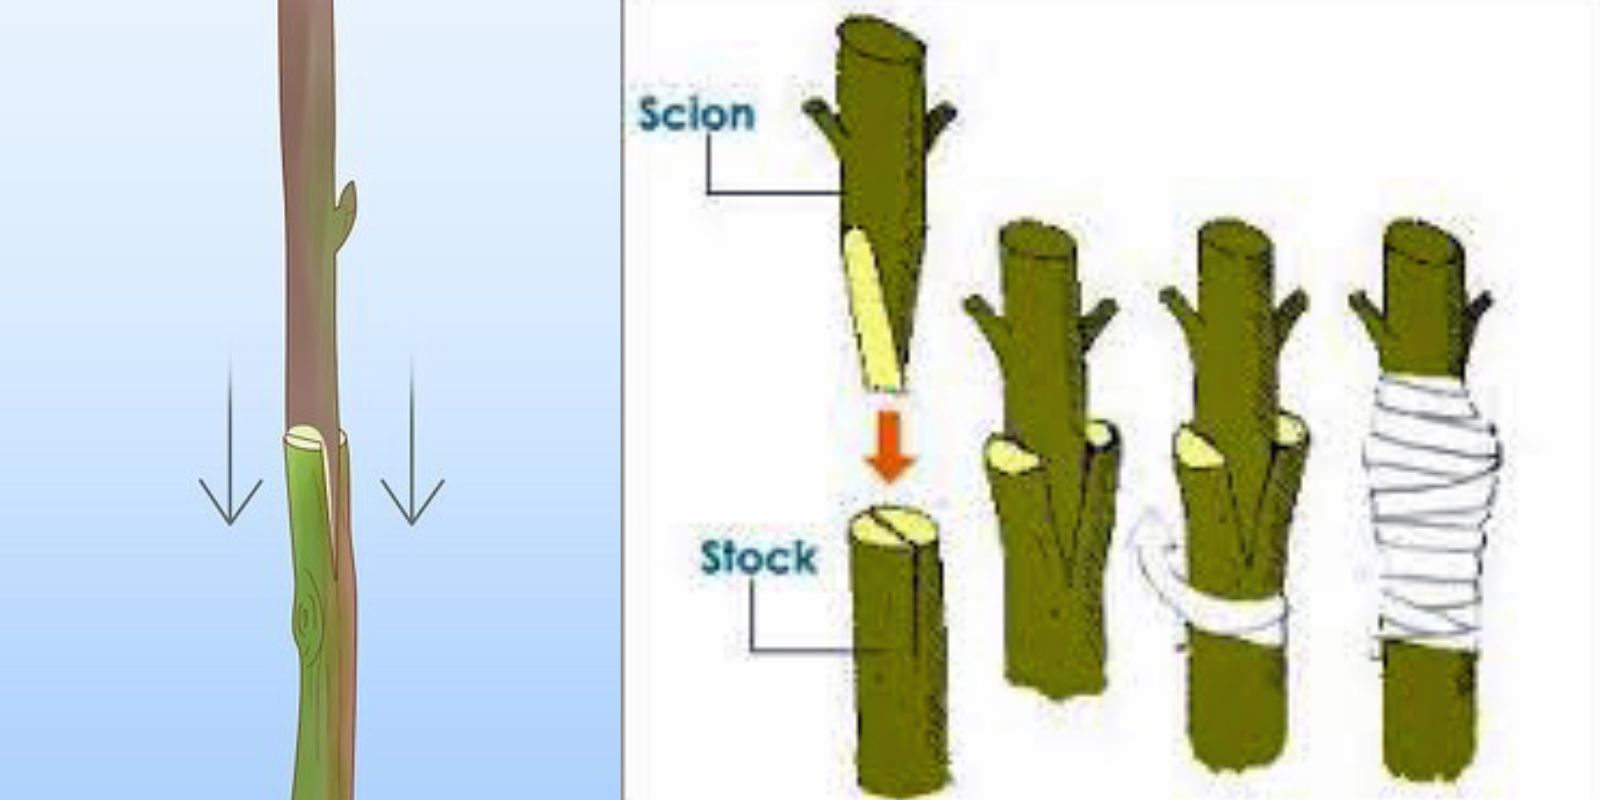
B. Whip and Tongue Grafting (Best for Younger Vines)
- Cut both the rootstock and scion at a 45-degree angle to create matching sloping cuts.
- Make a small tongue-like notch in both pieces to interlock them securely.
- Fit the two pieces together, ensuring tight contact between the cambium layers.
- Wrap with grafting tape to hold the joint firm and promote healing.
4. Securing the Graft
- Wrap the graft site with grafting tape to keep it protected and secure.
- If using wax, apply a thin layer to seal moisture in and prevent infection.
- Keep the grafted vine in a humid, shaded area to avoid stress while healing.
5. Providing Optimal Growing Conditions
- Water the grafted plant regularly but avoid overwatering.
- Keep the plant in a greenhouse or under controlled conditions for the first few weeks.
- Avoid direct sunlight until new shoots appear.
- Monitor for any signs of infection or graft failure.
6. Monitoring Growth and Aftercare
- After 3-6 weeks, you should see new shoots emerging from the grafted scion.
- Once the graft has successfully fused, remove the tape to prevent girdling.
- Prune any shoots that emerge from below the graft to encourage growth in the scion.
- Provide proper support using trellises or stakes to help the vine establish itself.
Common Grafting Mistakes to Avoid
- Misalignment of Cambium Layers – The cambium (the layer of active growth just beneath the bark) must be properly aligned for the graft to take.
- Using a Dull Knife – A sharp knife ensures clean cuts that heal quickly, reducing the risk of infection.
- Poor Sealing – Drying out is one of the main reasons grafts fail, so always use tape or wax.
- Overwatering or Underwatering – Maintain consistent moisture, but don’t let the rootstock sit in waterlogged soil.
- Grafting at the Wrong Time – Attempting to graft during extreme temperatures (too hot or too cold) reduces success rates.
When to Expect Results?
Grafted grape vines usually show signs of growth within 4-6 weeks. However, it may take an entire growing season for the graft to fully establish. With proper care, the vine will start producing fruit in about 2-3 years.
Conclusion
Grafting grape vines is a rewarding skill that allows you to create strong, productive, and disease-resistant plants. By following these simple steps, you can successfully graft your grape vines and enjoy a bountiful harvest in the years to come.
🌱 Have you tried grafting grape vines before? Share your experience in the comments! 🍇👇
#GraftingGrapes #VineyardLife #GardeningHacks #FruitGarden #OrganicFarming #DIYGardening #GrowYourOwn #HomeGardening