
Roses are undoubtedly one of the most beloved and timeless flowers in gardens worldwide. Their vibrant colors, intoxicating fragrance, and classic beauty make them a popular choice for both novice and experienced gardeners. One of the most rewarding ways to expand your rose collection is through propagation – specifically, by taking cuttings. Propagating roses from cuttings allows you to grow new plants from your favorite varieties, and it’s a simple, low-cost method that can be surprisingly effective when done correctly.
In this article, we’ll explore why you should consider propagating roses through cuttings and guide you through a foolproof method that will ensure your success. Whether you’re a seasoned gardener or a beginner, this method will make growing roses from cuttings easier and more fun than ever.
Why Should You Propagate Roses from Cuttings?
Before diving into the how-to, let’s take a moment to understand why propagating roses from cuttings is so appealing.
- Cost-Effective: Buying new rose plants can be expensive, especially if you have a particular variety in mind. Propagating your own roses from cuttings eliminates the need to purchase new plants, making it a budget-friendly option for expanding your garden.
- Preserving Favorite Varieties: If you have a rose variety you love, propagating it through cuttings ensures that you can keep growing that specific rose, whether it’s a rare heirloom or a beloved garden rose.
- Increase Your Rose Collection: Roses can be propagated fairly easily, so taking cuttings from one healthy rose bush can result in multiple new plants for your garden.
- It’s a Fun and Rewarding Experience: Watching your rose cuttings develop roots and grow into thriving new plants is a satisfying and educational experience. It’s a hands-on way to learn more about plant biology and gardening while connecting with nature.
The Cool Way to Take Rose Cuttings: Step-by-Step Guide
Now that you know why propagating roses from cuttings is so beneficial, let’s get into the method that will help you successfully grow roses from cuttings. This process is both easy and reliable, ensuring that you can quickly multiply your rose collection.
Step 1: Choose the Right Rose Stem
The first step in taking successful rose cuttings is selecting a healthy and strong stem from an existing rose plant. Look for a stem that is not too old or too young. A stem that is about one year old is ideal for cuttings because it’s still soft but mature enough to root.
- Best Time to Take Cuttings: The ideal time to take rose cuttings is during the late spring or early summer when the plant is actively growing. This is when the stem is not overly woody, which makes it easier for the cutting to form roots.
- Choosing the Right Stem: Choose a stem that has at least 3-5 leaves and is free of any disease or pest damage. Avoid stems with flowers or buds, as these parts take away energy from the cutting’s root development.
Step 2: Make the Cut
Once you’ve selected the perfect stem, it’s time to make your cut. Use sharp, clean gardening shears or a knife to make a clean, precise cut just below a leaf node (where a leaf grows from the stem). A good cutting should be about 6-8 inches long.
- Angle of the Cut: Make the cut at a 45-degree angle. This allows the cutting to absorb moisture and nutrients more efficiently while preventing the cutting from sitting flat against the soil, which can lead to rot.
- Removing the Flower: If the stem has any flowers or buds, remove them. This ensures that the plant will put all its energy into growing roots instead of trying to support flowers.
Step 3: Remove Lower Leaves
Once you’ve made the cut, it’s time to prepare the cutting for planting. Trim away any leaves from the bottom half of the cutting, leaving just a few leaves at the top. These leaves will help the cutting stay hydrated, while the bare part will be buried in the soil and used for root formation.
- Be Gentle: Be careful when removing the leaves to avoid damaging the delicate cutting. Use a gentle touch and be mindful of the stem’s integrity.
Step 4: Dip the Cutting in Rooting Hormone (Optional)
To give your cutting an extra boost, you can dip the cut end into rooting hormone. Rooting hormone is a natural or synthetic substance that encourages the formation of roots. While it’s not strictly necessary, using rooting hormone can significantly improve your chances of success, especially if you are working with a difficult-to-root variety.
- How to Use Rooting Hormone: Simply dip the cut end of the rose cutting into the rooting hormone powder or gel. Tap off any excess hormone, as too much can prevent the cutting from rooting.
Step 5: Prepare the Potting Medium
Now it’s time to prepare the medium for your rose cutting. You want to use a well-draining, moisture-retentive mix that provides a stable environment for the cutting. You can use a mix of perlite and peat moss, or simply buy a pre-made potting mix designed for cuttings.
- Why a Good Potting Mix Matters: The right potting mix allows the cutting to stay hydrated while also preventing waterlogging, which can lead to rotting. Ensure the medium is well-draining to encourage healthy root development.
Step 6: Plant the Cutting
Once your potting medium is ready, make a small hole in the soil using a stick or pencil. Insert the bottom of the cutting into the hole, ensuring that the node where you removed the leaves is buried in the soil. Gently press the soil around the cutting to secure it in place.
- Positioning: Make sure the cutting is planted deep enough so that the base is buried but not too deep, as this can interfere with root development.
Step 7: Provide the Right Environment
Rose cuttings require a warm, humid environment to thrive. To simulate this, you can cover the cutting with a clear plastic bag or place it in a mini greenhouse. This creates a humid environment that prevents the cutting from drying out.
- Temperature: Roses prefer warm conditions for rooting. Aim for a temperature of around 70°F (21°C) for optimal root growth. Make sure the cutting is in a bright location, but avoid direct sunlight, which could cause the cutting to overheat.
- Watering: Keep the soil moist but not soggy. Mist the cutting regularly to maintain humidity, and be sure the soil doesn’t dry out completely.
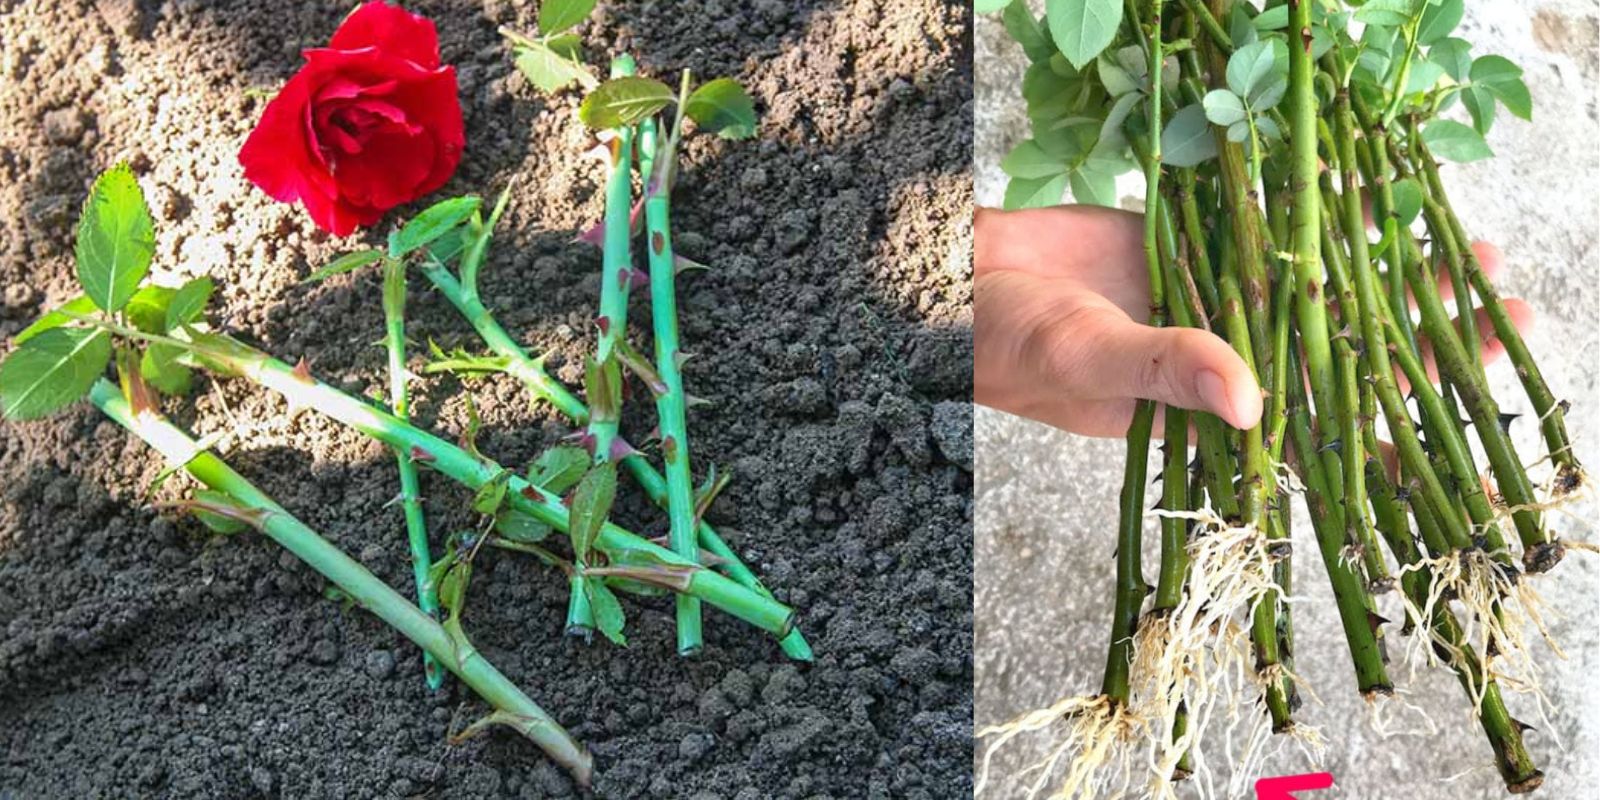
Step 8: Wait for Roots to Develop
Patience is key when propagating rose cuttings. After a few weeks, you should begin to notice new growth, including roots. Gently tug on the cutting to see if it has rooted. If it resists, that’s a good sign that roots are forming.
- Timeframe: Rooting can take anywhere from 2 to 6 weeks, depending on the rose variety and growing conditions.
Step 9: Transplant the New Rose
Once the rose cutting has developed a strong root system, you can transplant it into a larger pot or directly into your garden. Gradually acclimate it to outdoor conditions if you plan to plant it outside. Be sure to continue watering it regularly until it becomes established.
Final Thoughts: Rose Cuttings Are an Easy and Rewarding Way to Expand Your Garden
Propagating roses from cuttings is a fun and simple way to grow more of the beautiful roses you love. By following this easy, step-by-step method, you’ll be able to grow new plants with little effort and cost. Not only does it allow you to expand your collection of roses, but it also provides a hands-on opportunity to learn more about gardening and plant biology.
Whether you’re a seasoned gardener or a beginner, propagating roses from cuttings is an enjoyable experience that can yield stunning results. So, grab your shears, take a few cuttings, and watch your rose garden flourish!
🌹 Ready to start propagating your own roses? Share your experiences with us and join the community of passionate gardeners!
#RoseCuttings #GardeningTips #DIYGarden #PlantPropagation #GrowYourOwn #GardeningHacks #PlantLovers #GreenThumb #HomeGarden #GardeningCommunity