
Introduction
Mulberry trees (Morus species) are a fantastic addition to any garden or orchard. They provide delicious fruit, shade, and are highly adaptable to various climates. However, without proper maintenance, they can become oversized and difficult to manage. One effective method to control their size while promoting fresh growth is pollarding. Additionally, if you want to propagate more mulberry trees, using cuttings is a simple and cost-effective method. In this guide, we will walk you through the essential steps of pollarding and propagating mulberries, ensuring a healthy, productive, and beautiful tree in your garden.
Understanding Pollarding
Pollarding is a specialized pruning technique that involves cutting back branches to a specific height to encourage new, controlled growth. This technique is beneficial for urban gardens, as it prevents trees from growing too large and maintains an aesthetically pleasing form.
Why Pollard Mulberry Trees?
- Size Control – Keeps trees manageable in small spaces.
- Encourages Fresh Growth – Produces new branches and vigorous shoots.
- Boosts Fruit Production – Younger branches often yield better fruit.
- Reduces Wind Damage – A controlled tree is less prone to branch breakage.
- Enhances Tree Health – Helps prevent disease by improving air circulation.
How to Pollard Mulberry Trees
Step 1: Choose the Right Time
The best time to pollard mulberry trees is late winter or early spring, before new buds start to grow. This ensures minimal stress on the tree and promotes strong regrowth.
Step 2: Select the Right Branches
Identify the branches you want to keep. Ideally, choose a few strong, upright branches as the framework for future growth and remove excess branches.
Step 3: Make Clean Cuts
Using sharp pruning shears or a saw, cut back branches to a height of about 6 feet. Ensure that cuts are made just above a node (the point where leaves or smaller branches grow), as this will encourage fresh shoots.
Step 4: Remove Weak or Diseased Growth
Eliminate dead, weak, or crossing branches to maintain a balanced and healthy structure. This helps direct energy toward strong, productive growth.
Step 5: Maintain Annual Pollarding
Repeat the process every 1-2 years to maintain the tree’s shape and promote new fruit-bearing branches. Avoid skipping multiple years, as excessive growth can make it harder to restore control over the tree.
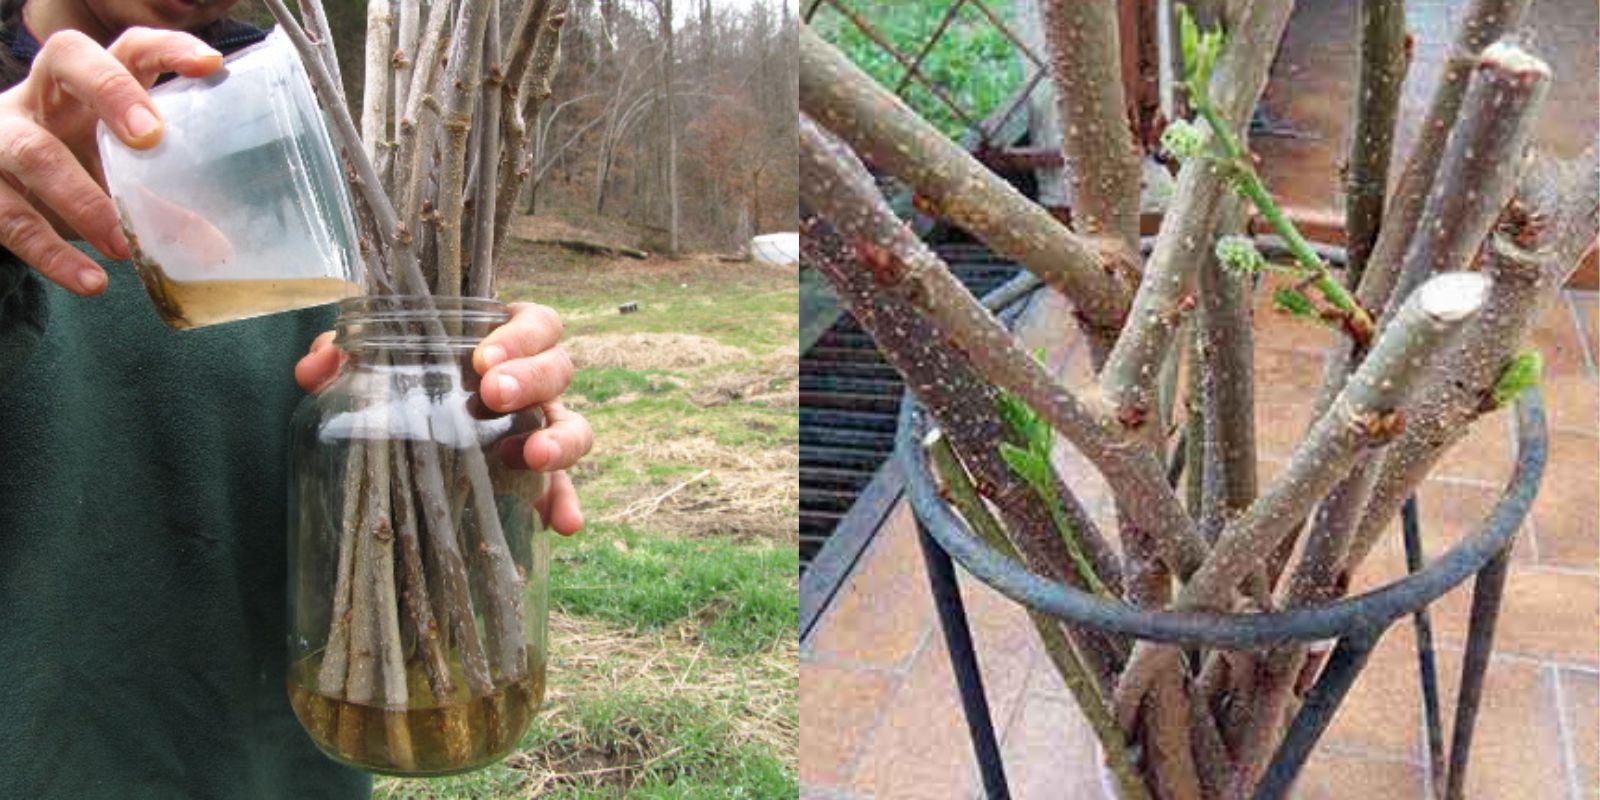
Propagating Mulberries from Cuttings
Propagation is a cost-effective way to grow more mulberry trees without purchasing saplings. Using hardwood cuttings is one of the easiest and most reliable methods.
Step 1: Select Hardwood Cuttings
Choose healthy, 8-12 inch long cuttings from last year’s growth. These should be about pencil-thick and contain several nodes.
Step 2: Remove Lower Leaves
Strip off any leaves from the bottom half of the cutting, leaving 2-3 leaves at the top. This prevents moisture loss while allowing photosynthesis to continue.
Step 3: Dip in Rooting Hormone
To enhance root development, dip the cut end in rooting hormone powder or gel. This step is optional but significantly increases success rates.
Step 4: Prepare the Soil
Use well-draining, nutrient-rich soil in pots or directly in the ground. A mixture of sand, compost, and loamy soil works best.
Step 5: Plant the Cuttings
Insert the cuttings 2-3 inches deep into the soil. Space them 6-8 inches apart if planting multiple cuttings.
Step 6: Keep the Soil Moist
Water the cuttings regularly to keep the soil evenly moist, but not soggy. Overwatering can lead to rot.
Step 7: Provide Humidity and Protection
To maintain humidity, cover the cuttings with a plastic dome or bag. Keep them in a warm, shaded area until roots develop.
Step 8: Transplanting
After 8-12 weeks, check for root growth by gently tugging on the cuttings. Once established, transplant them into larger pots or garden beds.
Common Mistakes to Avoid
Pollarding Mistakes:
- Over-Pruning – Cutting too aggressively can stress the tree.
- Pollarding Too Late – Performing this in late spring/summer can weaken the tree.
- Ignoring Annual Maintenance – Inconsistent pruning leads to uncontrolled growth.
Propagation Mistakes:
- Using Weak Cuttings – Avoid using diseased or too-thin branches.
- Not Keeping the Soil Moist – Dry soil can hinder root development.
- Skipping Rooting Hormone – While optional, it improves success rates.
Final Thoughts
Pollarding and propagating mulberries are essential techniques for maintaining a healthy, productive tree. By following the proper steps, you can control tree growth, enhance fruit production, and easily grow new trees from cuttings. Whether you’re an experienced gardener or just starting, these methods will help you cultivate a thriving mulberry tree in your space.
Have you tried pollarding or propagating mulberries before? Share your experience in the comments below! 🍇🌳
#MulberryTree #GardeningTips #FruitTreeCare #PlantPropagation #UrbanGardening #TreePruning #SustainableGardening