
Grafting is one of the most effective plant propagation techniques, allowing gardeners and horticulturists to grow stronger, disease-resistant plants by combining desirable traits from two different plants. Whether you’re looking to create a new fruit tree, increase your garden’s productivity, or enhance the resilience of your plants, grafting can help you achieve it. This article delves into a grafting technique renowned for its success rate—the cleft graft—along with detailed steps, preparation tips, and troubleshooting advice for the best results.
Why Grafting?
Grafting involves joining parts from two different plants so they grow as one. The rootstock (bottom part) provides stability, disease resistance, and nutrient uptake, while the scion (top part) brings the desired fruit, flower, or foliage characteristics. The cleft graft technique is particularly popular due to its simplicity, high success rate, and the versatility it offers across a variety of plants, including fruit trees, flowering shrubs, and ornamental plants.
Choosing the Right Time and Materials for Grafting
Before starting, it’s essential to gather the necessary materials and determine the right season for grafting. Here are a few tips to get you prepared:
- Optimal Season: Grafting is generally most successful in late winter to early spring, when the rootstock is still dormant but the plant is about to enter its growth phase.
- Choosing Stock and Scion: Select a vigorous, healthy rootstock and a scion with characteristics you want in your final plant.
- Tools and Supplies: You’ll need a sharp grafting knife, grafting tape or rubber bands, and grafting wax or sealant. Keeping tools clean and sharp is essential to reduce injury to the plant and prevent infections.
Step-by-Step Guide to Cleft Grafting
The cleft graft technique is highly regarded for its ease and success rate. Here’s how to execute it effectively:
1. Preparing the Rootstock
- Cut the Rootstock: Choose a sturdy branch or stem on the rootstock and cut it cleanly across the top, making a flat surface. Ideally, the rootstock should be slightly thicker than the scion.
- Make a Vertical Split: Using your grafting knife, create a vertical slit about 1-2 inches deep in the center of the cut end of the rootstock. This split will hold the scion and provide a good surface for cambial contact.
2. Preparing the Scion
- Select a Healthy Scion: Choose a scion with 2-4 buds. The scion should be around the same diameter as the rootstock, though slightly smaller scions can also work.
- Shape the Scion: Cut the base of the scion into a wedge shape, making two angled cuts so that it forms a “V” that can fit into the rootstock’s split. The wedge should be long enough to create a solid connection with the cambium layer of the rootstock.
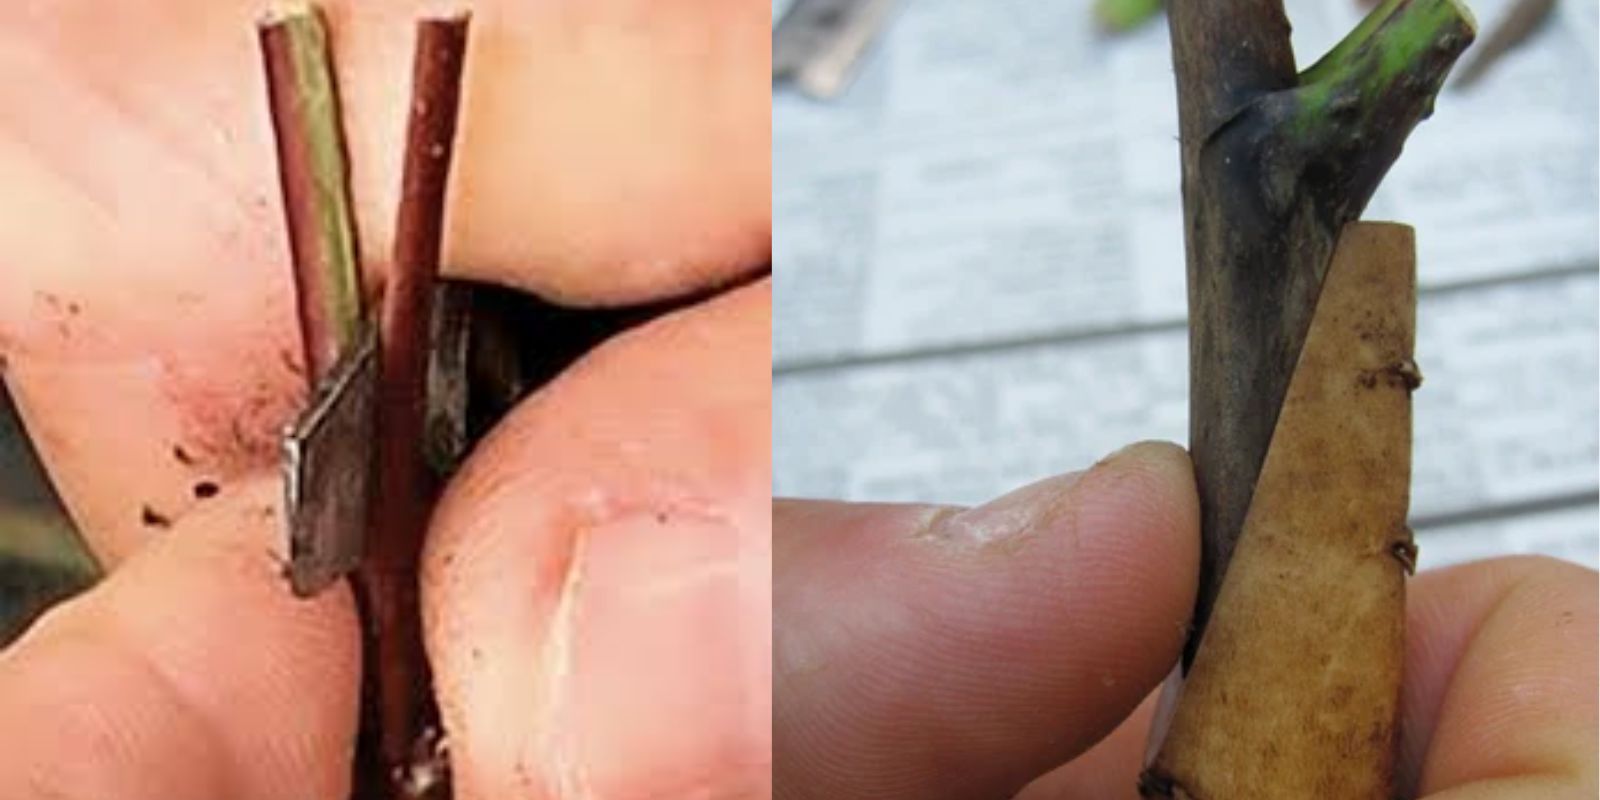
3. Inserting the Scion into the Rootstock
- Align the Cambium Layers: Carefully insert the wedge-shaped scion into the split on the rootstock. Make sure the cambium layers (the green layer just beneath the bark) of both the scion and the rootstock are in contact, as this is where nutrient transfer occurs.
- Check for Stability: The scion should sit firmly in the split without wobbling. Ensure that at least one side of the cambium layers aligns for nutrient flow, even if the entire perimeter isn’t perfect.
4. Securing the Graft
- Wrap the Union: Use grafting tape or a rubber band to tightly wrap the graft union, ensuring the scion and rootstock are firmly held together. This secures the graft and prevents the entry of air or pathogens.
- Apply Grafting Wax: Seal the graft area with grafting wax or another suitable sealant to lock in moisture and protect the union from bacteria, pests, and environmental stress.
5. Post-Graft Care
Once your graft is complete, proper care will help ensure success:
- Maintain High Humidity: If possible, place the grafted plant in a humid environment. Humidity helps prevent drying and promotes healing.
- Protect from Direct Sunlight: Place the plant in a location with indirect light. Direct sunlight can overheat the graft area, making it difficult for the plant to heal.
- Monitor Growth: Check for new growth after a few weeks. Once you see buds beginning to develop on the scion, it’s a sign the graft has taken.
Tips for Increasing Graft Success
Even with careful technique, certain practices can maximize the likelihood of a successful graft:
- Choose Compatible Plants: While grafting works across many species, choosing compatible plants (e.g., apple onto apple rootstock) enhances success. Incompatibility can lead to poor growth or graft failure.
- Keep Grafting Tools Sterile: Clean tools with alcohol or bleach between cuts to prevent the spread of diseases.
- Prevent Excessive Moisture: While humidity is essential, too much moisture can lead to mold. Proper ventilation is necessary.
- Avoid Moving the Plant: Grafts can be fragile initially, so avoid moving the plant too much until the graft union has formed a strong bond.
Troubleshooting Common Grafting Problems
While cleft grafting is generally reliable, some issues can still occur. Here are solutions to common problems:
- Scion Dried Out: If the scion dries out, it may be due to low humidity. Keep the graft in a humid environment, and consider covering it with a plastic bag if necessary (remove it occasionally to prevent overheating).
- Graft Failure: If the graft doesn’t take, the most common reasons are poor cambial contact or movement in the graft. Ensure a snug fit and rewrap if necessary.
- Mold or Rot: Mold can develop due to excessive moisture or poor airflow. Ensure the plant is stored in a location with adequate ventilation, and avoid overwatering.
- Slow Growth: If the graft grows slowly, it could be due to weak rootstock or scion. Select robust, healthy plant material for both parts to support strong growth.
Additional Grafting Techniques to Try
While cleft grafting is an excellent starting point, other methods can be useful for specific plants and situations. Consider trying these as you gain experience:
- Whip and Tongue Grafting: This method creates a more complex union and is often used for fruit trees due to its stability.
- Budding: This involves inserting a single bud rather than a scion and is great for plants with thinner stems or smaller buds.
- Approach Grafting: Two plants are joined side-by-side without detaching the scion, which is ideal for less hardy plants.
Benefits of Cleft Grafting for Home Gardeners
Cleft grafting is particularly useful for home gardeners because it:
- Saves Space: Allows for multiple varieties on a single rootstock, great for small gardens.
- Increases Resilience: Combines the hardiness of one rootstock with the desirable traits of another, enhancing disease resistance and growth potential.
- Promotes Diversity: Experimenting with grafting can lead to a more varied garden, as it’s possible to graft multiple varieties of the same plant species onto one rootstock.
Conclusion
Cleft grafting is a straightforward, effective technique with a high success rate, making it a fantastic choice for beginner and experienced gardeners alike. With the right preparation, tools, and post-graft care, you can master grafting to enhance your garden’s productivity, beauty, and diversity. This technique allows you to take control of your garden’s growth, combining the strength of one plant with the beauty or fruiting ability of another.
Ready to try your hand at cleft grafting? Share your grafting journey and success stories with us! 🌱 #GraftingSuccess #GardenersOfInstagram #GrowYourGarden #PlantPropagation #GardeningTips