
Grafting is a horticultural technique that has been used for centuries to propagate trees, enhance fruit production, and introduce new varieties. Among the numerous grafting methods available, the 3-flap grafting technique stands out as one of the most effective methods for pecan trees. This method ensures that the grafting union forms successfully, allowing the tree to grow vigorously and produce high-quality fruit. In this article, we will walk you through everything you need to know about 3-flap grafting for pecan trees, from understanding the basics of grafting to mastering the process itself.
What Is 3-Flap Grafting?
3-flap grafting is a method of budding or grafting where three vertical cuts are made on the rootstock, creating three flaps of bark that will hold the scion wood (the part of the tree that will grow into the new plant). This technique is particularly beneficial for pecan trees because it creates a stable and secure graft union, ensuring that the scion wood takes root and begins to grow.
The 3-flap grafting method has several advantages over other types of grafting, such as cleft grafting or whip-and-tongue grafting. The key benefits of 3-flap grafting include:
- Higher success rate: The method promotes better alignment of the cambium layers, which increases the chances of a successful graft.
- Stronger graft union: The three flaps provide a larger area for the scion to be securely attached to the rootstock.
- Faster healing: This grafting technique allows the tree to heal more quickly and resume growth sooner.
When Is the Best Time to Perform 3-Flap Grafting?
Timing is crucial when performing any grafting method, and 3-flap grafting is no exception. The best time to perform grafting on pecan trees is during early spring when the tree is actively growing and the sap flow is strong. This typically occurs after the danger of frost has passed but before the tree has fully leafed out.
Performing the graft when the tree is still in its dormant phase or when it is actively pushing out new growth helps ensure that the grafting process is more successful. This is because the rootstock and scion are in sync in terms of their metabolic activity, which increases the likelihood that the graft will successfully take.
Materials Needed for 3-Flap Grafting
Before you start grafting, gather all the necessary tools and materials. The following items are essential for performing 3-flap grafting on pecan trees:
- Sharp, clean grafting knife: The knife should be specifically designed for grafting to make clean, precise cuts.
- Grafting tape: This will be used to hold the graft securely in place while it heals.
- Grafting wax: Used to seal the graft site and prevent moisture loss and disease.
- Healthy scion wood: Choose a healthy piece of scion wood from a mature, disease-free pecan tree. The scion should have at least 3 buds.
- Rootstock: The rootstock is the tree that will provide the root system for the graft. Select a vigorous and disease-resistant rootstock that is compatible with pecan trees.
Steps to Perform 3-Flap Grafting on Pecan Trees
Now that you have your tools and materials ready, follow these steps to perform 3-flap grafting on your pecan trees:
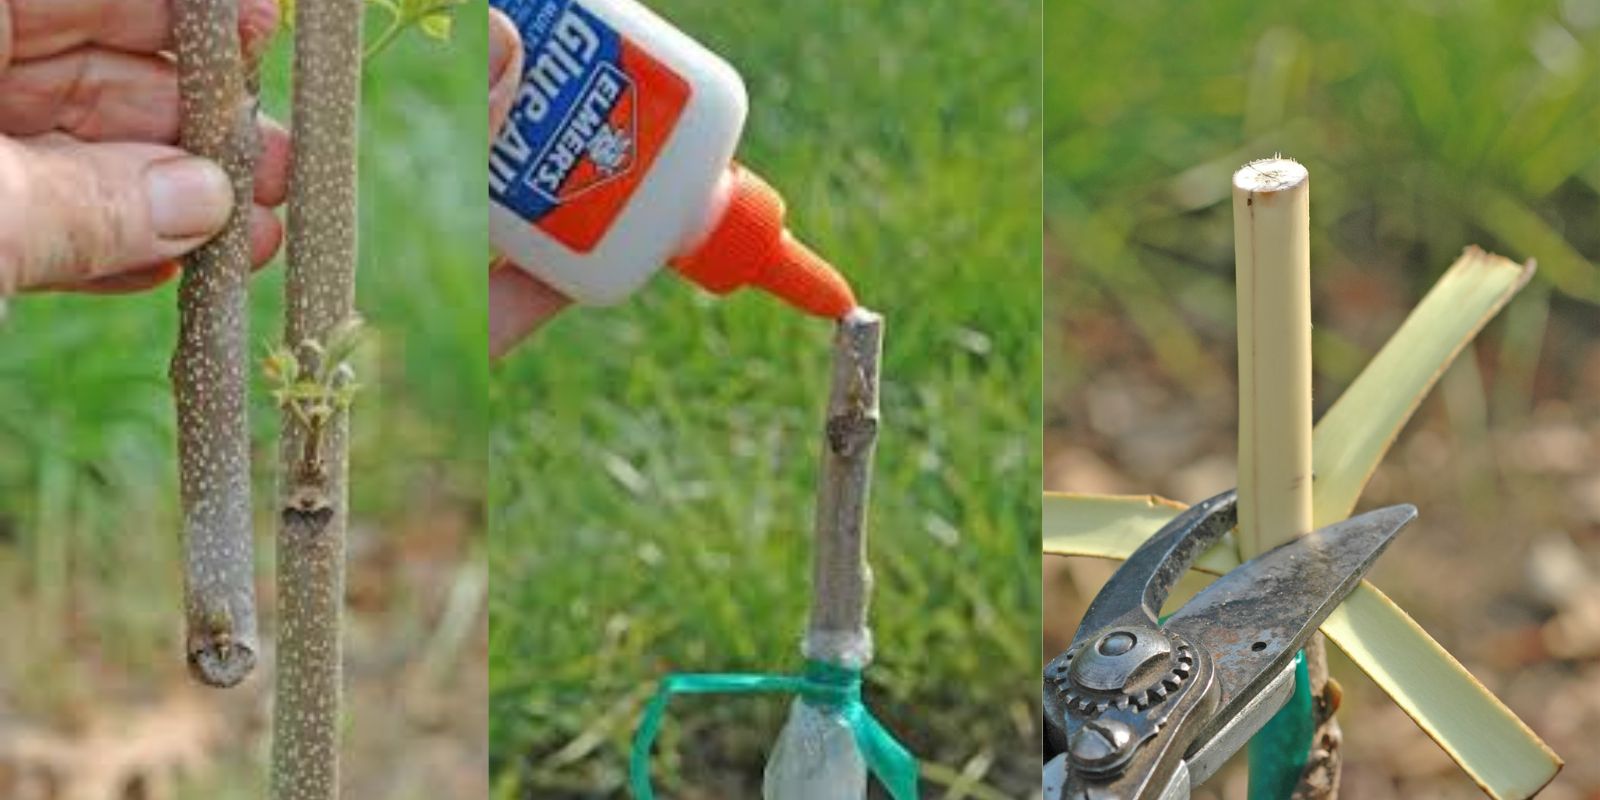
1. Prepare the Rootstock
Start by selecting a healthy rootstock that is approximately 1/2 to 1 inch in diameter. The rootstock should be free from diseases and pests. Using a sharp grafting knife, make three vertical cuts along the bark of the rootstock, approximately 1 inch long each. These cuts should be evenly spaced and create three flaps of bark that will be opened up to insert the scion wood.
2. Prepare the Scion Wood
Select scion wood from a mature pecan tree that is known for producing high-quality fruit. The scion wood should be 1/4 to 1/2 inch in diameter and have at least 3 healthy buds. Cut the scion wood to a length of about 4 to 6 inches.
3. Make the Graft Cuts
On the rootstock, use your grafting knife to make the three vertical cuts in the bark. Carefully peel back the flaps of bark to expose the cambium layer (the green tissue just under the bark). The cambium layers from the rootstock and scion must align perfectly for the graft to take successfully.
Next, make matching cuts on the base of the scion wood. These cuts should mirror the cuts on the rootstock, so the scion fits snugly inside the bark flaps of the rootstock. The cambium layers of the scion and rootstock should be in direct contact for successful grafting.
4. Insert the Scion Wood
Now it’s time to insert the scion wood into the prepared rootstock. Carefully place the scion into the three flaps of the rootstock, ensuring that the cambium layers of both the rootstock and scion are lined up as precisely as possible. The scion should fit snugly into the rootstock, with the cut surface of the scion making full contact with the cambium layer of the rootstock.
5. Secure the Graft
Once the scion is positioned correctly, use grafting tape to hold the three flaps of the rootstock tightly around the scion wood. Wrap the tape tightly but gently to secure the graft and prevent it from moving. The tape should be placed just above and below the grafting area to keep it in place during the healing process.
6. Seal the Graft
After securing the graft with tape, apply grafting wax to the entire graft site. This will help prevent moisture loss and protect the graft from disease. Be sure to cover all exposed areas, including the cut surfaces of the rootstock and scion wood.
7. Care for the Graft
After performing the graft, monitor the graft site carefully. Keep the area moist but not soggy, as excessive moisture can cause the graft to rot. You can water the tree gently to keep the graft hydrated, but avoid heavy watering that may disturb the graft. Additionally, protect the graft from extreme weather conditions, especially strong winds and direct sunlight, which can cause the graft to dry out prematurely.
8. Wait for the Graft to Heal
Give the graft time to heal and form a strong union. This typically takes 2 to 4 weeks. During this time, check the graft site regularly for signs of success, such as the scion wood starting to grow or the bark healing around the graft.
Once the graft has taken and new growth begins to appear on the scion, you can slowly remove the grafting tape. Allow the tree to continue growing until it is well-established and ready to be transplanted into your garden or orchard.
Tips for Success with 3-Flap Grafting
- Choose the right scion wood: Scion wood should come from a healthy tree with desirable characteristics such as high fruit production and resistance to diseases.
- Use sharp tools: Ensure your grafting knife is sharp and clean to make precise cuts that promote successful grafting.
- Protect the graft site: After grafting, make sure to protect the site from extreme weather and pests that may interfere with the healing process.
Benefits of 3-Flap Grafting on Pecan Trees
The 3-flap grafting method offers numerous benefits for pecan tree propagation and care. Some of the key advantages include:
- Faster growth: Grafting ensures that the scion wood is able to grow more quickly than growing from seed.
- Better fruit production: By selecting high-quality scion wood, you can ensure that your pecan trees produce better fruit more quickly.
- Disease resistance: Grafting onto disease-resistant rootstock helps protect the tree from various pests and diseases that could affect the root system.
Conclusion
3-flap grafting is an incredibly effective technique for propagating pecan trees. By following the steps outlined above, you can ensure that your grafting efforts will be successful, leading to healthy and productive trees. Remember that patience and attention to detail are key for successful grafting. With the right tools, preparation, and care, you’ll be able to enjoy your very own pecan trees in no time. Happy grafting!