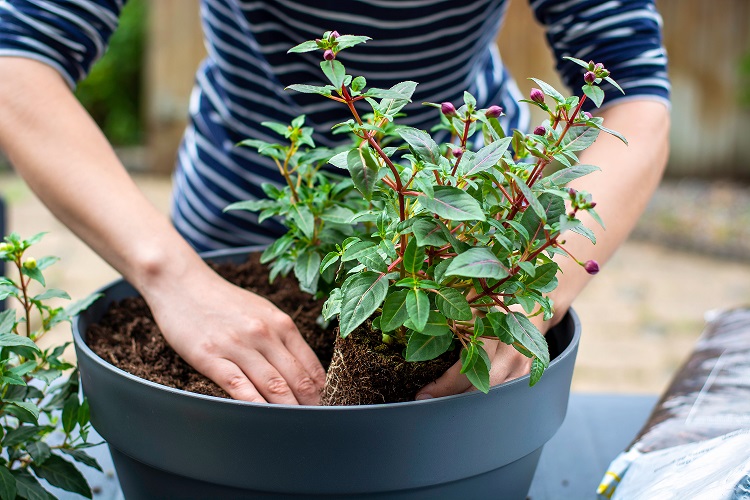
Whether you’re new to gardening or looking to refresh your green thumb skills, learning how to pot a plant is a fundamental step in creating a thriving indoor or outdoor garden. Potted plants bring beauty, freshness, and life to any space — from apartment balconies to home offices. But potting a plant correctly involves more than simply placing soil and a seedling into a container.In this guide, we’ll show you how to master the art of how to pot a plant like a pro — including step-by-step instructions, expert tips, and insights on choosing the right pot, soil, and watering techniques.Why Learning How to Pot a Plant MattersBefore you grab your trowel, it’s important to understand why potting properly makes such a difference. The process affects how well your plant grows, how strong its roots become, and how easily it absorbs nutrients and water. When you master the art of how to pot a plant, you give your greenery the foundation it needs to flourish.Incorrect potting often leads to:Root rot from poor drainageStunted growth due to compacted soilNutrient deficiencies from inadequate soil mixBy learning the correct technique, you’ll prevent these issues and ensure your plants grow vibrant, healthy, and long-lasting.Step 1: Choose the Right PotThe first step in mastering how to pot a plant is selecting the ideal container. Your pot is more than just décor — it’s your plant’s new home.Size and Material MatterSize: Choose a pot that’s 1–2 inches larger in diameter than your plant’s root ball. A pot that’s too large may cause water to pool and suffocate roots.Material:Terracotta pots are classic, breathable, and perfect for plants that prefer dry soil.Plastic pots retain moisture longer and are lightweight, ideal for beginners.Ceramic or glazed pots add style but may need extra attention to drainage.Drainage Is KeyAlways ensure your pot has drainage holes at the bottom. Without them, excess water can’t escape, leading to root rot — one of the most common beginner mistakes.If your favorite decorative pot doesn’t have holes, consider double potting: place your plant in a smaller plastic pot with drainage, then set that inside the decorative container.Step 2: Pick the Perfect Potting MixThe next step to master the art of how to pot a plant is choosing the right soil. Not all soil is created equal — using regular garden soil in a pot can compact easily and suffocate the roots.Use Potting Mix, Not Garden SoilOpt for a high-quality potting mix, which is specially designed to provide:Good drainageProper aerationBalanced nutrientsCustom Mixes for Different PlantsSucculents and cacti: Choose a sandy, fast-draining mix.Houseplants (like pothos or ferns): Use an all-purpose potting blend.Orchids: Need bark-based or lightweight mixes for air circulation.Vegetables and herbs: Go for nutrient-rich potting soil with compost or organic matter.You can also enhance your mix with perlite or coconut coir to improve aeration and water retention.Step 3: Prepare the PotBefore planting, prepare your pot properly. This step ensures your new plant settles into its new home comfortably.Add a drainage layer (optional): Some gardeners place small stones, gravel, or broken pottery at the bottom. This can help prevent soil from blocking drainage holes.Partially fill with potting mix: Add enough soil so that when the plant is placed inside, the top of its root ball sits about 1 inch below the rim of the pot. This space allows for easy watering later.Step 4: Remove and Loosen the PlantNow comes the most delicate part — transferring your plant into its new container.How to Remove the PlantGently squeeze or tap the sides of the old pot to loosen the soil.Carefully tip the plant out while supporting the base of the stem.Avoid pulling by the leaves, which can cause damage.Loosen the RootsIf the roots are tightly wound or circling the root ball, gently tease them apart with your fingers. This encourages them to spread out into the new soil rather than continuing to grow in a circle.Step 5: Position and FillPlace the plant in the center of your prepared pot. Adjust its height if needed by adding or removing soil beneath it.Then, fill around the sides with your potting mix, pressing lightly to remove air pockets. Don’t pack the soil too tightly — roots need space to breathe.When done, the plant should sit firmly but not buried. The soil should stop about an inch below the rim of the pot.Step 6: Water ThoroughlyAfter potting, give your plant a deep watering until water starts to drain from the bottom. This helps the soil settle around the roots and provides the moisture your plant needs to recover from the move.Let the excess water drain completely, and never leave your pot sitting in water for long periods.Step 7: Choose the Right LocationWhere you place your potted plant can make all the difference.Light: Match your plant’s needs — some prefer bright, direct sunlight, while others thrive in low light.Temperature: Avoid placing plants near drafts, heaters, or air conditioners.Humidity: Tropical plants benefit from misting or being grouped with others to increase humidity.By mastering these placement details, you truly master the art of how to pot a plant successfully.Practical Tips to Keep Your Potted Plants ThrivingEven after potting your plant, ongoing care is essential. Here are some expert tips to help your plants flourish year-round:1. Don’t OverwaterMost plant problems come from overwatering. Always check the top inch of soil — if it feels dry, it’s time to water.2. Feed Your PlantsUse a balanced liquid fertilizer every few weeks during the growing season (spring and summer). For low-maintenance care, choose slow-release pellets that provide nutrients over time.3. Repot When NeededPlants outgrow their pots over time. Signs that it’s time to repot include:Roots poking out of drainage holesSlower growthSoil drying out too quicklyRepot every 12–18 months or when you notice these signs.4. Clean and RotateWipe leaves occasionally to remove dust and help photosynthesis. Rotate your pots every few weeks to promote even growth toward the light.5. Add Mulch or Decorative StonesA thin layer of mulch or pebbles helps retain moisture, reduces soil splashing, and gives your pot a polished, finished look.Common Mistakes to Avoid When Potting a PlantEven seasoned gardeners can slip up. Here are a few pitfalls to watch for:Skipping drainage holes: Always ensure water can escape.Using the wrong soil: Garden soil compacts and suffocates roots in pots.Planting too deep: The base of the stem should sit at soil level, not buried.Ignoring sunlight needs: Each plant has its own lighting requirements.Avoiding these errors will keep your plants healthy and thriving.Conclusion: Bring Life to Your Space with Potted PlantsWhen you master the art of how to pot a plant, you unlock one of the most satisfying parts of gardening. From choosing the perfect pot to providing the right soil, every step helps your plants grow stronger and more beautiful.Whether you’re decorating a cozy apartment balcony, a sunny windowsill, or a lush backyard patio, properly potted plants will reward you with vibrant growth and natural charm all year long.So grab your pot, your favorite plant, and some rich potting mix — and get ready to master the art of how to pot a plant today. Your green oasis awaits! 🌿