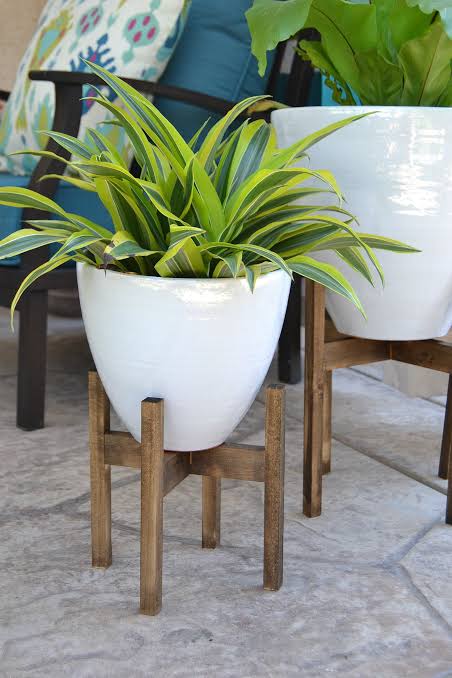
If you love houseplants, you know that displaying them beautifully is just as important as keeping them healthy. A plant stand isn’t just a piece of décor — it’s a clever way to give your greenery the spotlight it deserves while saving floor space and adding personality to your home. Whether you’re a beginner DIYer or just looking for inspiration, this guide will show you how to make a plant stand easily, affordably, and stylishly!Let’s dive into everything you need to know — from materials to design ideas — to make your very own plant stand. 🌱✨🌼 Why Make Your Own Plant Stand?Building a DIY plant stand has several benefits:🌿 Cost-effective: Create beautiful stands for a fraction of store prices.🌸 Customizable: Choose materials, colors, and sizes to suit your space.🌞 Functional décor: Elevate your plants for better sunlight exposure.🌻 Sustainable: Reuse scrap wood or metal for an eco-friendly project.💚 Creative satisfaction: There’s something special about displaying plants on a piece you built yourself!So, whether you’re crafting a modern corner stand, a rustic tiered setup, or a simple wooden riser, you’ll be surprised how easy it is to make one.🪴 What You’ll NeedBefore you begin, gather these basic materials (you can adjust them based on your design):Materials:Wooden boards or planks (pine, oak, or plywood)Screws or nailsWood glue (optional for extra stability)Sandpaper (medium and fine grit)Paint, stain, or clear varnishMeasuring tapeDrill and screwdriverSaw (hand saw or circular saw)💡 Optional extras: Metal brackets, decorative legs, casters for mobility, or rope for hanging plant stands.🌿 Step-by-Step Guide: How to Make a Simple Wooden Plant StandHere’s an easy DIY project that takes just a couple of hours and looks great indoors or outdoors.Step 1: Measure and Cut the WoodDecide how tall and wide you want your stand to be. For example:Height: 18 inches (great for small plants)Top platform: 12 × 12 inchesCut four legs of equal length and one square or circular top piece.💡 Tip: Use leftover wood or reclaimed boards for a rustic look.Step 2: Sand All PiecesSmooth all edges using medium-grit sandpaper, then finish with fine-grit. This ensures your plant stand looks polished and prevents splinters.Step 3: Assemble the FrameAttach the four legs to the underside of the top board using screws or nails.For better stability, angle the legs slightly outward.Add wood glue at the joints before screwing for a secure hold.If you’re making a taller stand, you can add crossbars near the base for extra support.Step 4: Paint or StainOnce assembled, it’s time to decorate!For modern décor: Use matte black, white, or pastel paint.For a rustic style: Apply a light stain and seal with varnish.For boho vibes: Try colorful paint or wrap the legs in jute rope.Let it dry completely before adding your plants.Step 5: Add Finishing TouchesStick felt pads under the legs to protect your floor. You can also add small hooks on the sides to hang mini planters or macramé decorations.Congratulations — your handmade plant stand is ready to shine! 🌸🌺 Creative DIY Plant Stand IdeasIf you want to take your project up a notch, here are some creative and easy variations:1. Tiered Plant StandPerfect for displaying multiple plants!Stack shelves at different heights.Use ladder-style supports or repurpose an old wooden ladder.2. Hanging Plant StandFor small spaces, try hanging planters using rope or macramé.Hang from the ceiling or a sturdy wall bracket.Combine with a wooden base for balance.3. Industrial Metal StandIf you love a modern aesthetic, mix wood with metal.Use metal pipes for legs and a wooden top for a chic, durable look.4. Corner Plant ShelfMake the most of unused corners by building an angled shelf unit.Great for apartments or small rooms.5. Recycled Materials StandUpcycle old stools, crates, or pallets.Paint and repurpose them into unique, eco-friendly stands.🌿 Pro Tips for Success✅ Measure twice, cut once: Accuracy ensures balance and stability.✅ Test for weight: Make sure your stand can hold your heaviest pot.✅ Use outdoor sealant: If the stand will sit on a patio or balcony, protect it from moisture.✅ Mix materials: Combine wood, metal, or even concrete for a stylish modern touch.✅ Keep it level: Check the balance before painting or staining.🌼 Styling Your Plant StandNow that you’ve built your masterpiece, it’s time to style it!🌿 Plant Pairings:Mix tall plants (like snake plants) with trailing ones (like pothos or ivy).Use pots of varying shapes, colors, and textures.🌸 Placement Ideas:Near windows for natural light.On patios or porches for outdoor greenery.In corners or hallways to fill empty space.💡 Tip: Group plants with similar light and water needs to make care easier.🌻 Easy MaintenanceTo keep your plant stand looking great:Wipe down regularly to remove dust and water stains.Reapply varnish or paint yearly for outdoor stands.Check for loose screws or signs of wear.A little upkeep goes a long way in keeping your stand sturdy and beautiful for years to come.🌿 Final ThoughtsMaking your own plant stand is a simple, rewarding DIY project that adds instant charm and functionality to your home. With just a few tools and a bit of creativity, you can craft a stand that perfectly fits your style — from rustic farmhouse to sleek modern.So grab your materials, roll up your sleeves, and bring your plants to new heights — literally! You’ll love how easy and satisfying it is to create a stunning display that shows off your green thumb. 🌸🌿