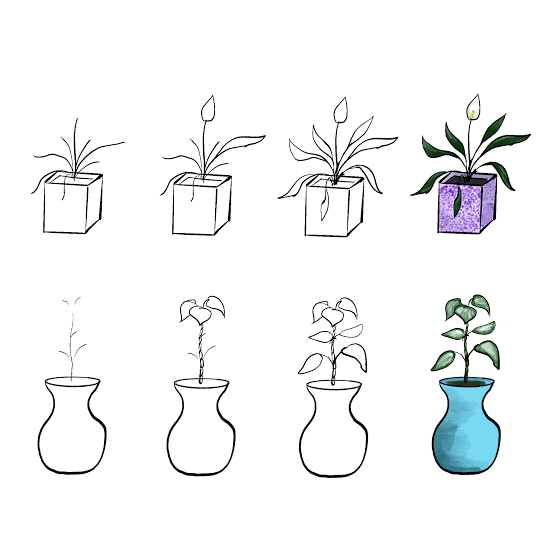
Drawing plants is one of the most relaxing and rewarding creative hobbies you can try. Whether you’re an absolute beginner or someone who loves sketching nature, learning how to draw a plant step by step can help you connect with the natural world while improving your artistic skills.In this guide, we’ll make it simple and fun. You’ll discover how to make it easy: how to draw a plant step by step! using basic shapes, light pencil strokes, and layering techniques. By the end, you’ll be able to create beautiful plant sketches — from leafy stems to detailed potted plants — with confidence and ease.Let’s grab a pencil, sit by a sunny window, and begin your creative journey!🌿 Why Learn to Draw Plants?Plants make perfect drawing subjects because they combine simplicity with endless variety. From tall trees to tiny succulents, each plant has unique shapes, textures, and patterns that inspire creativity.Here are a few reasons why people love learning how to draw a plant step by step:Relaxation: Drawing helps calm your mind and focus your thoughts.Observation skills: You’ll learn to see details — leaf veins, light, and shadows.Creativity boost: Experiment with different plant types and artistic styles.Decorative art: Use your drawings for wall art, cards, or journal pages.Whether you’re sketching for fun, school, or design work, this guide will help you make it easy: how to draw a plant step by step!✏️ Materials You’ll NeedBefore you start, gather these simple supplies — most of which you may already have at home:Pencil (HB or 2B): Great for light sketching.Eraser: To correct shapes as you refine your drawing.Sharpener: A fine pencil tip gives better line control.Sketchbook or plain paper: Use smooth, good-quality paper for clean lines.Optional: Colored pencils, fine liners, or watercolor paints for adding color later.That’s it! You don’t need fancy art tools — just a bit of patience and curiosity to explore how to draw a plant step by step.🌱 Step-by-Step: How to Draw a Simple PlantWe’ll start with a classic subject — a small potted plant. Follow these steps carefully, and by the end, you’ll have your first realistic plant drawing.Step 1: Sketch the PotBegin with a light pencil line to draw an oval at the bottom — this forms the pot’s opening.Draw two slightly curved lines down from each side of the oval.Connect them with a curved line at the base to create the pot’s shape.Add a second curved line inside the top oval to show thickness or depth.You’ve just created the foundation of your potted plant — simple and clean!Step 2: Draw the StemNow that you have your pot, let’s grow your plant upward.From the center of the pot, draw a vertical line for the main stem.Make it slightly curved — plants rarely grow in perfect straight lines.Add a few small branches coming out from the main stem at gentle angles.This gives your drawing a natural, organic feel.Step 3: Add the LeavesThis is where your plant comes to life!On each branch, sketch simple leaf shapes — elongated ovals or teardrops.Draw them in pairs or alternating on each side of the stem.Vary their direction slightly — some pointing up, others sideways.Keep your strokes light at first, so you can adjust the shape easily.For realism, make the leaves near the top a bit smaller than those near the bottom.Step 4: Add DetailsInside each leaf, draw a central vein running down the middle.Add smaller side veins branching off.Lightly shade one side of each leaf to show depth and light direction.You can also add little imperfections — a tiny curve or nick makes it look more real.These details make your sketch look professional while staying easy.Step 5: Add Soil and TextureInside the pot, draw a slightly curved soil line just below the rim.Add light texture with small dots or lines to suggest pebbles or dirt.To give dimension, lightly shade the side of the pot opposite your light source.Now your plant looks grounded and complete!Step 6: Refine and OutlineOnce you’re happy with your sketch:Go over your final lines with a darker pencil or fine liner.Erase any extra construction lines.Add shadows beneath the pot to give it a realistic base.You’ve now learned how to draw a plant step by step — and it looks great!🎨 Optional: Add ColorColoring brings warmth and life to your drawing. You can use colored pencils, markers, or watercolors.Here’s how to keep it simple:Leaves: Blend two greens — a light green for highlights and a darker green for shadows.Stem: Use a slightly brown-green mix for a natural look.Pot: Choose earthy tones (terracotta, beige, or gray). Add soft shading for realism.Background: Leave white or lightly color with soft sky tones for contrast.This step is optional, but coloring transforms your sketch from a study into artwork.🌾 Simple Tricks to Improve Your Plant DrawingsOnce you’ve mastered the basics, try these simple tricks to improve your technique and style:1. Observe Real PlantsNothing beats drawing from life. Sit near a window or in your garden and observe how leaves curve, twist, and catch the light.2. Use Reference PhotosIf you can’t draw from real plants, use high-quality reference images. Look for photos with clear lighting and visible textures.3. Practice Different Plant TypesTry sketching succulents, vines, flowers, or trees. Each type teaches you new shapes and patterns.4. Experiment with Line WeightUse lighter lines for delicate leaves and thicker ones for stems. It adds depth and variety.5. Try Shading TechniquesPractice hatching, cross-hatching, or stippling to create texture and shadow without heavy coloring.6. Keep PracticingThe more you draw, the better your control and observation become. Try one plant a day — it’s relaxing and fun!🌸 Drawing Different Types of PlantsOnce you’re comfortable, branch out (pun intended!) and draw other plant styles:SucculentRound, thick leaves arranged in rosettes — great for shading practice.CactusUse simple cylinders with spikes and small flowers for detail.Flowering PlantAdd blossoms to your stems using basic petal shapes — like daisies or tulips.Hanging PlantDraw long, cascading vines spilling from the pot — adds dynamic movement to your drawing.Exploring these variations helps you understand plant structure and expand your creativity.🌻 Common Mistakes to AvoidEven simple drawings can go wrong without a few precautions. Here are common pitfalls and how to avoid them:Pressing too hard: Light strokes let you erase easily.Ignoring symmetry: Step back occasionally to check balance.Over-detailing early: Build layers gradually — don’t rush.Skipping shading: Even basic shading makes a huge difference.Not enjoying the process: Relax! Art is about expression, not perfection.Remember, it’s okay if your first drawing isn’t perfect. Every sketch is progress.🌼 Benefits of Learning How to Draw PlantsMastering how to draw a plant step by step offers more than artistic satisfaction — it’s also good for your well-being.Boosts mindfulness: Focused drawing helps reduce stress.Improves coordination: You’ll train your eye and hand to work together.Enhances creativity: Encourages experimenting with form and color.Creates beauty: You can decorate journals, notebooks, or even gifts with your drawings.It’s a relaxing skill you can enjoy anywhere — in your sketchbook, at the park, or even on a rainy afternoon.🌺 Conclusion: Anyone Can Draw Plants!And there you have it — your complete guide to Make It Easy: How to Draw a Plant Step by Step!You’ve learned the basics of structure, proportion, shading, and creativity — all while discovering the joy of drawing nature. With regular practice, you’ll soon be able to sketch plants from imagination, design botanical art, or even decorate your space with your own creations.Remember: start simple, be patient, and have fun. Nature doesn’t rush — and neither should you. So, grab your pencil and start drawing your way into a greener, more creative world!