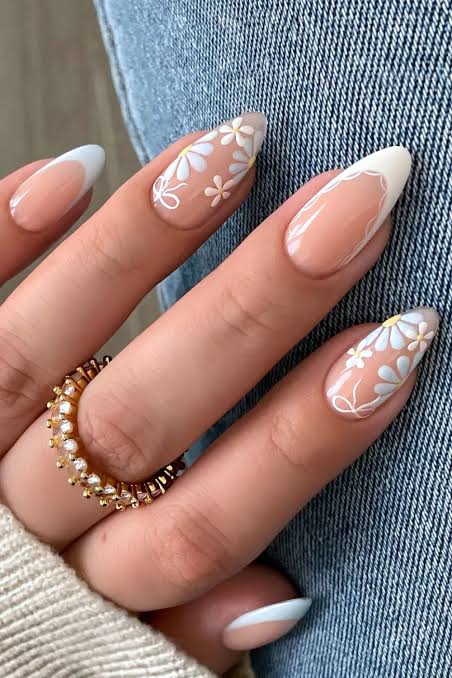
If you’re looking for a chic, timeless manicure that combines elegance with a playful touch, then Make it easy: French tip with flowers! is the perfect nail art trend for you. French tips have long been a classic staple in the world of nail design, symbolizing simplicity and sophistication. Adding delicate floral designs elevates the style, transforming it into a versatile, eye-catching manicure suitable for daily wear, special occasions, or even weddings.In this guide, we’ll break down how to achieve a French tip with flowers at home quickly and easily. From selecting the right tools and colors to step-by-step techniques and professional tips, this article covers everything you need to master this feminine and elegant look. By the end, you’ll be able to create a stunning manicure that looks like it came straight from a nail salon—all from the comfort of your home.Why Choose a French Tip with Flowers?French tips are renowned for their clean, polished look. They are versatile, matching any outfit or style. When combined with floral designs, they offer several advantages:Elegance meets creativity: A French tip provides the classic framework, while flowers add a touch of artistry.Customization: You can vary colors, flower types, and placement for a unique manicure every time.Suitable for all occasions: Perfect for weddings, brunches, office wear, or casual outings.Beginner-friendly: With the right tools and a few simple techniques, even beginners can achieve professional-looking results.Whether you are a nail art enthusiast or a novice, learning how to Make it easy: French tip with flowers! can elevate your style and boost your confidence.Materials You’ll Need for a French Tip with FlowersBefore starting, gather all necessary tools to ensure a smooth process. Here’s a detailed list:Essential Nail ProductsBase coat to protect nails and ensure polish longevityWhite nail polish for the classic French tipLight pink or nude polish for the nail baseTop coat for shine and durabilityTools for Flower DesignsNail art brushes (fine detail brush or striping brush)Dotting tools for creating petals and flower centersToothpick (optional, for very small details)Acrylic paints or colored nail polish for flowersNail stickers or decals (optional for a faster method)Additional ItemsNail polish remover and cotton swabs for cleanupNail file and bufferCuticle pusher and trimmerHaving the right materials ready is key to making a French tip with flowers easy and enjoyable.Step-by-Step Guide: Make It Easy: French Tip with Flowers!Creating this elegant nail design can be simple if you follow the steps below.Step 1: Prepare Your NailsRemove any old polish and clean your nails thoroughly.File and shape your nails to your desired length and shape (square, almond, or oval).Gently push back your cuticles and remove any excess.Apply a base coat to protect your nails and help the polish adhere evenly.Proper nail preparation ensures your manicure lasts longer and looks professional.Step 2: Apply the Base ColorApply a nude or light pink polish to all nails.Allow the first layer to dry completely before applying a second coat if needed.The base color creates a smooth, elegant canvas for both the French tip and floral designs.Step 3: Create the French TipUse white nail polish to paint the tip of each nail. You can freehand the line or use nail guide stickers for precision.Make sure the line is thin and even across all nails for a classic look.Allow the French tips to dry completely before moving to floral designs.French tips provide a clean and timeless look, forming the foundation for the flowers.Step 4: Add the Floral DesignsUsing a fine nail art brush or dotting tool, create small flower petals near the tips or corners of the nail.Typically, 3–5 petals form a simple yet elegant flower.Add a small dot of a contrasting color in the center to complete the flower.Repeat for each nail, varying the position and color of the flowers for a natural, whimsical look.Optional: Add tiny leaves or additional details for a more intricate design.This step transforms a simple French tip into a personalized, artistic manicure.Step 5: Seal the DesignApply a clear top coat to protect your nail art and add shine.Allow nails to dry completely.Sealing your manicure ensures durability and keeps your flowers looking fresh and vibrant.Creative Variations of French Tip with FlowersOne of the best aspects of Make it easy: French tip with flowers! is its versatility. You can adapt the design to suit different styles and occasions.1. Pastel Flower French TipsUse soft pastel colors for a delicate, spring-inspired look. Perfect for weddings or Easter celebrations.2. Bold and BrightChoose vivid flower colors for a playful, summery vibe. Ideal for casual outings or festivals.3. Minimalist DesignAdd a single small flower to one or two accent nails while keeping the other nails classic French tips.4. Glitter and SparkleAdd a subtle glitter overlay on the tips or flower petals to create a glamorous effect.5. Seasonal ThemesSpring: Cherry blossoms in pink and whiteSummer: Tropical flowers in bright yellows and orangesAutumn: Deep reds and burnt orangesWinter: Snowflake-inspired flower designs in silver or whiteThese variations allow you to refresh your manicure for any season or event while keeping it elegant.Practical Tips for the Perfect French Tip with FlowersTo ensure your manicure looks professional and lasts longer, follow these tips:1. Work Slowly and SteadilyTake your time with the flower petals. Precision matters more than speed.2. Use Fast-Drying PolishesFast-drying nail polishes reduce smudging and speed up your process.3. Clean Up Mistakes QuicklyUse a small brush dipped in nail polish remover to correct any stray lines.4. Layering TipsAllow each layer (base, tips, flowers) to dry completely before adding the next to prevent smudging.5. Practice on PaperIf you’re new to nail art, practice flower designs on paper or a plastic surface first.6. Nail Stickers for BeginnersIf hand-painting flowers seems daunting, opt for flower decals or stickers—they’re fast, easy, and look professional.7. Protect Your ManicureWear gloves when doing chores and apply a fresh layer of top coat every 2–3 days for longevity.By following these practical tips, you can confidently Make it easy: French tip with flowers! at home without stress.ConclusionA French tip is a timeless classic, but adding delicate floral designs transforms it into a charming, versatile manicure that suits any occasion. With this guide, you now know how to Make it easy: French tip with flowers! using simple tools, step-by-step techniques, and practical tips.Whether you prefer soft pastels, bold hues, minimalist designs, or glitter accents, this style can be customized to reflect your personal taste. Perfect for beginners and nail art enthusiasts alike, the French tip with flowers is an elegant, fun, and professional-looking manicure you can achieve from the comfort of your home.By practicing and experimenting with colors, flower placements, and creative variations, you can elevate your nail game and create a manicure that is both stylish and uniquely yours. Try it today, and enjoy a beautiful, eye-catching look that is perfect for everyday wear or special events in the U.S., U.K., and Canada.