
In the world of gardening, innovation is key, especially for those with limited space. The “Seed Snail Growing Method” is an ingenious approach that allows gardeners to maximize their harvest while minimizing the required area. Whether you’re working with a small balcony, an urban patio, or an indoor setup, this method offers a simple yet highly effective way to grow a variety of plants in a creative, space-efficient manner.
This article explores everything you need to know about the Seed Snail Growing Method, from preparation to harvesting, ensuring that even beginner gardeners can achieve big results in small spaces.
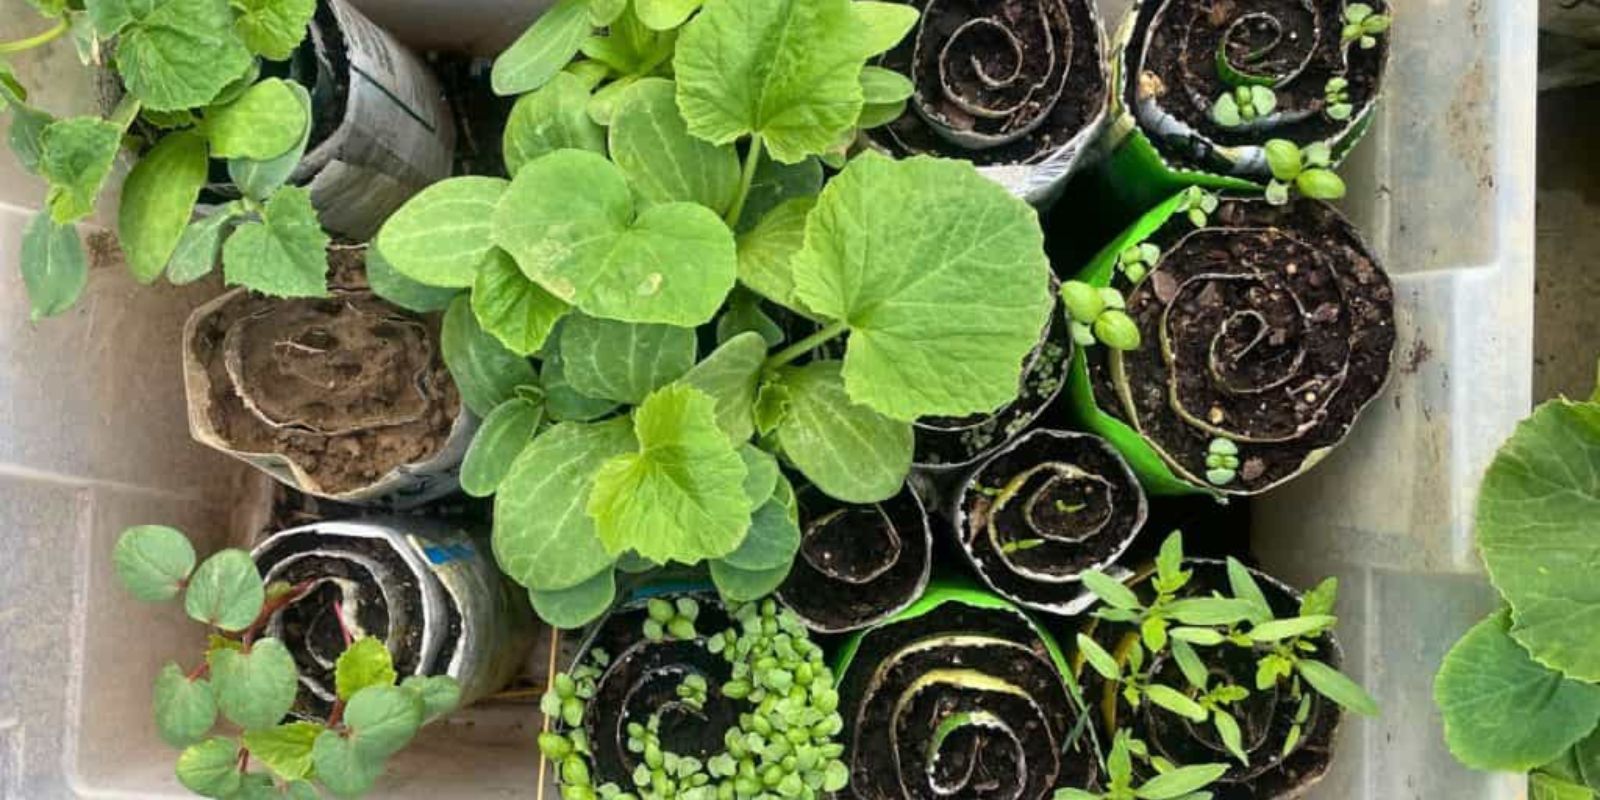
What Is the Seed Snail Growing Method?
The Seed Snail Growing Method derives its name from the unique spiral shape formed during the planting process. By rolling soil, seeds, and planting medium into a compact “snail” shape, gardeners can grow multiple plants in a single, confined area. This technique not only saves space but also simplifies watering, sunlight exposure, and maintenance.
Perfect for growing herbs, leafy greens, and even small-rooted vegetables, the Seed Snail method is a game-changer for urban gardeners and anyone looking to maximize their planting potential.
Benefits of the Seed Snail Growing Method
- Space Efficiency:
The compact snail design allows you to grow more plants in less space, making it ideal for apartments, balconies, or indoor setups. - Easy Maintenance:
Watering and fertilizing are simplified as the snail shape ensures even distribution of nutrients and moisture. - Versatility:
This method is suitable for various plants, including herbs, lettuces, spinach, and even certain flowers. - Sustainability:
By using reusable materials like felt or plastic sheeting, you can reduce waste and contribute to eco-friendly gardening. - Aesthetic Appeal:
The unique snail-like structure adds a decorative element to your garden, making it visually appealing while functional.
How to Create Your Seed Snail Garden
Step 1: Gather Your Materials
To get started, you’ll need:
- A long, flexible material such as plastic sheeting, fabric, or felt.
- A planting medium like soil or coco peat.
- Seeds of your choice (herbs, greens, or small-rooted vegetables).
- A shallow container or tray for stability.
- String, clips, or rubber bands to secure the snail structure.
Step 2: Prepare the Strip
Lay the flexible strip flat on a table or ground. Ensure it’s clean and wide enough to hold a layer of soil and seeds.
Step 3: Add the Planting Medium
Spread a thin layer of your planting medium evenly along the length of the strip. Avoid making it too thick to ensure the snail can roll properly.
Step 4: Sprinkle Seeds
Scatter seeds along the soil layer. Space them appropriately to allow room for growth, ensuring they don’t overcrowd each other.
Step 5: Roll the Snail
Starting at one end of the strip, gently roll it up like a sleeping bag, forming a spiral shape. Secure the roll using string, clips, or small rubber bands to hold the snail in place.
Step 6: Position in a Container
Place the rolled snail upright in a shallow container or tray. Ensure the container has good drainage to prevent waterlogging.
Step 7: Water and Care
Water the snail gently, ensuring the planting medium remains moist but not soggy. Place the container in a location with adequate sunlight or under grow lights if indoors.
Step 8: Watch It Grow
As the seeds germinate and plants start to grow, monitor their progress. Water as needed and provide additional nutrients through compost tea or liquid fertilizers.
Pro Tips for Success
- Choose the Right Plants: Opt for fast-growing, small-rooted plants like herbs, lettuce, or spinach for best results.
- Optimize Sunlight: Rotate the snail periodically to ensure all sides receive equal sunlight.
- Reuse and Recycle: Use old fabric, plastic, or any other reusable materials to make your snail eco-friendly.
- Monitor Moisture: Overwatering can lead to mold or rot, so check the moisture levels regularly.
Common Challenges and How to Overcome Them
- Overcrowding:
If plants are too close, thin them out after germination to prevent competition for nutrients. - Dry Edges:
Ensure even watering by using a spray bottle or a drip system for better moisture distribution. - Lack of Stability:
Use a sturdy container to keep the snail upright, especially in windy outdoor conditions. - Pest Control:
Keep an eye out for pests and treat them with organic solutions like neem oil if necessary.
Harvesting and Replanting
Once your plants reach maturity, begin harvesting leaves or vegetables as needed. The beauty of this method lies in its ability to regrow; for example, harvesting lettuce leaves allows the plant to continue producing. After the growing season, unroll the snail, compost the used soil, and start fresh with new seeds for continuous gardening.
Why You Should Try the Seed Snail Method
This innovative approach combines space efficiency with sustainability, making gardening accessible to everyone, regardless of space or skill level. It’s a fun and creative way to grow fresh produce, reduce your carbon footprint, and enjoy the satisfaction of cultivating your own food.
Conclusion
The Seed Snail Growing Method is perfect for gardeners of all levels, especially those with limited space. Its compact, efficient design ensures big results without requiring extensive resources or effort. Whether you’re growing fresh herbs for your kitchen or leafy greens for salads, this method is a rewarding way to embrace sustainable gardening.
Ready to roll up your gardening sleeves and try the Seed Snail Method? Let us know how it works for you! Share your experience and tips in the comments below!
🌟 #SpaceSavingGardening #SeedSnailMethod #DIYGarden #GrowYourOwnFood #GardeningInnovations