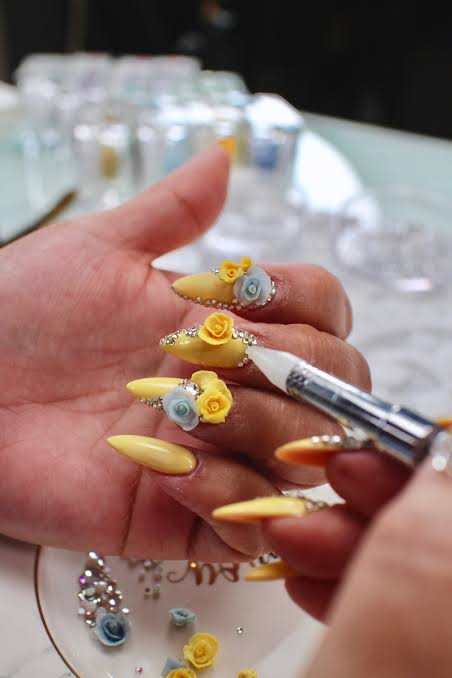
Acrylic flowers on nails are a timeless nail art technique that adds dimension, elegance, and artistry to any manicure. From soft bridal designs to bold statement nails, 3D acrylic flowers instantly elevate your look. The good news? Once you learn the secrets behind them, they’re far easier to create than they look.This guide is perfect for nail enthusiasts and aspiring nail techs in the United States, United Kingdom, and Canada.What Are Acrylic Flowers on Nails?Acrylic flowers are 3D nail art designs created using colored acrylic powder and liquid monomer. Unlike flat nail art, these flowers are sculpted directly onto the nail, giving them a raised, realistic appearance.They’re commonly seen in:Bridal nailsProm and special-occasion setsLuxury acrylic manicuresCompetition nail artWhy Acrylic Flowers Are So PopularElegant and eye-catchingFully customizable in color and sizeLong-lasting when done correctlyPerfect for special occasionsShowcase advanced nail artistryLearning acrylic flowers on nails sets your nail game apart instantly.The Biggest Secret: Acrylic ConsistencyPerfect Bead = Perfect Flower 🌸The #1 secret to beautiful acrylic flowers on nails is getting the acrylic bead consistency right.Too wet → flower spreads and loses shapeToo dry → acrylic becomes crumblyPerfect bead → smooth, moldable, and soft👉 The bead should look satin-matte, not shiny or chalky.Tools You’ll NeedTo create acrylic flowers successfully, gather these essentials:Acrylic powder (white, nude, or colored)Liquid monomerAcrylic brush (size 8–10 works well)Dappen dishNail file and bufferBase color (gel or acrylic)Top coat (optional—many leave flowers matte)Step-by-Step: How to Create Acrylic Flowers on NailsStep 1: Prep the NailShape and buff the nailApply base color and cure if using gelLightly remove shine where the flower will sitStep 2: Pick Up an Acrylic BeadDip your brush into monomer, then lightly into acrylic powder.Let the bead settle until it reaches the right consistency.Step 3: Place the BeadPlace the bead gently onto the nail where you want the petal.Step 4: Shape the PetalsUsing the tip of your brush:Press lightlyFan out the acrylicCreate petal shapesRepeat for each petal, working quickly before acrylic sets.Step 5: Build the CenterAdd a tiny bead in the center of the flower for dimension.You can also add rhinestones or pearls.Pro Tips for Perfect Acrylic FlowersWork on one petal at a timeClean your brush between petalsUse light pressure—let acrylic do the workPractice on nail tips before clientsStart with simple 5-petal flowersColor & Design IdeasClassic white flowers on nude nailsPastel florals for springBold red or black flowers for statement setsOmbre petals for depthMatte flowers with glossy nailsAcrylic flowers pair beautifully with French tips and baby boomer nails.Common Mistakes to AvoidRushing the beadUsing too much monomerOverworking the acrylicMaking flowers too thickSkipping nail prepPatience is key to mastering acrylic flowers on nails.How Long Do Acrylic Flowers Last?With proper application:2–3 weeks on acrylic setsUntil infill or removalSecure and chip-resistantAvoid sealing thick flowers with top coat unless needed.Practice Makes PerfectThe real secret to acrylic flowers on nails? Practice.Each bead teaches control, timing, and precision. Even professionals practiced dozens of flowers before mastering the technique.ConclusionNow that you’ve learned the secret to acrylic flowers on nails, you’re one step closer to creating salon-quality, show-stopping manicures. With the right bead consistency, proper tools, and a little patience, you can sculpt stunning 3D florals that turn nails into wearable art.Start simple, practice often, and let your creativity bloom 💅🌸