
Composting is a gardener’s best friend, turning kitchen scraps and garden waste into rich, organic matter that nourishes the soil. But when winter arrives, traditional composting methods can slow down due to cold temperatures. Fortunately, trench composting provides an easy and effective solution to continue composting even in the chilliest months.
This method, which involves burying organic waste directly in the soil, bypasses the need for a compost bin or pile. It’s a low-maintenance, odor-free, and environmentally friendly way to enrich your garden while winter sets in.
Let’s explore the step-by-step process of trench composting, its benefits, and how you can start doing it this winter.
What is Trench Composting?
Trench composting is a method where organic materials are buried in trenches or holes directly in your garden. Over time, the scraps break down, enriching the surrounding soil with nutrients. This technique works well in winter since the underground temperature is warmer and more stable, allowing decomposition to continue slowly.
Unlike traditional compost piles, trench composting requires no turning, monitoring, or worrying about pest infestations. It’s a set-it-and-forget-it method, ideal for gardeners who want to compost with minimal effort.
Benefits of Trench Composting in Winter
- Minimal Effort: No need to turn a pile or maintain a bin. Simply bury the scraps and let nature do the rest.
- Odor-Free: Trench composting eliminates odors since the organic matter is covered with soil.
- Pest Prevention: Burying scraps keeps them out of reach of pests like raccoons and rodents.
- Soil Enrichment: As the waste decomposes, it improves soil fertility and structure, preparing your garden for spring planting.
- Year-Round Composting: This method allows you to compost even when outdoor bins slow down due to freezing temperatures.
How to Trench Compost in Winter
Step 1: Choose a Location
Select a spot in your garden where you want to improve the soil. It can be a vegetable bed, flower garden, or a fallow area you’ll plant in spring.
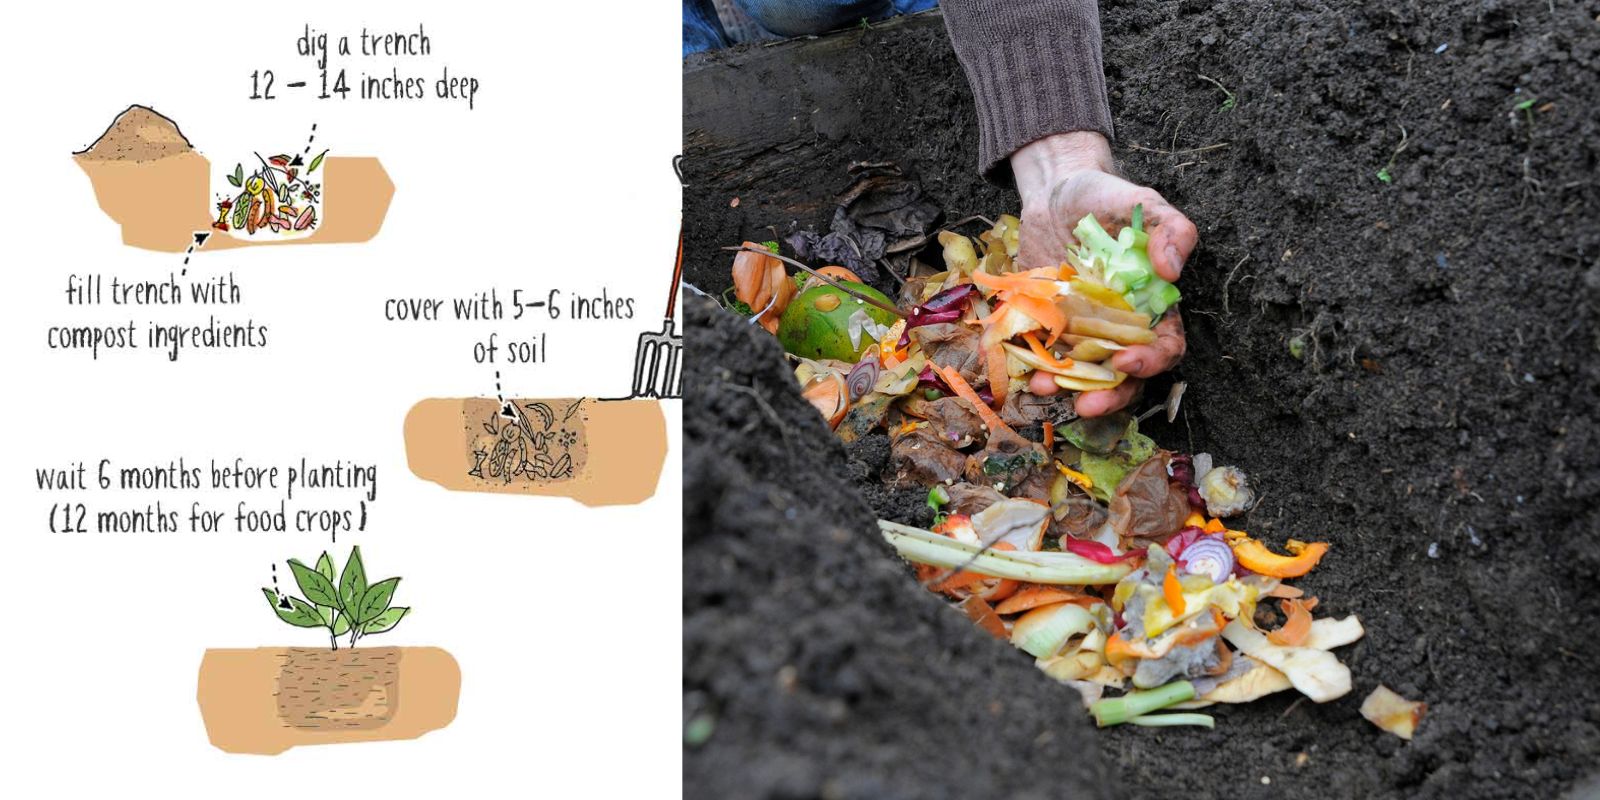
Step 2: Dig a Trench or Hole
Using a shovel, dig a trench about 12 inches deep and as long as needed to accommodate your scraps. Alternatively, dig individual holes for smaller batches of waste. The depth ensures the scraps are insulated from freezing temperatures and hidden from pests.
Step 3: Add Organic Material
Layer your kitchen scraps and garden waste into the trench. Acceptable materials include:
- Fruit and vegetable peels
- Coffee grounds and tea bags
- Crushed eggshells
- Shredded paper or cardboard (as a carbon source)
Avoid adding meat, dairy, or oily foods, as they can attract pests and take longer to break down.
Step 4: Cover with Soil
Once the trench is filled with scraps, cover it with the soil you dug out earlier. Make sure the soil layer is thick enough (about 6 inches) to insulate the waste and prevent animals from digging it up.
Step 5: Let It Decompose
Allow the buried scraps to decompose over the winter. By the time spring arrives, the organic matter will have broken down, enriching your soil with nutrients and improving its structure.
Tips for Successful Winter Trench Composting
- Plan Ahead: If you know you’ll need compost-rich soil in a specific area for spring planting, start trench composting there in winter.
- Rotate Trenches: To avoid overloading one spot, rotate where you trench compost throughout your garden.
- Chop Scraps into Smaller Pieces: Smaller pieces decompose faster, even in cold weather.
- Add a Carbon Source: Balance nitrogen-rich scraps with carbon-rich materials like shredded leaves or paper to speed up decomposition.
- Mark Your Trenches: Use stakes or markers to remember where you’ve buried scraps to avoid disturbing them prematurely.
Common Mistakes to Avoid
- Shallow Trenches: Digging too shallow may attract pests or lead to freezing of the scraps.
- Adding Too Much at Once: Overloading a trench can slow decomposition and create imbalances in the soil.
- Neglecting Carbon Sources: A lack of carbon-rich materials can result in slow decomposition and unpleasant odors.
- Ignoring Soil Testing: If your soil already has high nutrient levels, trench composting may not be necessary in certain areas.
What to Do in Spring
By spring, most of the organic material will have decomposed, leaving behind nutrient-rich soil. You can plant directly in the trenched area or spread the enriched soil throughout your garden beds. If some scraps haven’t fully broken down, don’t worry—they will continue to decompose as the soil warms.
Why Trench Composting is Perfect for Winter Gardening
Trench composting is not only practical but also aligns with sustainable gardening practices. During winter, when other composting methods slow down, this technique allows you to:
- Recycle kitchen waste without interruption.
- Improve your soil naturally, preparing it for a productive spring.
- Reduce your environmental footprint by keeping organic waste out of landfills.
It’s an effortless way to keep your garden thriving, even in the off-season.
Final Thoughts
Winter doesn’t have to mean the end of composting. With trench composting, you can turn your kitchen scraps into a powerful soil amendment while minimizing effort and environmental impact. By following these simple steps, you’ll not only save time and energy but also set the stage for a vibrant, productive garden come spring.
💡 Have you tried trench composting in winter? Share your experience and favorite composting tips in the comments below!
Viral Gardening Hashtags
#WinterGardening #TrenchComposting #EcoFriendlyLiving #CompostTips #SustainableGardening #OrganicGardening #SoilHealth #GardeningMadeEasy