
Hydrangeas are one of the most beloved garden plants. Their large, showy flowers brighten up gardens throughout the summer, and their variety of colors makes them a versatile choice for any landscape. However, despite their beauty, they can be somewhat expensive to buy, and many gardeners wish they could grow more of these plants without the need to purchase them. Luckily, one of the easiest ways to expand your hydrangea collection is through taking cuttings.
While hydrangeas can be propagated at various times of the year, fall is considered the best time to take cuttings. Not only is this the perfect time to ensure strong root growth before the cold weather hits, but it also allows you to start preparing new plants for the following growing season. Whether you’re a seasoned gardener or just starting out, taking hydrangea cuttings in the fall is an excellent way to grow more hydrangeas without a huge investment.
In this article, we’ll walk you through the steps involved in taking successful hydrangea cuttings, from selecting the right plant to caring for your new cuttings until they’re ready to plant in the ground.
Why Fall is the Best Time to Take Hydrangea Cuttings
Before we dive into the step-by-step guide, let’s explore why fall is such an ideal time for propagating hydrangeas. Hydrangeas naturally go dormant in the winter, making fall the perfect time to take cuttings. At this time, the plant’s energy is focused on developing strong roots, so cuttings taken in fall tend to establish themselves well before the colder months set in.
Additionally, since hydrangeas are deciduous plants, the leaves will start to drop in fall, reducing the chance of disease or pests affecting your cutting. By taking cuttings now, you give your new plants a head start before spring arrives.
Step 1: Select Healthy Stems
The first step to propagating hydrangeas from cuttings is selecting the right plant. You’ll want to choose a healthy, well-established hydrangea that is free from pests or disease. Look for non-flowering stems that are still soft and pliable but not too new (as younger stems might not root well). Aim for stems that are about 4 to 6 inches long—this size is ideal for rooting.
Avoid selecting stems that have flower heads still attached, as these will not root as effectively. Instead, focus on stems that are strong and vigorous and have an even distribution of leaves.
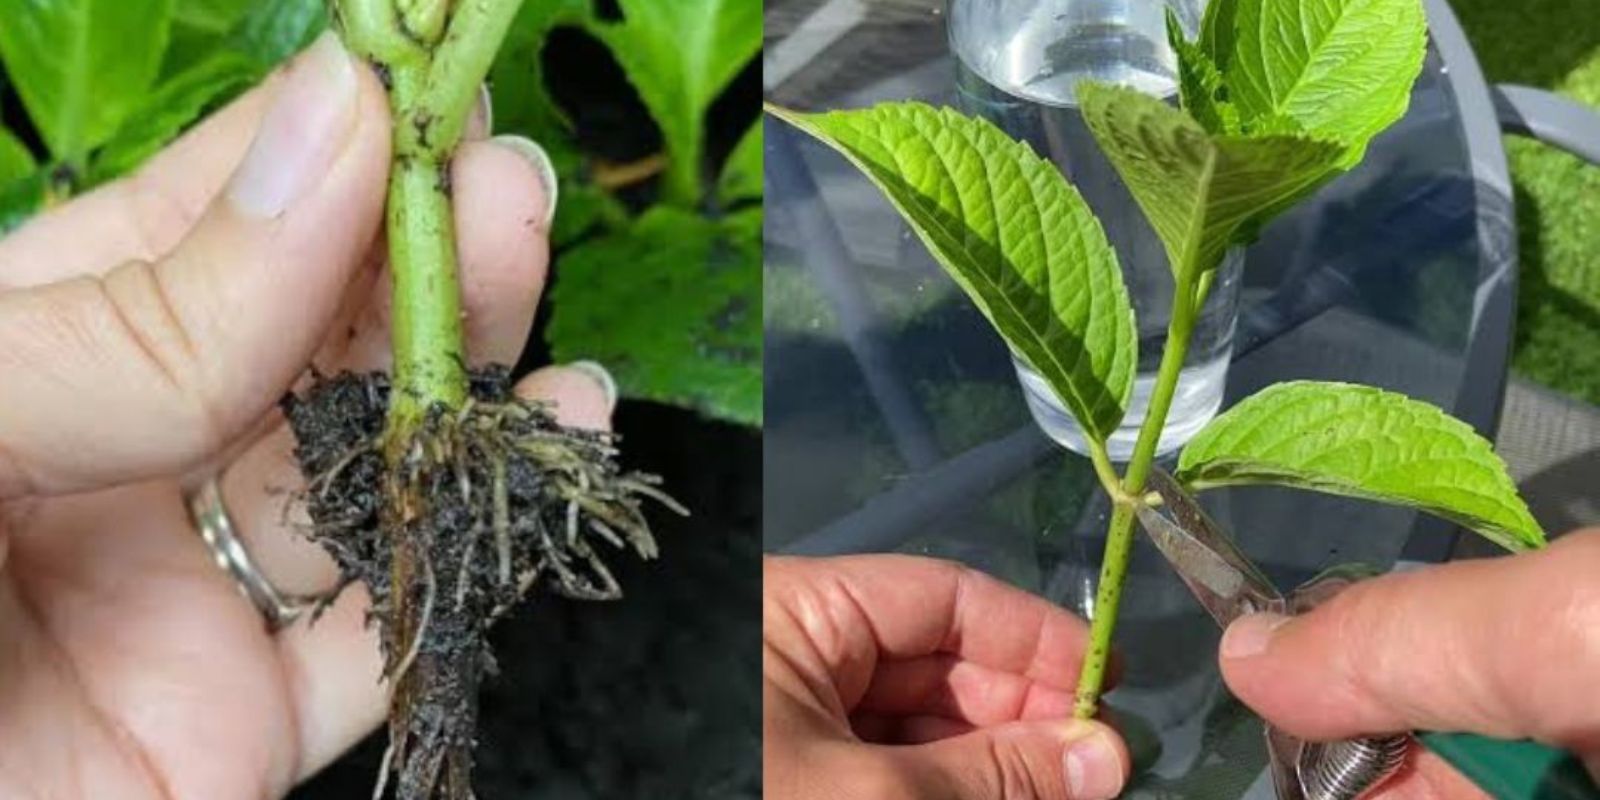
Step 2: Cut the Stems
Once you’ve identified the perfect hydrangea stems, use sharp, clean pruning shears to cut the stems just below a leaf node (the point where the leaves grow). This will ensure you have a healthy cutting with enough length to grow new roots.
Your cuttings should be around 4-6 inches long, and make sure to cut at a 45-degree angle. This angled cut will help the cutting absorb water and nutrients more effectively. You may want to remove any leaves from the lower half of the cutting, as these could potentially rot in the soil and hinder the development of roots.
Step 3: Prepare the Cuttings
Once you’ve cut the hydrangea stems, it’s time to prepare them for rooting. At this point, you can choose whether or not to use rooting hormone. While it’s not absolutely necessary, applying rooting hormone can increase the likelihood of successful rooting and promote faster growth.
If you choose to use rooting hormone, dip the cut end of each hydrangea stem into the powder or gel. Make sure the stem is lightly coated but not overwhelmed by the hormone. Excess rooting hormone can actually hinder growth, so a small amount is best.
Step 4: Plant the Cuttings in Potting Mix
Now that your cuttings are ready, it’s time to plant them in pots. Choose small pots or containers with drainage holes to ensure excess water doesn’t accumulate and cause root rot. Fill the pots with a well-draining, moist potting mix. You can use a standard potting mix, or if you want to create a more tailored environment for the cuttings, you can mix in some perlite or vermiculite to increase aeration.
To plant the cuttings, make small holes in the potting mix using a stick or pencil. Gently insert the cut ends of your hydrangea cuttings into the holes, ensuring they are standing upright and not leaning. Firm the soil around the base of each cutting to keep it in place and ensure good contact with the soil.
Step 5: Create a Humid Environment
After planting your cuttings, it’s important to create a humid environment that will encourage root growth. The best way to do this is by covering the pot with a plastic bag or using a small plastic greenhouse. This will trap moisture and heat, creating a mini-greenhouse effect that encourages rooting.
Make sure the plastic doesn’t touch the leaves of the cutting, as this can cause mold or mildew to form. You can either secure the bag with a rubber band or tie it off, or use a clear plastic dome to cover the cuttings if you have one available. The goal is to keep the air around the cuttings moist without suffocating them.
Step 6: Place the Pot in a Bright, Warm Spot
Hydrangea cuttings need light to root, but they should not be placed in direct sunlight, as this can dry them out too quickly. Find a bright, warm spot in your home, such as near a south-facing window. A temperature of around 65-75°F (18-24°C) is ideal for root development.
Check the cuttings regularly to ensure that the soil remains moist, but not soggy. Too much water can cause the cuttings to rot, while too little can dry them out. Keep the humidity level high and adjust the plastic cover if necessary.
Step 7: Wait for Roots to Develop
After about 3-4 weeks, your hydrangea cuttings should begin to develop roots. You can check the progress by gently tugging on the cutting to see if it resists. If the cutting pulls out easily, it likely hasn’t rooted yet. If there’s resistance, it’s a good sign that roots are starting to form.
At this stage, you can also gently remove the plastic covering for a short time each day to introduce some fresh air and reduce the risk of mold or fungal growth.
Step 8: Transplant the Rooted Cuttings
Once your hydrangea cuttings have developed a good root system, you can transplant them into larger pots or directly into your garden, depending on the climate. If you’re planting outdoors, wait until the danger of frost has passed, as hydrangea cuttings are still fragile and need to be protected from extreme cold.
If you’re keeping your cuttings in pots, continue to care for them by watering them regularly, ensuring they get enough sunlight, and watching for any signs of stress. After a year or two, your new hydrangea plants should be large enough to thrive in the garden.
Conclusion
Propagating hydrangeas by taking cuttings is a simple and rewarding process, and fall is the ideal time to do so. By following these steps, you can grow new hydrangeas that will add beauty to your garden for years to come. With just a few supplies and some patience, you’ll be able to cultivate a flourishing collection of these beautiful plants, all from a few cuttings. Happy gardening!
#HydrangeaCuttings #PlantPropagation #FallGardening #GrowYourOwn #GardeningTips #GreenThumb #HydrangeaLove #DIYGarden