
Thuja, also known as arborvitae, is a versatile and attractive evergreen plant commonly used in landscaping for hedges, privacy screens, and decorative accents. Whether you want to increase your Thuja collection, fill out an existing hedge, or simply propagate them for friends and family, one of the most cost-effective ways to do so is by growing new Thuja plants from cuttings. Even better, using aloe vera gel as a natural rooting agent enhances the chances of successful propagation, thanks to its growth-boosting properties.
In this article, we’ll cover why Thuja is such a popular choice, the benefits of using aloe vera gel in propagation, and the detailed steps to grow thriving Thuja plants from cuttings. By following this easy guide, you’ll be able to propagate your own Thuja plants with confidence and grow beautiful evergreens for your garden.
Why Thuja is a Popular Choice
Thuja plants are loved for their dense, lush green foliage, conical shape, and ability to withstand a range of environmental conditions. These characteristics make them perfect for use as windbreaks, privacy screens, or ornamental landscaping features. Thuja can also tolerate cold winters, heat, and drought once established, making them a low-maintenance choice for both amateur and seasoned gardeners.
Additionally, Thuja’s ability to grow in both full sun and partial shade means they can thrive in many different garden settings. They are also known for their relatively fast growth, reaching up to 1-2 feet per year in favorable conditions, which is ideal if you’re looking to establish a quick-growing privacy hedge.
Why Use Aloe Vera Gel for Propagation?
Many gardeners are familiar with using commercial rooting hormones for plant cuttings, but aloe vera gel offers a natural and equally effective alternative. Aloe vera contains antibacterial and antifungal properties that help protect new cuttings from infections. More importantly, it contains vital enzymes, vitamins, and minerals that stimulate root growth.
Aloe vera’s ability to aid plant regeneration has made it a favored natural rooting agent in sustainable gardening practices. By using aloe vera gel, you avoid synthetic chemicals and promote healthier, organic growth in your garden. It’s also incredibly easy to obtain, either from a plant you grow at home or from a store-bought gel.
Materials Needed for Thuja Propagation
Before you begin, make sure you have the following materials:
- A healthy, mature Thuja plant
- Clean, sharp pruning shears or scissors
- Aloe vera gel (either directly from an aloe leaf or store-bought)
- Small pots or containers with drainage holes
- Well-draining potting mix (preferably a blend of peat, perlite, and sand)
- Plastic bags or clear containers to create a mini greenhouse effect
- Water and a spray bottle
Now, let’s move on to the step-by-step process of propagating Thuja from cuttings using aloe vera gel.
Step-by-Step Guide to Propagate Thuja from Cuttings
1. Select the Right Time and Prepare Your Equipment
Propagation is most successful when done during the plant’s active growing season, typically in late spring to early summer. The reason is that the plant’s hormones responsible for root growth are more active during this period, making it easier for the cuttings to develop roots.
Prepare your tools by sterilizing your pruning shears or scissors with rubbing alcohol. This step is crucial to prevent any potential contamination or disease from affecting the cutting. Clean tools ensure that the cutting will remain healthy as it begins to root.
2. Choose Healthy Cuttings
Select healthy, semi-hardwood cuttings from your Thuja plant. Semi-hardwood refers to branches that are neither too green nor too woody. These are the ones that typically grow during the current season but have matured enough to have some rigidity. Cut a stem that is around 6 to 8 inches long, ensuring that the cutting has multiple nodes (the areas where leaves emerge).
Make a clean cut just below a node, as this is where new roots will form. You can take multiple cuttings at once to increase the chances of successful propagation.
3. Remove the Lower Leaves
Once you have your cuttings, remove the leaves from the bottom half of each stem. It’s important to avoid damaging the stem itself, as the exposed nodes will be where the new roots emerge. Leaving the upper leaves intact allows the cutting to photosynthesize while it’s rooting, but you want to prevent excess moisture loss by trimming off the lower leaves.
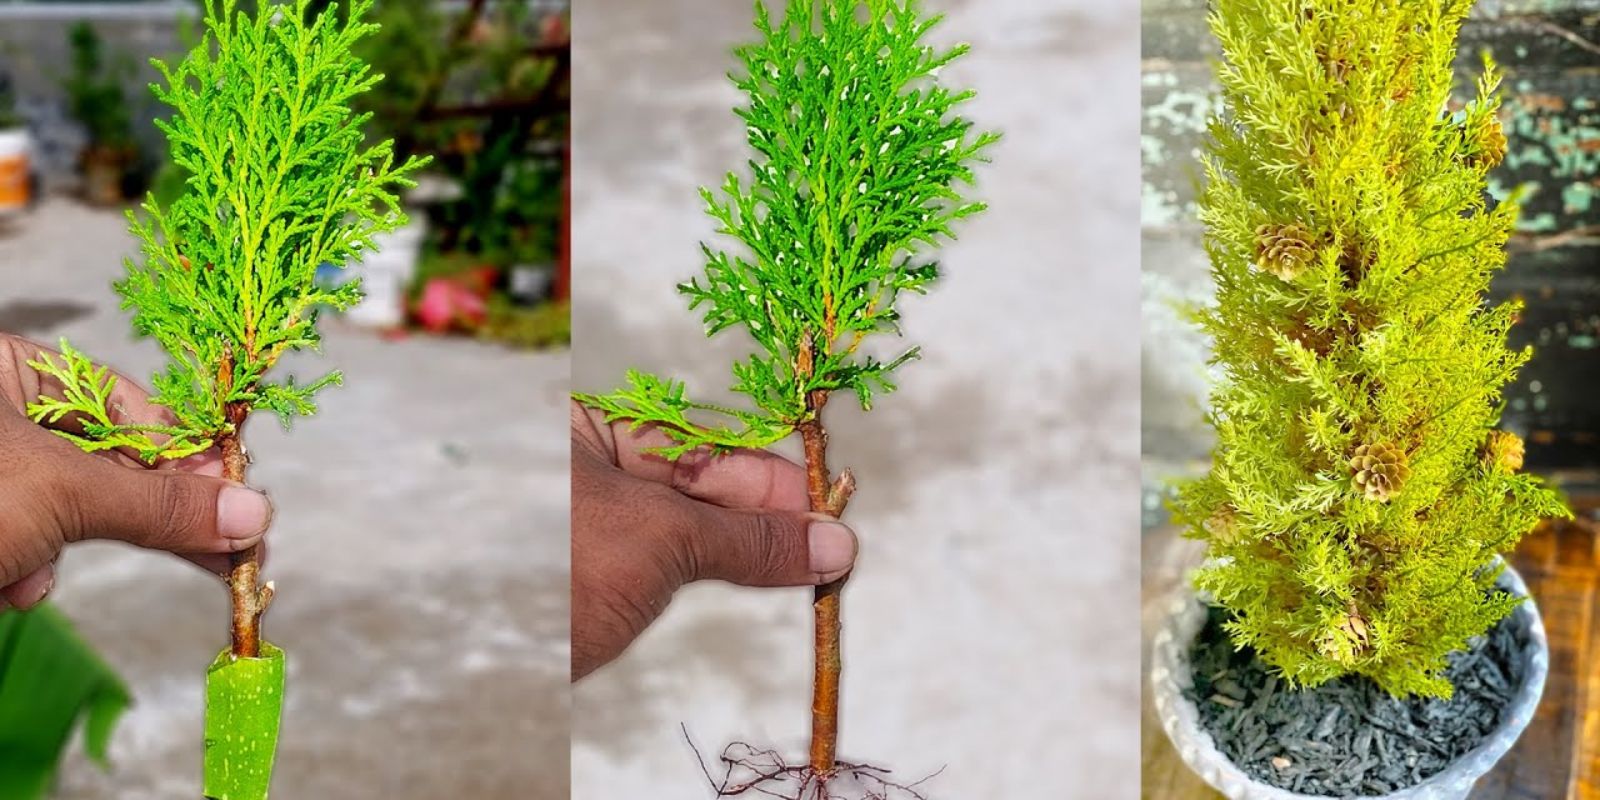
4. Apply Aloe Vera Gel
Now comes the aloe vera magic. Cut a fresh aloe leaf or use store-bought aloe vera gel. Dip the cut end of the Thuja cutting into the gel, making sure to coat the base thoroughly. Aloe vera acts as a natural rooting hormone and helps protect the cutting from bacterial and fungal infections, which are common issues during the rooting process.
5. Plant the Cuttings in Well-Draining Soil
Prepare small pots with well-draining potting mix. A combination of peat, perlite, and sand is ideal for encouraging root development while preventing waterlogging. Make a small hole in the soil using your finger or a pencil, then insert the aloe-coated end of the Thuja cutting into the soil.
Press the soil gently around the base of the cutting to ensure it’s stable. Make sure the cutting is upright and that the soil is firm but not compacted too tightly.
6. Create a Humid Environment
New cuttings need a humid environment to prevent them from drying out while they establish roots. One way to achieve this is by covering the pot with a plastic bag, making sure the bag doesn’t touch the leaves of the cutting. Alternatively, you can use a clear plastic container to create a mini greenhouse effect. This will help maintain moisture levels and encourage root growth.
Place the pots in a location where they’ll receive indirect sunlight. Too much direct sunlight can stress the cutting and cause it to dry out, while too little light may slow down the rooting process.
7. Water and Maintain the Cuttings
Water the cuttings lightly but consistently. The soil should be kept moist but not soggy, as overwatering can lead to rot. Mist the leaves occasionally with a spray bottle to maintain humidity. After a few weeks, you can gently tug on the cutting to check if it has started to form roots.
Rooting typically takes about 4-6 weeks, but it can vary depending on the environment and the condition of the cuttings.
8. Transplant Your Thuja Once Rooted
Once the cuttings have developed a healthy root system, it’s time to transplant them into larger pots or directly into the garden. Be sure to choose a well-draining location with plenty of sunlight for your new Thuja plants. Keep the soil moist while they’re still establishing themselves in their new environment.
Final Tips for Success
- Patience is key: Propagation takes time, and not all cuttings will root successfully on the first try. Try multiple cuttings to increase your chances.
- Watch out for pests: While your cuttings are rooting, monitor for signs of pests or mold. Aloe vera helps prevent infections, but it’s still important to keep the area clean.
- Temperature matters: Thuja cuttings thrive in temperatures around 65-75°F (18-24°C). Too much heat can dry out the cuttings, while too little may slow down the rooting process.
Conclusion
Propagating Thuja plants from cuttings using aloe vera gel is a simple, natural, and rewarding process. With the right timing, proper care, and the power of aloe vera, you can grow beautiful, thriving Thuja plants for your garden. This method not only saves you money but also allows you to take part in sustainable gardening practices by avoiding synthetic rooting hormones. So, why not give it a try? You’ll be amazed at how easily you can expand your Thuja collection!
Share Your Propagation Journey!
Have you tried this method? Let us know your experiences or tips in the comments below! 🌱 #ThujaPropagation #AloeVeraMagic #GardenHacks #EvergreenBeauty #SustainableGardening #GreenThumbTips #DIYPropagation #GardeningLife