
Growing guava trees at home is a rewarding experience for gardeners of all skill levels. While the typical method of propagation relies on seeds or cuttings, there is an innovative way to grow guava trees that few know about—using guava leaves. This guide will walk you through every step of this process, from selecting the right leaves to nurturing your tree into a healthy, fruit-bearing plant. By the end of this article, you’ll have all the knowledge you need to grow your own guava tree using this lesser-known method.
Why Grow Guava Trees from Leaves?
Growing guava from leaves is a unique technique that offers many advantages:
- High success rate: With the right conditions, leaves can root and grow into strong guava trees.
- Faster results: You can skip the sometimes tedious process of growing from seeds, as leaves propagate faster.
- Sustainability: This method allows you to propagate a tree using a renewable part of the plant without the need for seeds.
Let’s dive into the step-by-step process.
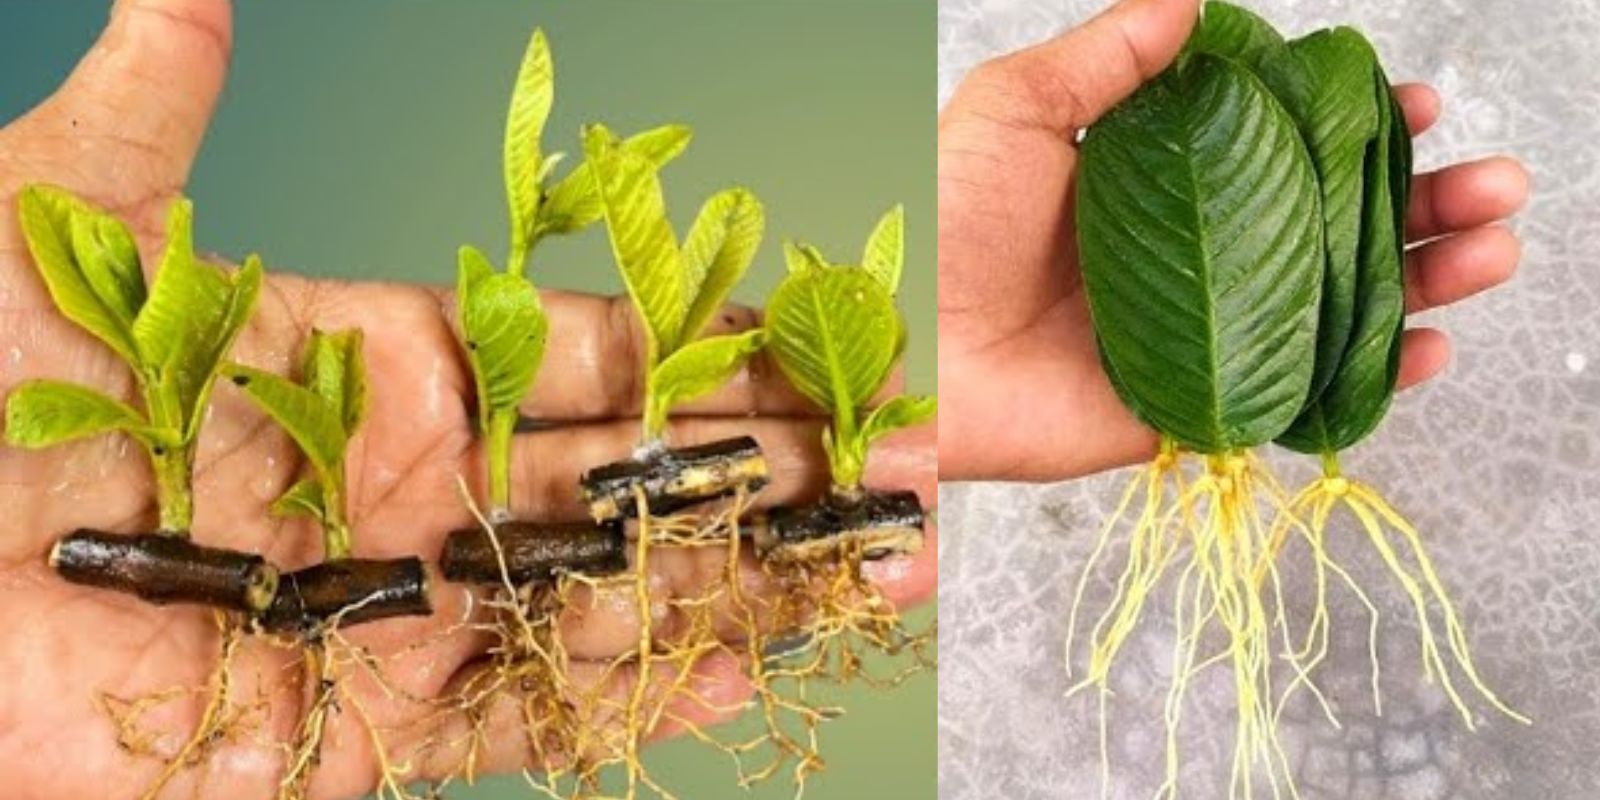
Step 1: Select Healthy Guava Leaves
The success of this propagation method hinges on choosing the right guava leaves. Here’s how to do it:
- Find a healthy guava tree: Select a tree that is free from disease, has strong growth, and is producing fruit. Avoid trees that show signs of stress or infestation.
- Pick mature leaves: Look for leaves that are firm, mature, and deep green. Young or damaged leaves might not have the strength to root.
- Pick multiple leaves: Since not every leaf will root successfully, it’s smart to have a few extras to improve your chances.
Step 2: Clean and Prepare the Leaves
Once you’ve gathered the leaves, you’ll need to prepare them for propagation.
- Gently wash the leaves: Use clean water to remove dust, dirt, or insects. Be careful not to damage the leaf surface.
- Crush the veins: Using your fingers or a blunt tool, lightly crush the veins on the underside of each leaf. This helps stimulate the root development process.
The next step is setting up the optimal environment for these leaves to sprout roots.
Step 3: Create a Moist Environment for Rooting
The key to propagating plants from leaves is maintaining the right moisture and humidity levels. Here’s how to do it:
- Get a plastic bag: A regular plastic sandwich bag works perfectly. Place the prepared guava leaves inside.
- Add moisture: Dampen a paper towel or tissue with water and place it in the plastic bag with the leaves. This creates a humid environment without oversaturating the leaves.
- Seal the bag: Close the bag, making sure it’s airtight but not overpacked, leaving room for air circulation.
- Store in a warm place: The ideal temperature for rooting is between 70°F and 85°F (21°C and 29°C). Keep the bag out of direct sunlight to avoid overheating, but make sure it’s in a bright area.
At this stage, patience is key. You’ll begin to see changes after a few weeks.
Step 4: Monitor Root Growth
After about two to three weeks, you should start seeing roots forming. Here’s what you need to do during this waiting period:
- Check for moisture: Every few days, open the bag to ensure the paper towel remains damp. If it dries out, re-wet it slightly. Avoid too much moisture as it could cause mold.
- Look for root formation: After about 10-14 days, small roots should begin to appear on the crushed areas of the leaves. Not all leaves will root at the same time, so continue checking regularly.
Once the roots are long enough (approximately 1-2 inches), the leaf is ready to be transferred to soil.
Step 5: Transfer to Soil
At this point, you’re ready to plant your newly rooted guava leaves. Here’s how:
- Select a pot: Choose a small container with good drainage holes. A 4-6 inch pot is ideal for each leaf to allow room for root expansion.
- Prepare the soil: Use a mix of well-draining potting soil. Guava trees prefer slightly acidic to neutral soil, so aim for a pH between 5 and 7. You can mix in a bit of compost to improve nutrient levels.
- Plant the rooted leaves: Gently place each rooted leaf into the soil, ensuring the roots are fully covered. Water lightly to settle the soil around the roots.
- Place in indirect sunlight: For the first few days after planting, keep the pot in a bright but indirect light spot. This helps the plant acclimate without getting stressed by too much sunlight.
Step 6: Care for Your Guava Seedling
Your guava tree is now officially in its growing stage! Caring for it properly will ensure it thrives and eventually produces fruit. Here’s how to care for your seedling:
- Watering: Guava trees prefer regular watering, especially during the growing season. Keep the soil consistently moist but not waterlogged.
- Sunlight: After the seedling has acclimated, move it to a sunny spot. Guava trees need at least 6 hours of sunlight each day for optimal growth.
- Fertilizing: Use a balanced, slow-release fertilizer every 4-6 weeks. This will provide the nutrients needed for healthy growth.
- Pruning: As the tree grows, remove any dead or damaged leaves and branches. This encourages stronger growth and a better shape.
- Transplanting: Once the tree outgrows its pot, transplant it into a larger container or plant it in the ground. Guava trees can grow up to 30 feet tall, so ensure the tree has enough space to develop.
Benefits of Growing Guava Trees at Home
Growing a guava tree from leaves is not only fascinating but also offers several benefits:
- Fresh fruit: Enjoy the taste of fresh, organic guava right from your garden or container.
- Sustainability: Growing your own guava reduces the need for store-bought fruit, lowering your carbon footprint.
- Aesthetic appeal: Guava trees are visually appealing with their glossy green leaves and fragrant white flowers.
- Versatility: Guava trees can thrive in both pots and gardens, making them perfect for urban and rural homes alike.
Common Issues and Troubleshooting
While propagating guava from leaves is generally straightforward, there can be a few issues along the way:
- Leaves rotting: This is usually caused by too much moisture in the plastic bag. Ensure the paper towel is damp, not soaking wet.
- No roots forming: If roots don’t form within 3-4 weeks, the leaves might not have been healthy enough, or the environment wasn’t warm enough. Try again with a new batch of leaves.
- Pest problems: Guava trees are prone to pests like aphids and whiteflies. Regularly check your plant and treat it with organic insecticide if necessary.
Conclusion: A Unique Way to Grow Guava Trees
Growing guava trees from leaves may not be the most common propagation method, but it is certainly one of the most rewarding. With just a few leaves and the right care, you can create a thriving guava tree in your garden or on your balcony. By following the steps outlined in this guide, you’ll increase your chances of success and soon be enjoying the fruits of your labor—literally.
Call to Action:
Ready to start your own guava tree from leaves? Try this technique and share your progress with us! #GuavaGrowing #GardeningHacks #SustainableGardening #FruitGardens #HomeGardeningTips #GreenThumb