
Marigolds are among the easiest and most popular flowers to grow, renowned for their vibrant colors and ability to brighten any garden or container. With shades ranging from yellow and orange to red and gold, they are versatile flowers that thrive in various environments. Beyond their aesthetic appeal, marigolds are often grown for their pest-repellent properties, making them excellent companions in vegetable gardens. Starting marigolds from seed is an affordable and rewarding way to fill your garden with these cheery flowers.
In this guide, we will take you through the process of starting marigold seeds from scratch, covering everything from the selection of seeds to the care of seedlings. By following this step-by-step approach, you’ll soon be enjoying the beauty of marigold blooms in your garden.
1. Why Grow Marigolds from Seed?
Marigolds are incredibly easy to grow, making them a perfect choice for gardeners of all skill levels. They germinate quickly, grow vigorously, and adapt well to different soils and conditions. Here are some reasons why growing marigolds from seed is a great idea:
- Cost-Effective: Buying marigold seeds is much more affordable than purchasing mature plants. A single packet of seeds can yield dozens of plants.
- Variety: When starting from seed, you have access to a wider variety of marigold types, including French, African, and Signet marigolds. This allows you to experiment with different sizes, colors, and textures.
- Control Over Growth: Starting seeds gives you the satisfaction of watching your plants grow from the very beginning. You also have more control over their care, ensuring healthy, robust plants.
2. Choosing the Right Marigold Seeds
Marigolds come in several different varieties, each with its own characteristics. Here are the main types of marigolds to consider:
- French Marigolds (Tagetes patula): These are compact plants that produce small to medium-sized flowers. They bloom profusely and are excellent for borders, containers, or interplanting with vegetables. French marigolds typically grow 6-12 inches tall and come in shades of red, yellow, and orange.
- African Marigolds (Tagetes erecta): Also known as American marigolds, these are taller plants with large, pom-pom-like blooms. They can grow up to 3 feet tall, making them perfect for the back of flower beds or as focal points in your garden. African marigolds usually come in shades of yellow and orange.
- Signet Marigolds (Tagetes tenuifolia): These marigolds are delicate, with fern-like foliage and small, daisy-like flowers. They have a more subtle, citrusy fragrance and are often used in edible gardens. Signet marigolds are smaller and ideal for edging or window boxes.
Once you’ve decided on the type of marigold you want to grow, purchase seeds from a reputable seed supplier to ensure good quality and high germination rates.
3. When to Start Marigold Seeds
Timing is crucial when starting marigold seeds. They are warm-season annuals, meaning they thrive in the warmth of summer and can be damaged by frost. Here are the general guidelines for when to start your seeds:
- Indoor Sowing: If you’re starting marigold seeds indoors, sow them about 6-8 weeks before the last expected frost in your area. This gives the seedlings enough time to establish themselves before being transplanted outdoors.
- Direct Sowing: In regions with long growing seasons, you can also sow marigold seeds directly in the garden once all danger of frost has passed, and the soil has warmed to at least 60°F (15°C).
If you’re unsure of your local frost dates, you can check online resources or ask at your local gardening center.
4. How to Start Marigold Seeds Indoors
Starting marigold seeds indoors is a simple process. Follow these steps for success:
Materials You’ll Need:
- Marigold seeds
- Seed-starting trays or small pots
- Seed-starting mix (light, well-draining soil)
- Watering can or spray bottle
- Plastic wrap or a humidity dome (optional)
- A sunny windowsill or grow lights
Step-by-Step Instructions:
1. Fill Seed Trays with Seed-Starting Mix:
Start by filling your seed trays or pots with a light seed-starting mix. Avoid using garden soil, as it can be too heavy and may not drain well. Lightly moisten the mix before adding your seeds.
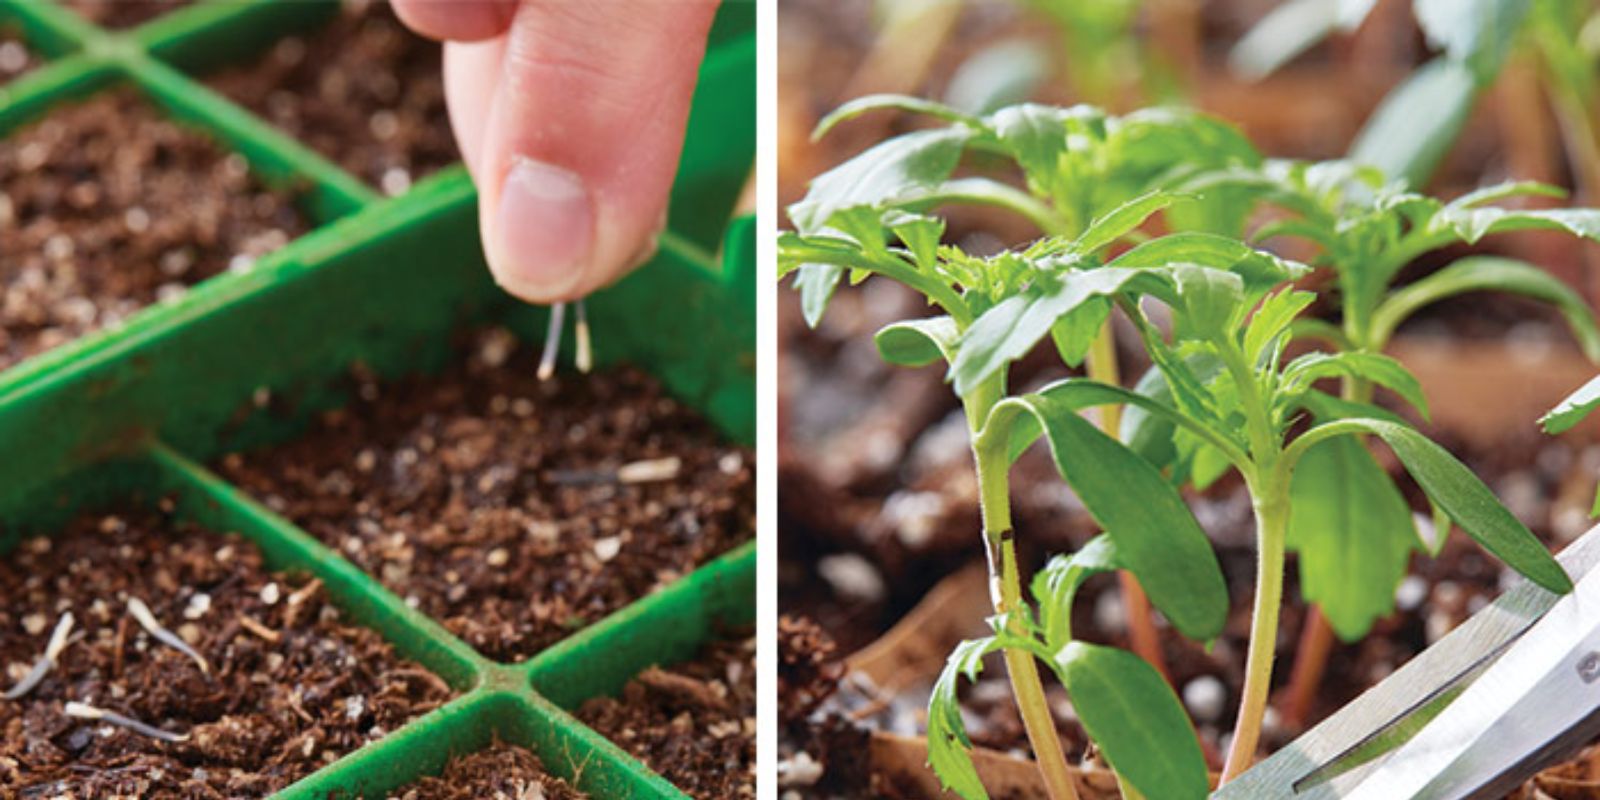
2. Plant the Seeds:
Marigold seeds are long and thin, making them easy to handle. Sow the seeds about 1/4 inch deep in the soil. You can plant one seed per cell in a seed tray, or space them about 2 inches apart in a larger pot. Cover the seeds with a thin layer of soil and gently pat it down.
3. Water the Seeds:
After planting, water the seeds lightly using a spray bottle or a watering can with a fine nozzle. The soil should be evenly moist but not waterlogged. Overwatering can cause the seeds to rot before they germinate.
4. Create a Greenhouse Effect:
To retain moisture and warmth, cover your seed trays with plastic wrap or place them under a humidity dome. This creates a mini-greenhouse environment that encourages faster germination. Once the seeds sprout, remove the cover to prevent mold from developing.
5. Place in a Warm, Sunny Spot:
Marigolds need warmth to germinate. Place the trays in a location where they will receive bright, indirect sunlight, or use grow lights if you don’t have enough natural light. The ideal temperature for germination is between 70-75°F (21-24°C).
6. Keep the Soil Moist:
Check the soil regularly to ensure it stays moist but not soggy. If the top layer of soil begins to dry out, mist it with water to maintain even moisture levels.
7. Germination:
Marigold seeds typically germinate within 5-7 days, depending on the conditions. Once you see the seedlings emerging, ensure they get plenty of light to prevent them from becoming leggy and weak.
5. Transplanting Marigold Seedlings Outdoors
Once your marigold seedlings have grown to about 2-3 inches tall and have developed a couple of sets of true leaves, they are ready to be transplanted outdoors. Follow these steps to ensure a successful transition:
Step-by-Step Instructions:
1. Harden Off the Seedlings:
Before transplanting, you need to acclimate your marigold seedlings to the outdoor environment, a process known as hardening off. Over the course of 7-10 days, place the seedlings outside for a few hours each day, gradually increasing their exposure to direct sunlight and outdoor temperatures.
2. Choose the Right Location:
Marigolds thrive in full sun, so select a spot in your garden that receives at least 6-8 hours of sunlight daily. They prefer well-draining soil but can tolerate various soil types, including poor soil.
3. Prepare the Soil:
Loosen the soil in the planting area to a depth of about 6-8 inches. If the soil is heavy or compacted, you can improve drainage by adding compost or sand. While marigolds are not particularly fussy about soil conditions, they do best in soil that is rich in organic matter.
4. Plant the Seedlings:
Dig a hole large enough to accommodate the seedling’s root ball. Carefully remove the seedling from its pot or tray, being mindful of the delicate roots. Place it in the hole, firm the soil around the base, and water thoroughly.
5. Space Appropriately:
Depending on the variety, marigolds should be spaced 6-12 inches apart for smaller French marigolds and 12-18 inches apart for larger African marigolds. This ensures they have enough room to grow and helps prevent overcrowding, which can lead to disease.
6. Water and Mulch:
After planting, water the marigolds deeply to help them settle into their new environment. You can also add a thin layer of mulch around the base of the plants to help retain moisture and suppress weeds.
6. Caring for Marigolds
Once your marigolds are planted, they require minimal care. Here’s how to keep them healthy and blooming throughout the growing season:
- Watering: Marigolds are relatively drought-tolerant once established, but they will produce more flowers if they receive regular watering. Water deeply, allowing the soil to dry slightly between waterings. Be cautious not to overwater, as marigolds are prone to root rot in overly wet conditions.
- Fertilizing: Marigolds are not heavy feeders, and too much fertilizer can result in lush foliage but fewer flowers. If you want to encourage more blooms, you can apply a balanced, water-soluble fertilizer every 4-6 weeks, but this is optional.
- Deadheading: To promote continuous blooming, remove spent flowers regularly. This process, called deadheading, encourages the plant to produce new buds instead of putting energy into seed production.
- Pest and Disease Control: Marigolds are generally resistant to pests, but they can sometimes attract aphids or spider mites. You can control these pests by spraying the plants with a mixture of water and dish soap or using insecticidal soap. Additionally, avoid overwatering to prevent fungal diseases like powdery mildew.
7. Harvesting Marigold Seeds
One of the best things about growing marigolds is that you can collect seeds from your plants at the end of the
season to use for next year’s garden. To harvest marigold seeds:
- Allow some flowers to remain on the plant until they dry out and form seed heads.
- Once the seed heads are completely dry, remove them from the plant and gently pull them apart to release the seeds.
- Store the seeds in a cool, dry place until you’re ready to plant them again.
Conclusion
Starting marigold seeds is a fun and rewarding process that can fill your garden with vibrant colors and delightful blooms throughout the summer. With a bit of care and attention, you can easily grow marigolds from seed, whether you’re a beginner or an experienced gardener. By following the steps outlined in this guide, you’ll be well on your way to enjoying the beauty and benefits of marigolds in your garden or containers.