
As gardeners, we are constantly looking for ways to save time, money, and resources while caring for our plants. One solution that’s both eco-friendly and effective is reusing plastic water bottles to create simple drip waterers. Not only does this practice help conserve water, but it also allows us to reduce waste by repurposing items we might otherwise throw away. With just a few easy steps, you can create a homemade drip irrigation system that will keep your plants hydrated and thriving without much effort.
In this article, we will guide you through the process of turning plastic water bottles into DIY drip waterers, providing you with an easy, cost-effective, and sustainable way to water your garden. Let’s dive in!
Why Use Plastic Water Bottles for Drip Irrigation?
Drip irrigation is one of the most efficient methods of watering plants. Unlike traditional watering methods, which can lead to water runoff and evaporation, drip irrigation delivers water directly to the roots, where it’s needed most. This method ensures that your plants receive a consistent and controlled supply of water, preventing overwatering and underwatering.
Plastic water bottles are an ideal tool for creating a low-tech, self-watering system. They are widely available, inexpensive, and come in various sizes, making them adaptable for all kinds of plants. By reusing plastic bottles, you are not only conserving water, but you are also contributing to the reduction of plastic waste, making this a double-win solution.
What You’ll Need
Before getting started, gather the following materials:
- Empty plastic water bottles (sizes can vary depending on the needs of your plants)
- A drill or something sharp like a nail or pushpin to create small holes
- A pair of scissors (optional)
- A garden tool or small shovel (for burying the bottle in the soil)
- Water for filling the bottles
- A small nail or pushpin (for making holes)
Step-by-Step Instructions: How to Make a Drip Waterer from a Plastic Bottle
1. Clean the Bottle
The first step is to thoroughly clean your plastic water bottle. Remove any labels and rinse out the bottle to ensure there are no contaminants left inside. This will prevent any potential build-up of mold or bacteria that could harm your plants. Once cleaned, set the bottle aside to dry completely.
2. Make Small Holes in the Cap
Now that your bottle is clean, it’s time to turn it into a waterer. Take the cap and use a small nail, pushpin, or drill to make tiny holes in the cap. The number of holes you make will depend on how much water you want to release and how quickly you want it to drain. For a small plant, a few tiny holes will suffice, while larger plants might need more holes.
If you use a drill, make sure to use a small drill bit to create the holes. If you’re using a pushpin or nail, gently poke several holes in the cap, ensuring they’re evenly spaced. The goal is to allow water to trickle out slowly, simulating the effect of drip irrigation.
3. Prepare the Bottle for Watering
Once your bottle’s cap has holes, it’s time to fill it with water. This step is simple — just fill the bottle with water up to the top, ensuring that it’s completely filled. For best results, use room temperature water. Cold water could shock your plants, and extremely warm water might cause the bottle to crack under heat.
4. Place the Bottle in the Soil
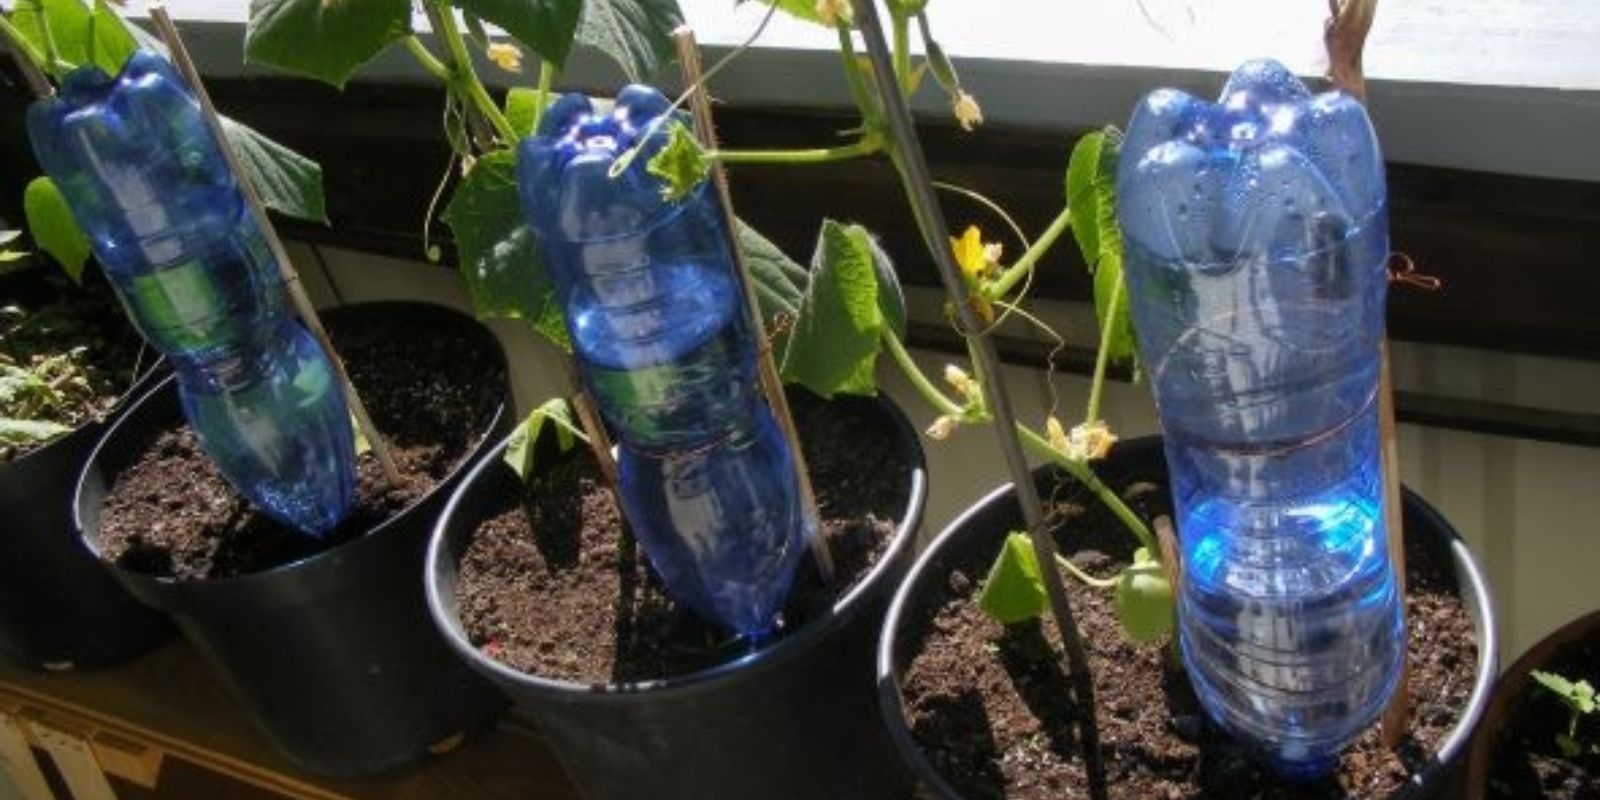
Now, it’s time to place your DIY drip waterer into the soil. Turn the bottle upside down (so the cap is facing down) and bury it about 2-3 inches into the soil near the base of your plant. If you’re using the waterer for multiple plants, you can space the bottles out around your garden to ensure each plant gets enough water.
If you want to create a self-watering system for container plants, simply bury the bottle halfway into the soil and leave the top exposed. Make sure the bottle is secure in the soil so it doesn’t tip over easily.
5. Test the Watering System
After you’ve placed your water bottle in the soil, observe how the water is dispensed. You should see a slow, steady drip of water coming out of the holes in the cap. This drip should be slow enough to allow the plant’s roots to absorb the water over time.
If the water is dripping too quickly or too slowly, you can adjust the size of the holes by using a slightly larger nail or a different tool. A small hole will ensure a slow and steady release, while a larger hole will allow more water to flow at once.
6. Keep the Water Bottle Refreshed
One of the benefits of using plastic bottles as drip waterers is that they can be refilled easily. When you notice that the water level has dropped or your plants appear dry, simply refill the bottle. This method reduces the amount of water you need to use while still maintaining a steady supply for your plants.
Variations on the Drip Waterer: Customizing for Different Needs
While the basic method outlined above is ideal for smaller garden beds, there are ways to customize your drip waterers for larger plants or specific gardening needs.
Large Containers or Garden Beds
For larger garden beds or containers, use bigger bottles or multiple smaller bottles to ensure an even water distribution. You can also create a series of drip waterers connected by a simple hose if you have a larger area to cover. The idea is to ensure that each plant receives a steady supply of water without the waste associated with traditional watering methods.
For Hanging Baskets
If you have hanging baskets, you can adapt the water bottle drip method by simply hanging the bottles upside down over your baskets. This provides consistent water to the roots and eliminates the need for frequent hand watering.
Self-Watering Planters
Another variation is to use the plastic water bottle as part of a self-watering planter system. Cut the bottom of the bottle off and invert it into the container. Fill the bottle with water, and the soil will gradually absorb the moisture through the holes in the cap, keeping the plant hydrated.
Benefits of Using Drip Waterers Made from Plastic Bottles
- Water Conservation: One of the biggest advantages of using plastic bottles as drip waterers is their ability to reduce water waste. The controlled, slow release of water ensures that the plant roots receive exactly what they need without excess runoff or evaporation.
- Cost-Effective: This method is inexpensive, as plastic water bottles are easy to find and repurpose. You won’t need to purchase expensive irrigation systems or watering cans.
- Eco-Friendly: By reusing plastic bottles, you are helping to reduce plastic waste, giving your bottles a second life while also benefiting your garden.
- Low Maintenance: Once set up, these drip waterers require minimal effort to maintain. You only need to refill them when they run out of water, and they’ll continue to provide moisture to your plants automatically.
- Customization: You can easily adjust the size of the holes in the bottle cap, the number of bottles used, and the placement of the waterers to suit the specific needs of your garden.
Conclusion: The Power of Repurposing for Sustainable Gardening
Using plastic water bottles as drip waterers is a simple yet effective way to care for your plants while reducing water waste and plastic pollution. Not only are you creating a more sustainable garden, but you’re also adding a personal touch to your gardening practice with a DIY project that’s both fun and functional.
By following the easy steps outlined above, you can quickly turn your plastic water bottles into efficient and eco-friendly water dispensers that help your plants thrive. Embrace the power of repurposing, and create a green garden that is both sustainable and beautiful.
Start repurposing and make your plants happy today! 🌱💧
#SustainableGardening #PlasticBottleReuse #DripWateringSystem #EcoFriendlyGardening #Upcycling #WaterConservation #DIYGardening #GreenThumb #GardeningTips #ZeroWaste