
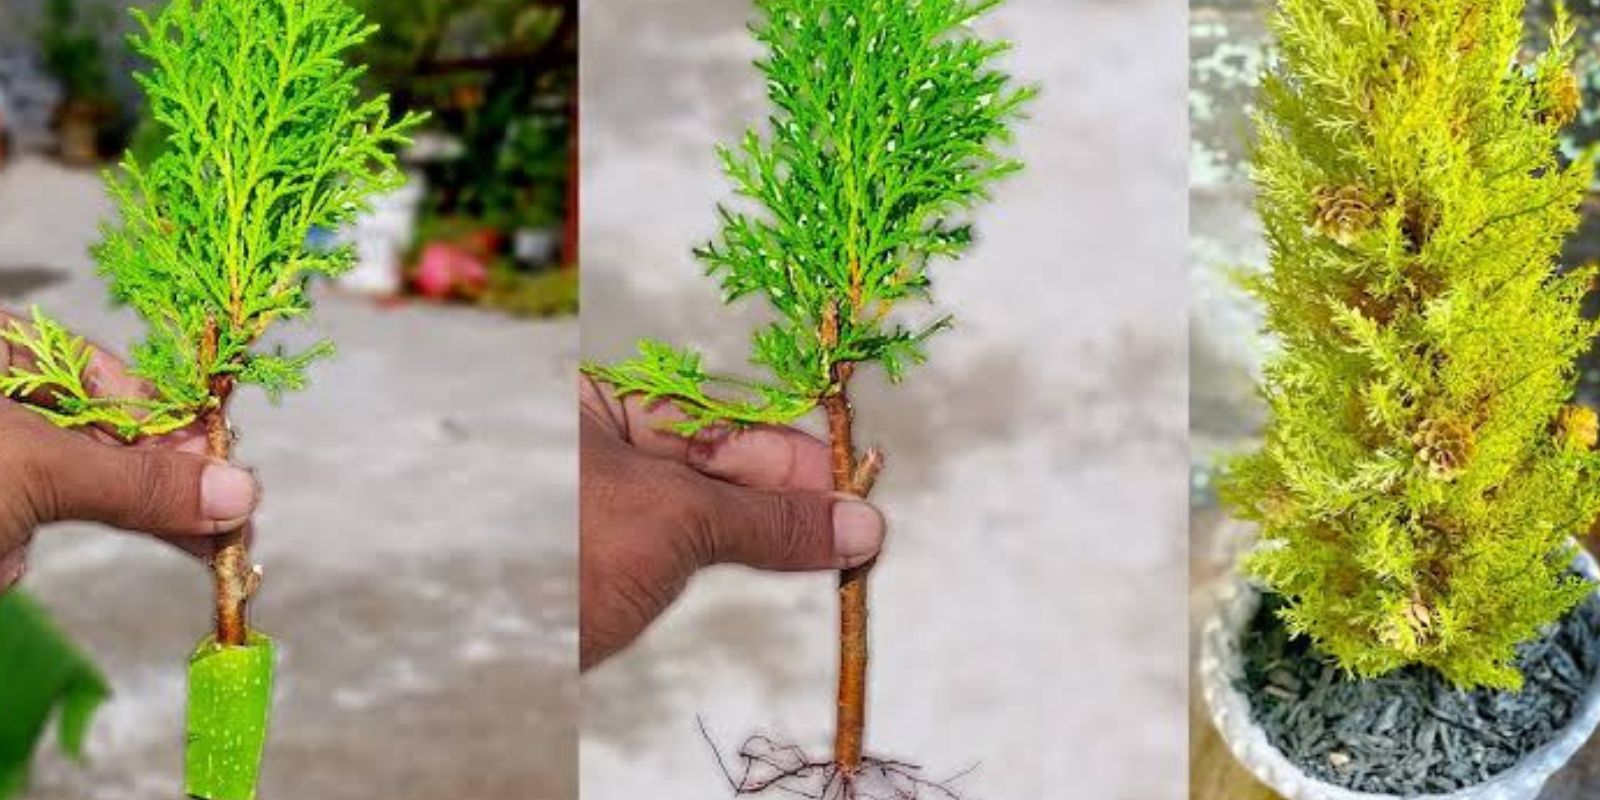
When it comes to expanding your garden with low-cost, easily manageable plants, propagating Thuja (also known as arborvitae) from cuttings is an incredibly effective method. Thuja is a popular evergreen shrub used for privacy hedges, landscaping, and decorative purposes, thanks to its dense, fast-growing foliage.
While propagating Thuja from seeds can be tricky and time-consuming, cutting propagation allows you to clone your favorite plants with ease. Additionally, when paired with Aloe Vera, a powerful, natural rooting stimulant, the process becomes even more successful. Aloe Vera has long been used for its medicinal properties, but did you know it can help speed up the root growth of plants, too?
In this comprehensive guide, we’ll cover everything you need to know to successfully propagate Thuja from cuttings using Aloe Vera, including why this method works so well, the materials you need, and a step-by-step walkthrough to ensure success.
Why Use Aloe Vera for Propagating Thuja?
Aloe Vera is an ancient, all-natural plant with a range of benefits for gardeners. When used in propagation, Aloe Vera helps to stimulate root growth by acting as a natural rooting hormone. This not only encourages faster rooting but also promotes the overall health of the cutting. Aloe Vera’s gel contains auxins—plant hormones that play a crucial role in the development of roots and shoots. By using Aloe Vera as a rooting agent, you are providing your Thuja cutting with the best environment to thrive.
Materials Needed
Before you start propagating your Thuja cuttings, gather the following materials:
- Healthy Thuja Cuttings: Select a healthy branch that is approximately 4-6 inches long, free of disease, damage, or pests.
- Sharp, Clean Scissors or Pruning Shears: Use a pair of sterilized pruning shears or scissors to take a clean cutting.
- Aloe Vera Gel: Fresh Aloe Vera gel is the best option for rooting. You can extract it directly from an Aloe Vera leaf.
- A Small Pot or Container: A small pot with drainage holes works best. It allows the roots to grow freely and helps avoid root rot.
- Well-Draining Soil: A good quality potting mix, preferably one made for rooting, will give the Thuja cutting a solid foundation to grow.
- Plastic Bag or Clear Plastic Dome: This will help maintain humidity around the cutting, which is essential for successful root growth.
- Watering Can or Spray Bottle: To gently water the cutting without disturbing the roots.
Step-by-Step Guide: How to Propagate Thuja from Cuttings Using Aloe Vera
Now that you have all your materials ready, follow these simple steps to successfully propagate your Thuja cuttings using Aloe Vera:
Step 1: Select Healthy Cuttings
The first step in propagating Thuja is to choose a healthy cutting. Look for a branch that is free of pests, diseases, or any signs of damage. You want a healthy section of the plant to ensure successful propagation.
- Select a piece of the branch that is 4-6 inches long and contains several leaves.
- Use clean, sharp scissors or pruning shears to make a clean cut at a 45-degree angle to the branch. This angle provides a larger surface area for rooting, which promotes faster root growth.
Step 2: Prepare the Aloe Vera Gel
Now that you have your cutting, the next step is to prepare the Aloe Vera gel. Aloe Vera gel contains natural auxins, which are essential for stimulating root growth in cuttings. You can either extract the gel directly from an Aloe Vera leaf or use store-bought Aloe Vera gel (ensure it’s 100% pure, without additives).
- Take an Aloe Vera leaf, and with a sharp knife, slice it open. Scoop out the gel from the leaf using a spoon.
- Make sure to collect enough gel to coat the bottom of your Thuja cutting adequately.
Step 3: Apply Aloe Vera Gel to the Cutting
With your Aloe Vera gel in hand, apply it directly to the cut end of your Thuja cutting. Gently dip the cut end of the branch into the gel, ensuring that the exposed area is completely coated. The Aloe Vera gel acts as a natural rooting hormone that helps the cutting develop roots more quickly and strengthens its ability to absorb water and nutrients.
- Make sure to apply the gel liberally, as this will help prevent any infection or drying out of the cutting’s exposed area.
- Aloe Vera also provides an antibacterial layer that can protect your cutting from harmful pathogens during the rooting process.
Step 4: Prepare the Pot and Soil
Next, prepare a small pot with well-draining soil. If you’re using a standard potting mix, you can add a little perlite or sand to increase drainage. Thuja cuttings don’t like to sit in soggy soil, so good drainage is essential.
- Fill the pot with the soil mix, ensuring it’s not packed too tightly. You want the soil to be loose enough for the roots to grow freely.
- Create a small hole in the center of the soil to insert your cutting. A pencil or stick works well for this.
- Water the soil lightly before planting the cutting. This will help the roots settle in once they begin to grow.
Step 5: Plant the Cutting
Insert the cutting into the pre-made hole in the soil. Be sure that at least one or two inches of the cutting are buried in the soil. Gently press the soil around the cutting to hold it in place and keep the cutting steady.
- After planting, make sure to water the soil again lightly to keep it moist, but not waterlogged.
- You may also choose to add a bit more Aloe Vera gel to the surface of the soil around the cutting to ensure that it remains well-protected.
Step 6: Maintain a Humid Environment
The cutting needs a humid environment to encourage rooting. You can achieve this by covering the pot with a plastic bag or a clear plastic dome. This helps trap moisture and warmth around the cutting, mimicking the conditions of a greenhouse.
- Make sure that the plastic covering does not touch the cutting itself, as this could cause mold or mildew growth.
- If you are using a plastic bag, you can tie it around the pot’s base, ensuring there is enough airflow for the cutting.
Step 7: Provide Optimal Light Conditions
Place the pot in a warm, bright location where it will receive indirect sunlight. Thuja cuttings don’t need direct sunlight at this stage, as it can dry them out too quickly. A well-lit spot with filtered light works best.
- Avoid placing the cutting in direct sunlight, as the plastic covering could trap too much heat and damage the cutting.
- Check the cutting every day to ensure that the humidity is still high and the soil remains moist.
Step 8: Wait for Root Development
Now comes the patience part! It typically takes a few weeks for the cutting to develop roots. During this time, continue to monitor the cutting and ensure that the plastic covering remains in place.
- After about 2-3 weeks, gently tug on the cutting to check if it has rooted. If there’s resistance, the cutting has developed roots and is ready for the next step.
- Once roots have formed, you can begin to slowly acclimate the cutting to outdoor conditions by removing the plastic covering for a few hours each day.
Step 9: Transplant the Rooted Cutting
Once the cutting has a healthy root system, it’s time to transplant it into a larger pot or directly into the ground, depending on your preference. Make sure to handle the cutting gently during this transition to avoid damaging the roots.
- Prepare the new planting location with well-draining soil, and transplant the cutting carefully, making sure the root system is well-covered.
- Water the newly planted cutting generously to help it settle in.
Final Thoughts
Propagating Thuja from cuttings using Aloe Vera is a simple, natural method that can help you multiply your favorite plants in no time. By following the steps outlined in this guide, you can enjoy healthy, thriving Thuja plants in your garden, whether you’re creating a hedge, a privacy screen, or simply expanding your collection.
Using Aloe Vera as a rooting agent not only accelerates root development but also ensures the overall health and vitality of the cutting. With a bit of patience, a little care, and the power of Aloe Vera, your Thuja cuttings will thrive and reward you with lush, beautiful plants that will last for years.
Happy gardening, and don’t forget to share your propagation successes with friends and fellow gardeners! 🌿