
Roses are among the most beloved and timeless plants in gardens worldwide. Their vibrant colors, delicate petals, and sweet fragrance make them an irresistible addition to any garden. If you’ve ever wanted to grow more roses without having to purchase new plants, propagating roses from cuttings is an excellent option. While there are several techniques available for propagating roses, using toilet paper is one of the simplest, most effective methods for successful root development. In this article, we’ll guide you through the steps to propagate roses using toilet paper, ensuring that you can multiply your favorite varieties effortlessly.
Why Use Toilet Paper for Propagating Roses?
When propagating roses, the main challenge is ensuring that the cuttings maintain the right moisture levels while they develop roots. The toilet paper method is an incredibly effective way to achieve this, as it helps retain moisture around the base of the cutting, allowing for better root development. Additionally, using toilet paper is an affordable and easy-to-find material, making it a fantastic option for gardeners looking for a simple and budget-friendly propagation technique.
The moisture retention qualities of toilet paper, combined with its ability to protect the cutting from drying out, create an ideal micro-environment for the development of new roots. Moreover, this method encourages the formation of strong, healthy roots, which will help your rose cuttings thrive when transplanted into the garden.
Step-by-Step Guide to Propagate Roses Using Toilet Paper
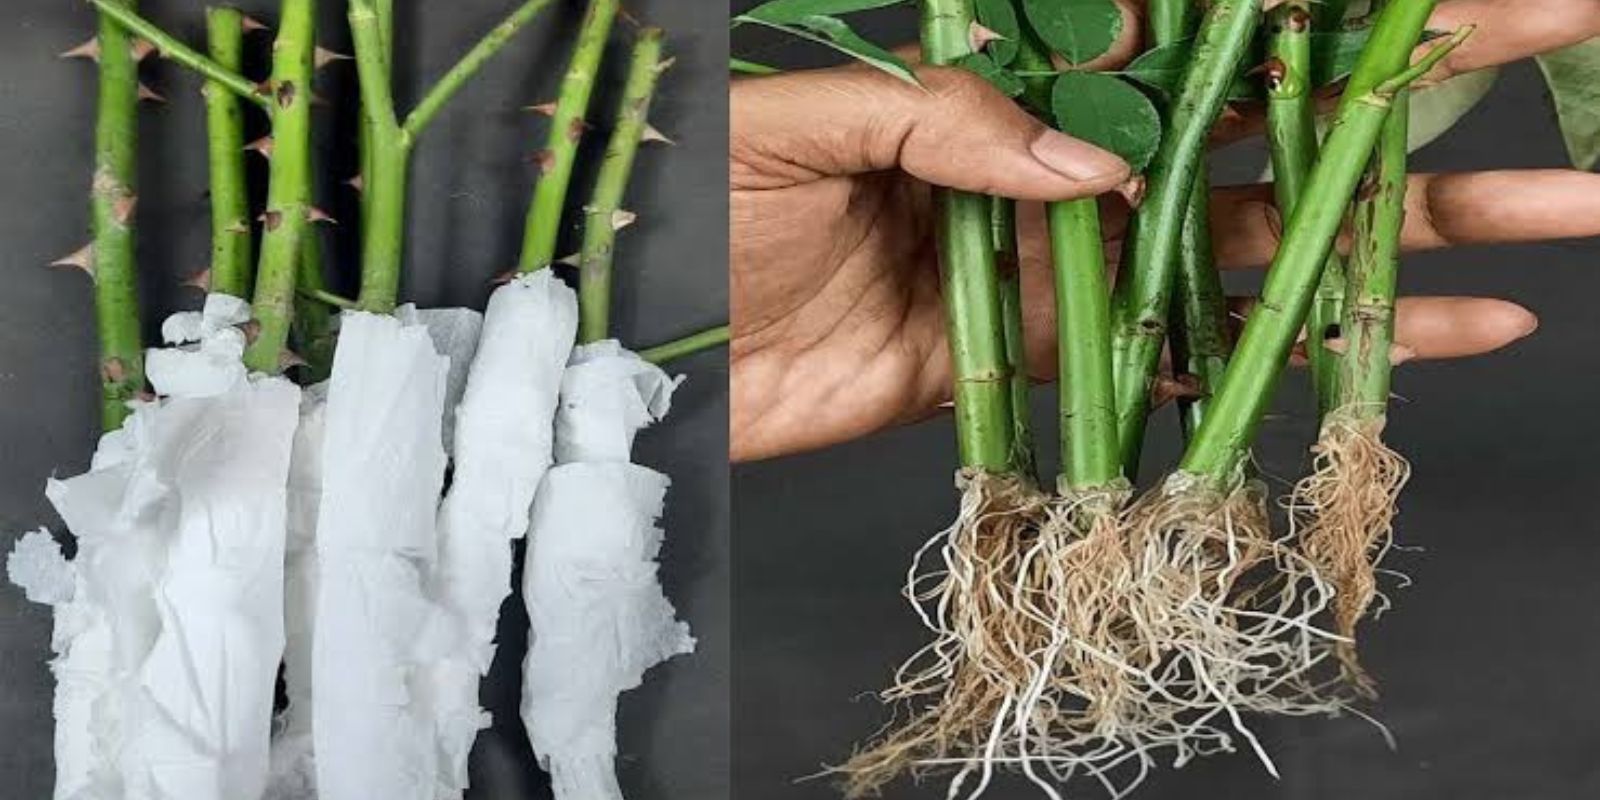
Step 1: Get Healthy Rose Cuttings The first step in propagating roses is to take cuttings from a healthy, vigorous rose bush. Look for a plant that is free from pests or diseases to ensure that the new plants will grow strong and healthy. You’ll need to cut a section of the stem that is 15 to 20 centimeters (6 to 8 inches) long. It’s important to choose a stem that is not too young or too woody; a semi-hardwood stem is ideal.
Use sharp, sanitized pruning shears to make a clean cut. Be sure to cut just below a leaf node (the spot where leaves grow from the stem), as this is where the roots will develop. A clean cut minimizes the risk of infection and encourages healthy root growth.
Step 2: Remove Leaves and Excess Growth Once you have your cuttings, remove any leaves or side shoots from the lower part of the stem. This helps reduce moisture loss, allowing the cutting to focus its energy on root development rather than keeping the leaves hydrated. Leave a few leaves at the top of the cutting to help provide energy for the rooting process.
For optimal results, cut the remaining leaves in half to further reduce moisture loss. Be careful not to remove too much foliage, as the leaves help sustain the cutting during the rooting process. Your cutting should now have a clean, leaf-free base and a few leaves at the top.
Step 3: Make a Clean Cut at the Bottom of the Stem To encourage the cutting to root, make a small cut at the bottom of the stem just below the leaf node. This cut should be made at a 45-degree angle, which increases the surface area for root formation. The angled cut helps the cutting take up more water, which can stimulate root growth more quickly.
If you’re using rooting hormone, now is the time to dip the base of the cutting into the hormone powder. Rooting hormone helps stimulate faster and stronger root growth, but it is not absolutely necessary. You can propagate roses successfully without it, but if you have access to rooting hormone, it can help boost your chances of success.
Step 4: Wrap the Cutting in Toilet Paper Now comes the fun part: wrapping the cutting in toilet paper! Dampen the toilet paper slightly with water (don’t soak it). You want the paper to be moist, not dripping wet, as too much water can encourage mold growth. Take 3 to 4 layers of toilet paper and gently wrap them around the bottom of the cutting, covering the area where you made the angled cut.
The toilet paper serves a few purposes: it keeps the cutting hydrated, helps retain moisture, and provides a small buffer that protects the cutting while it forms roots. The paper also helps maintain the ideal humidity level around the base of the cutting, which is crucial for successful propagation.
Step 5: Prepare the Pot with Well-Draining Soil Next, prepare a small pot for your cutting. Choose a pot that has drainage holes at the bottom, as good drainage is essential to prevent waterlogging, which can rot the cutting. Fill the pot with a well-draining potting mix. A mixture of garden soil, compost, and sand works well, as it offers good aeration and drainage.
Gently firm the soil to ensure that it stays in place, but don’t compact it too much. The goal is to create an environment where air can circulate around the cutting while also providing enough moisture to keep it hydrated.
Step 6: Plant the Cutting Once the pot is ready, make a small hole in the soil with your finger or a pencil. Place the wrapped cutting into the hole, ensuring that the toilet paper-wrapped end is buried under the soil. Gently press the soil around the cutting to secure it in place. The cutting should be positioned so that the top part of the cutting, with the remaining leaves, is above the soil surface.
Water the cutting gently to settle the soil around the cutting and ensure that it is evenly moist. Be careful not to overwater, as this can lead to root rot.
Step 7: Place the Pot in the Right Location After planting the cutting, place the pot in a bright, warm location where it will receive indirect sunlight. Roses do best in bright light, but direct sunlight can scorch the cutting and inhibit root formation. A windowsill or a place near a bright window that gets a few hours of indirect sunlight each day is ideal.
To maintain a humid environment for the cutting, you can place a clear plastic bag or a plastic dome over the top of the pot. This will help retain moisture and create a greenhouse effect, which promotes root development. Just be sure to remove the cover occasionally to prevent mold growth and ensure the cutting gets fresh air.
Step 8: Care for the Cutting Throughout the rooting process, you’ll need to monitor the cutting’s moisture levels. Keep the soil slightly moist, but avoid overwatering. Water the cutting whenever the top layer of the soil feels dry. If the air is too dry in your home, you can mist the cutting occasionally with water to maintain humidity.
Check the cutting regularly to ensure it is not wilting or showing signs of disease. If the cutting begins to show signs of rot, remove it from the pot and start with a new cutting.
Step 9: Transplanting the Cutting After 2 to 4 weeks, you can check to see if the cutting has rooted by gently tugging on the stem. If you feel resistance, the cutting has developed roots. Once the roots are well-formed, you can transplant the cutting into a larger pot or directly into your garden.
Be sure to harden off the cutting by gradually acclimatizing it to outdoor conditions. Start by placing the cutting in a shaded area for a few hours each day, and then slowly increase the amount of sunlight and time it spends outside over the course of a week.
Conclusion
Propagating roses using toilet paper is a straightforward, low-cost method that offers excellent results. By following these simple steps, you can create multiple new rose plants from just a few cuttings. The toilet paper method helps maintain the moisture levels necessary for successful rooting, leading to strong, healthy plants that can thrive in your garden for years to come. Whether you’re a seasoned gardener or a beginner, this technique offers an easy and effective way to multiply your roses and enjoy their beauty in your home or garden. Happy propagating!