
Introduction:
Rose propagation through cuttings is a tried-and-true method for growing new rose plants from existing ones. One of the most effective and straightforward techniques is propagating rose branches in sand. This method not only encourages strong root development but also helps in the healthy growth of new rose plants. If you’re looking to expand your rose garden or simply want to multiply your favorite roses, this guide will walk you through the steps for successful propagation using sand.
Why Sand?
Sand is an excellent medium for propagating rose cuttings because it provides good drainage, which is crucial for preventing rot. Unlike soil, sand does not retain excessive moisture, reducing the risk of fungal infections. Additionally, sand’s coarse texture allows for easy root penetration, which promotes robust root development.
Step-by-Step Guide to Propagating Rose Cuttings in Sand:
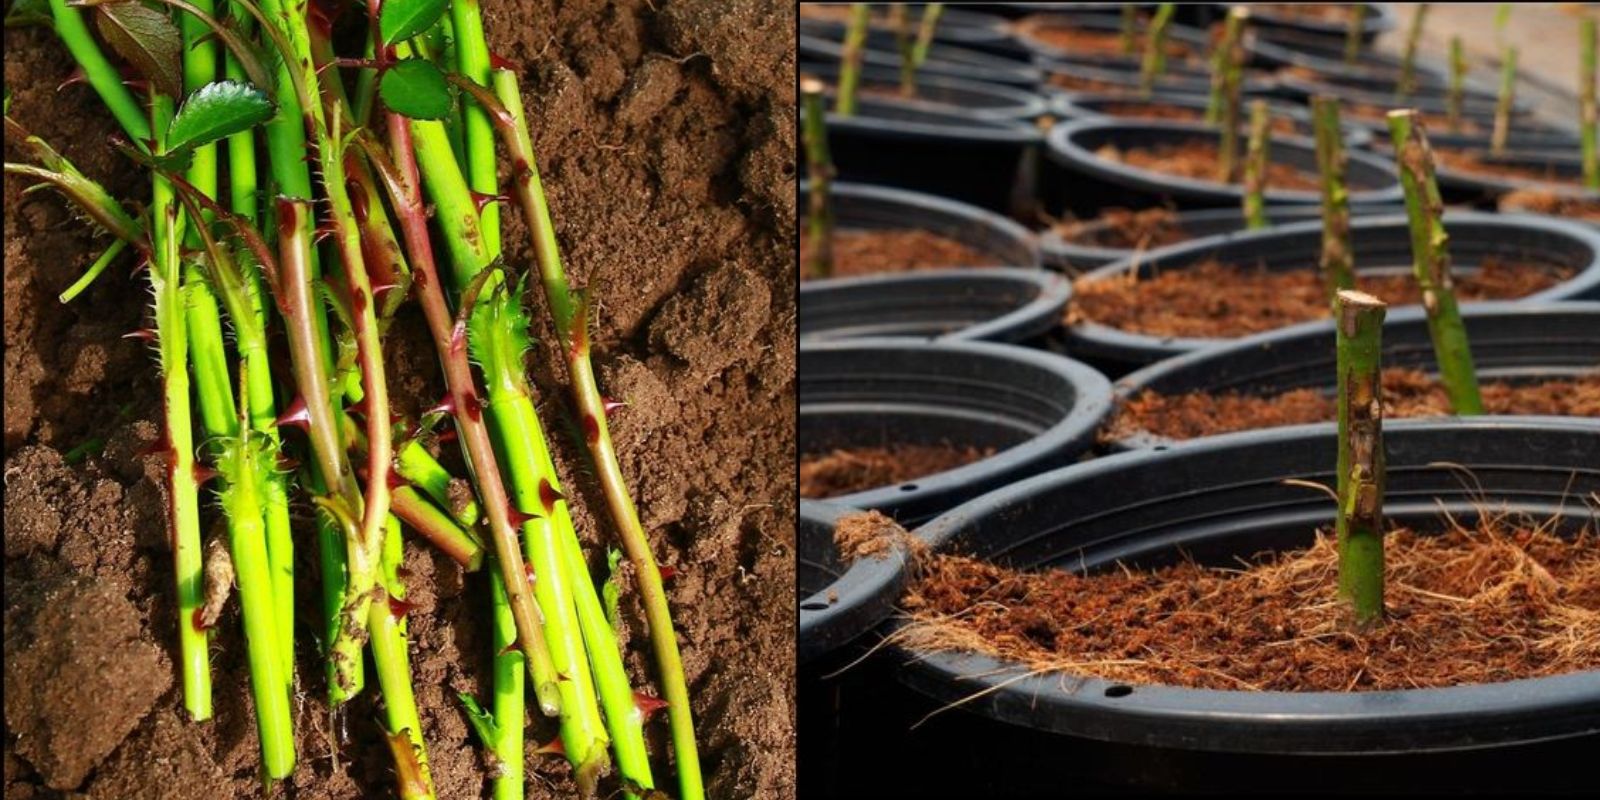
- Select and Prepare the Cuttings:
- Choose Healthy Plants: Begin by selecting healthy rose bushes from which you will take cuttings. Look for stems that are disease-free and strong.
- Take Cuttings: Use clean, sharp pruning shears to cut 6-8 inch (15-20 cm) sections from the tips of the rose stems. Each cutting should have at least 2-3 leaf nodes. Ensure you make the cut just below a leaf node.
- Remove Excess Leaves: Trim away any excess leaves from the bottom half of the cutting to reduce moisture loss and to allow better placement in the sand.
- Prepare the Sand:
- Choose the Right Sand: Use clean, coarse sand that has been sterilized. You can purchase horticultural sand or use builder’s sand that has been baked to kill any pathogens.
- Moisten the Sand: Lightly moisten the sand before planting the cuttings. The sand should be damp but not waterlogged.
- Plant the Cuttings:
- Prepare the Planting Container: Use a pot or tray with drainage holes to prevent water accumulation. Fill the container with the prepared sand.
- Insert the Cuttings: Make small holes in the sand using a pencil or stick. Insert the rose cuttings into these holes, ensuring that at least one node is buried in the sand. Firm the sand around the base of each cutting to secure it in place.
- Water the Cuttings: Lightly water the sand to settle it around the cuttings. Avoid overwatering, as this can lead to rot.
- Create the Ideal Environment:
- Light: Place the container in a bright, indirect light location. Avoid direct sunlight, which can cause the cuttings to dry out.
- Humidity: Cover the container with a clear plastic bag or a plastic dome to create a humid environment. This helps in reducing moisture loss and promotes root growth.
- Temperature: Maintain a warm temperature between 65-75°F (18-24°C) for optimal root development.
- Monitor and Care for the Cuttings:
- Check Moisture Levels: Regularly check the moisture levels in the sand. The sand should remain consistently moist but not soggy. Water as needed to maintain the right moisture balance.
- Ventilation: Occasionally remove the plastic cover for a few minutes to provide ventilation and prevent mold growth. This helps in acclimating the cuttings to the outside environment.
- Root Development: After 4-6 weeks, gently tug on the cuttings to check for resistance, which indicates that roots are developing. You can also check for root growth by carefully removing a cutting from the sand.
- Transplanting the New Plants:
- Prepare New Containers: Once the cuttings have developed a strong root system, prepare new pots with a mix of potting soil and compost for transplantation.
- Transplanting: Gently remove the cuttings from the sand and place them in the new pots. Be careful not to damage the delicate roots during the process.
- Water and Care: Water the newly transplanted roses thoroughly and place them in a bright location with indirect sunlight. Continue to care for them by maintaining consistent moisture and providing appropriate nutrients.
Troubleshooting Common Issues:
- Rotting Cuttings: If you notice rotting, it may be due to excessive moisture. Ensure that the sand is not waterlogged and improve ventilation to reduce humidity.
- Poor Root Growth: If the cuttings are not developing roots, check the temperature and light conditions. Ensure that the sand is adequately moistened and not too dry.
- Pest Infestations: Keep an eye out for pests such as aphids or mold. Use appropriate treatments if pests are detected to prevent damage to the cuttings.
Conclusion:
Propagating rose cuttings in sand is an effective and manageable method for expanding your rose garden. By following these steps, you can grow new rose plants from existing ones, enjoying a lush and vibrant garden. The key to success lies in providing the right conditions and monitoring the cuttings carefully. Try this method, and you may be rewarded with beautiful new roses to admire and share. 🌹🌱