
Introduction
Lemon trees are a beloved staple in many home gardens, not only for their bright and zesty fruits but also for the vibrant greenery they add to any space. If you’ve ever wanted to grow your own lemon tree, there’s a highly efficient and rewarding method you can try—propagating from cuttings. Unlike starting from seeds, which can take years to bear fruit, propagating from cuttings allows you to clone a mature tree and enjoy lemons much sooner.
In this guide, we will walk you through a detailed, step-by-step process to propagate a lemon tree from cuttings using a new and effective technique that focuses on maximizing root growth and improving the survival rate of your cuttings. Whether you’re a seasoned gardener or a beginner, these easy-to-follow steps will help you grow your own lemon tree successfully.
Why Propagate Lemon Trees from Cuttings?
Growing lemon trees from cuttings has several advantages over growing from seeds. When you use cuttings, you’re cloning the parent tree, which means you’ll get the same quality of fruit. Additionally, propagating from cuttings often leads to quicker fruit production since the cutting comes from a mature tree. By contrast, lemon trees grown from seeds may take several years to mature and bear fruit.
Propagating from cuttings also allows you to multiply a healthy and productive tree. If you’ve been enjoying the fruits of a particular lemon tree, you can propagate it and grow more of the same type in your garden.
Materials You’ll Need
Before you begin, gather the following materials:
- Healthy, mature lemon tree for cuttings
- Pruning shears or a sharp knife
- Rooting hormone (optional but recommended)
- Small pots with well-draining potting mix
- Plastic bags or a clear plastic cover to create a greenhouse effect
- Watering spray bottle
- Indirect sunlight or grow lights
Step-by-Step Guide to Propagating Lemon Trees from Cuttings
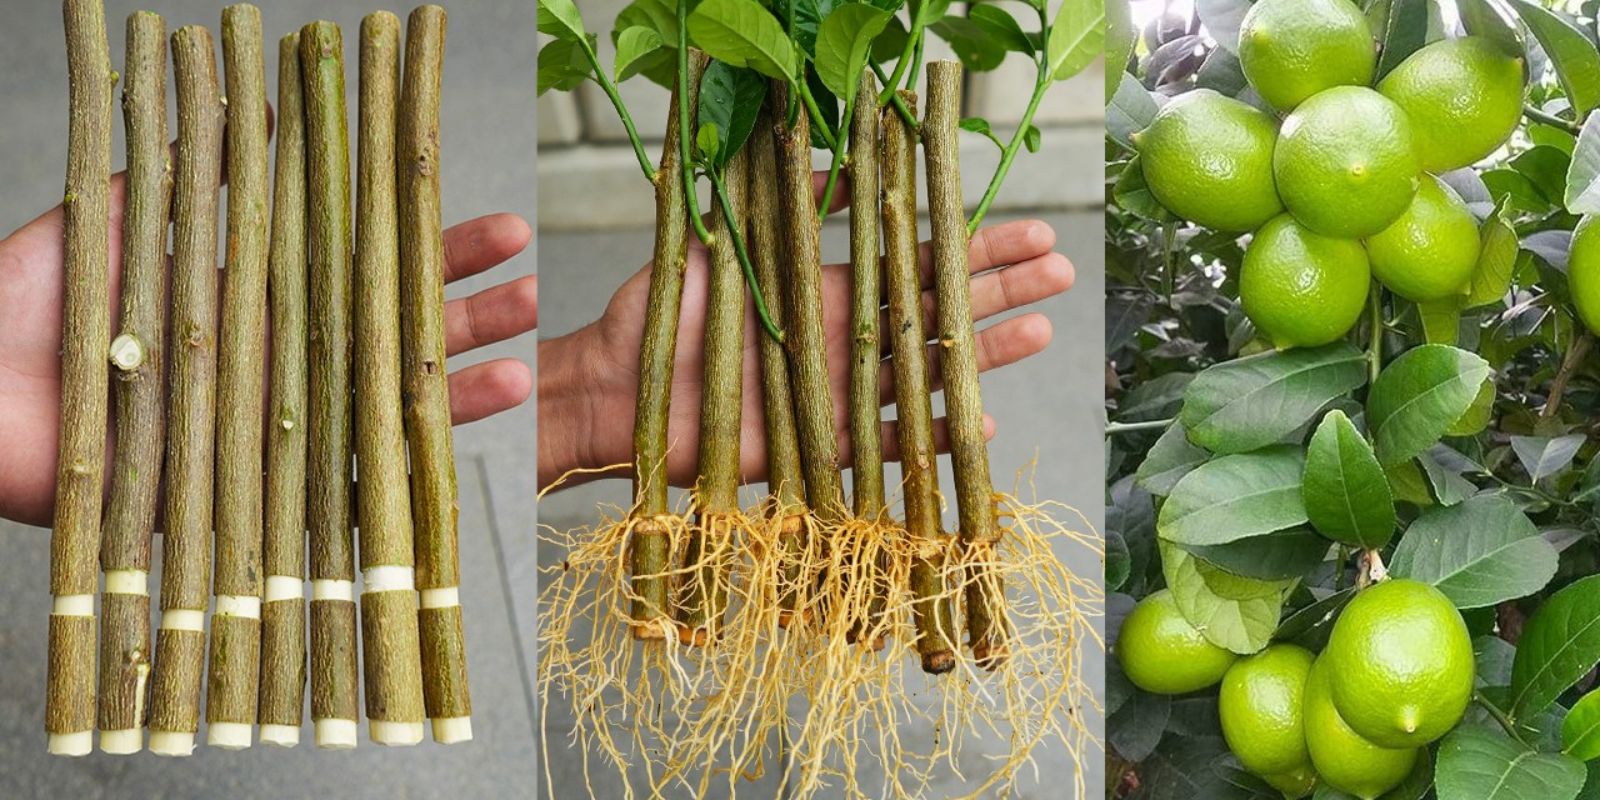
1. Selecting the Right Cutting
The first and most crucial step is selecting a healthy cutting from the parent tree. Choose a branch that is green, but mature, about 6 to 8 inches long. The best time to take a cutting is during the spring or early summer when the tree is actively growing. Look for a cutting with several leaves but avoid overly woody or extremely soft new growth.
When you make the cut, use clean pruning shears to ensure you don’t transfer any diseases to the parent tree or the cutting. Cut at a 45-degree angle just below a node, which is where the leaves emerge from the branch. This will maximize the cutting’s ability to absorb water and nutrients.
2. Preparing the Cutting
Once you’ve selected your cutting, you’ll need to remove the lower leaves. Carefully strip off the leaves from the lower half of the cutting, leaving only a few leaves at the top. This step reduces water loss through transpiration while the cutting is establishing its roots.
After removing the leaves, make a small slit at the base of the cutting, about an inch up from the bottom. This slit increases the surface area for root growth, giving your cutting a better chance of success.
3. Apply Rooting Hormone
To speed up the rooting process and improve the chances of your cutting taking root, dip the base of the cutting into rooting hormone. This is an optional step, but it greatly enhances the chances of successful propagation, especially for beginners. Rooting hormone can be purchased at most gardening centers and is easy to use. Simply dip the bottom 1-2 inches of your cutting into the powder or gel, tapping off any excess.
4. Planting the Cutting
Prepare a small pot with well-draining potting mix, preferably one that is lightweight and contains perlite or vermiculite for aeration. Make a hole in the soil about 2-3 inches deep using a stick or your finger. Insert the prepared cutting into the hole, ensuring that the base is buried and the remaining leaves are above the soil.
Gently press the soil around the cutting to ensure it is supported. Proper support is crucial because it helps the cutting stay upright while the roots begin to form.
5. Create a Humid Environment
Lemon tree cuttings need a high-humidity environment to promote root development. One easy way to do this is by creating a mini greenhouse effect. After planting the cutting, cover the pot with a clear plastic bag, securing it around the pot with a rubber band. The plastic bag traps humidity, creating a perfect environment for root growth.
Make sure the bag doesn’t touch the leaves by using small sticks or stakes to keep it elevated. You can also use a plastic bottle cut in half to cover the plant. This step is vital to prevent the cutting from drying out and encourages rapid root growth.
6. Place the Cutting in Indirect Sunlight
Lemon cuttings need light to grow, but they should not be exposed to direct sunlight at this early stage. Direct sunlight can dry out the cutting before it has time to root. Place the potted cutting in a spot that receives bright, indirect light, such as near a window or under grow lights if you’re propagating indoors.
Ensure that the cutting remains in a warm environment with temperatures around 70-80°F (21-27°C), as warmth is essential for root development.
7. Water and Mist Regularly
Maintaining consistent moisture levels is crucial during the propagation process. While you don’t want to overwater the cutting, the soil should be kept slightly damp at all times. Mist the cutting and the inside of the plastic bag daily with a spray bottle to maintain humidity.
Keep an eye on the soil; it should never be waterlogged, but also not allowed to dry out completely. Over the course of the next few weeks, you will need to continue misting the cutting and monitoring the soil’s moisture level.
8. Monitor Root Growth
After about 4 to 8 weeks, you should start to see signs of root growth. You can gently tug on the cutting to check if it has rooted; if you feel resistance, roots have likely formed. If you don’t see any growth after 8 weeks, be patient and keep caring for the cutting.
Once the roots have developed, remove the plastic bag and allow the cutting to acclimate to regular indoor or outdoor conditions. At this point, you can begin watering it more as you would a regular plant.
9. Transplant the Cutting
When the cutting has established a solid root system, it’s time to transplant it into a larger pot or directly into your garden, depending on your climate. If you live in an area with cold winters, it’s best to keep the lemon tree in a pot that can be brought indoors during the colder months.
When transplanting, choose a sunny spot with well-draining soil, as lemon trees thrive in bright sunlight and don’t like soggy roots. Water regularly and fertilize with a balanced fertilizer to promote healthy growth and fruit production.
Conclusion
Growing a lemon tree from cuttings is not only a rewarding experience but also a great way to ensure you get a tree that produces the same quality fruit as the parent plant. By following these easy steps, you can propagate a lemon tree at home and enjoy fresh lemons much sooner than growing from seeds.
With just a bit of time, patience, and care, you can have your very own thriving lemon tree, all from a single cutting. Start your citrus gardening journey today and share your progress with fellow gardeners!
Engage with us:
🍋 Ready to grow your own lemon tree? Try this cutting propagation method and share your experience! #LemonTreePropagation #HomeGarden #GrowYourOwn #GreenThumb #DIYGardening