
Lavender, with its fragrant aroma and vibrant purple blooms, is one of the most beloved herbs in gardens around the world. Not only does it provide a soothing scent, but its flowers attract pollinators, and its essential oils are known for their therapeutic benefits. Whether you’re a seasoned gardener or a beginner, propagating lavender from cuttings is an easy and effective way to multiply this wonderful plant. In this article, we will walk you through everything you need to know to successfully propagate lavender from cuttings and enjoy an abundance of this aromatic herb in your own garden.
Why Propagate Lavender from Cuttings?
Before diving into the “how-to,” it’s important to understand why you should propagate lavender from cuttings in the first place. Lavender can be expensive to purchase from nurseries, and if you already have a healthy, mature lavender plant, it’s simple to propagate it and grow more plants.
Propagation by cuttings allows you to replicate the exact traits of the parent plant, ensuring that you maintain the same flower color, scent, and growth habits. Additionally, lavender is a low-maintenance, drought-tolerant plant that thrives in sunny gardens, making it perfect for beginner gardeners who want a reliable and beautiful addition to their landscape.
Materials You’ll Need
- Healthy lavender plant
- Clean, sharp scissors or pruning shears
- Rooting hormone (optional but recommended)
- Small pots or containers
- Well-draining potting mix (preferably with a mix of sand or perlite)
- Plastic bag or clear plastic dome
- Spray bottle or watering can
Best Time to Propagate Lavender
Timing is crucial when propagating lavender. The best time to take cuttings is during late spring or early summer, when the plant is actively growing but not yet flowering. During this period, lavender cuttings have a better chance of rooting and developing into healthy plants. Avoid taking cuttings during the winter months, as lavender is dormant and will not root as successfully during colder seasons.
Steps to Propagate Lavender from Cuttings
Now that you know why and when to propagate lavender, let’s break down the step-by-step process of propagating this hardy herb from cuttings.
1. Select a Healthy Lavender Plant
Choose a healthy lavender plant to take your cuttings from. Look for a plant that is free from pests and disease, with plenty of green, leafy growth. It’s also important to choose a plant that hasn’t yet bloomed, as this will ensure that the cutting is still in a vegetative stage, which is best for rooting.
2. Prepare Your Tools
Before taking any cuttings, make sure your scissors or pruning shears are clean and sharp. Clean tools prevent the spread of disease and allow you to make clean cuts, reducing the chances of damaging the plant or the cutting. You can disinfect the tools by wiping them with rubbing alcohol or diluted bleach before use.
3. Take the Cutting
Cut a healthy, non-flowering stem that is 4-6 inches long. The best cuttings come from semi-woody stems, which are neither too soft nor too woody. Look for a green, flexible stem with no flowers or buds. You can remove the lower leaves of the stem, leaving only the top two to three inches of the cutting covered with leaves. This ensures the cutting can focus its energy on root development rather than supporting leaves.
4. Remove the Lower Leaves
After cutting the stem, remove the leaves from the lower half to two-thirds of the cutting. This prevents the leaves from touching the soil, where they could rot. Be gentle when removing the leaves to avoid damaging the stem.
5. Apply Rooting Hormone (Optional)
Although lavender can root without rooting hormone, applying it can significantly increase your chances of success. Rooting hormone stimulates root growth and helps the cutting establish itself more quickly. Dip the cut end of the stem into rooting hormone, tapping off any excess before planting. Be sure to use the correct type of rooting hormone—some are formulated specifically for hardwood cuttings, while others are for softwood cuttings.
6. Prepare the Pot and Soil
Choose a small pot with good drainage holes to avoid waterlogging, which could lead to rot. Fill the pot with a well-draining potting mix, preferably one that contains sand or perlite to improve drainage. Lavender does not like to sit in wet soil, so it’s essential that the soil is light and porous. You can also use a mix of one part perlite and one part cactus or succulent mix for added drainage.
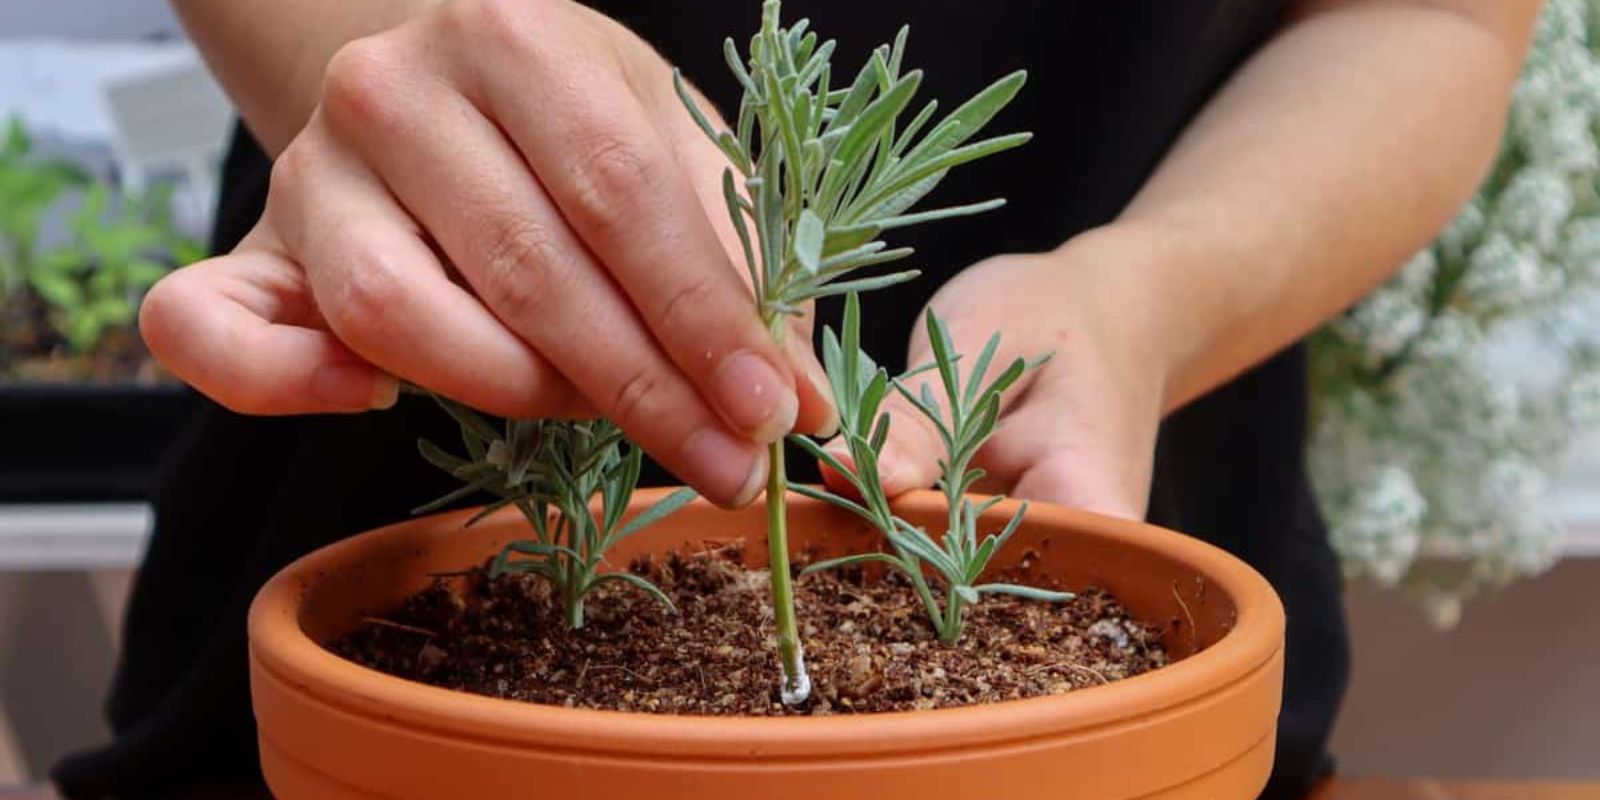
7. Plant the Cutting
Insert the cutting into the soil, burying it at least one inch deep. Press the soil gently around the cutting to ensure it stays upright and is in firm contact with the soil. Be careful not to damage the cutting during this step.
8. Create a Humid Environment
To encourage the cutting to root, it needs a humid environment. You can create this by covering the pot with a clear plastic bag or a plastic dome. This helps retain moisture and prevents the cutting from drying out. Ensure that the plastic is not touching the cutting itself, as this could cause mold to form.
If you’re using a plastic bag, make sure to leave a small opening to allow for air circulation, which will help prevent fungal issues. Alternatively, you can place the pot in a humidity dome or use a small greenhouse setup if you have one.
9. Place the Cutting in a Bright, Warm Location
Lavender cuttings need bright, indirect light to root successfully. Place the pot in a warm spot, but out of direct sunlight, which could scorch the delicate cutting. The temperature should be between 65°F and 75°F (18°C to 24°C). If possible, place the pot near a sunny window, but avoid intense afternoon sun, as this could overheat the cutting.
10. Mist Regularly and Keep Soil Moist
Mist the cutting regularly with a spray bottle to maintain humidity. Keep the soil lightly moist, but be careful not to overwater. Lavender doesn’t like wet feet, and too much moisture can lead to rot. It’s best to let the top inch of soil dry out before watering again.
11. Check for Root Development
After 4-6 weeks, gently tug on the cutting to check for root growth. If you feel resistance, this means roots have begun to form. At this point, you can begin to remove the plastic covering, but continue to keep the cutting in a humid environment for a while longer to ensure it fully establishes.
12. Transplanting the Cutting
Once the cutting has developed a strong root system, it’s ready to be transplanted into a larger pot or directly into your garden. If you’re transplanting it outdoors, make sure the weather is warm enough, as lavender needs full sun and well-draining soil. Harden the cutting off by gradually acclimating it to outdoor conditions over the course of a week.
Tips for Success in Propagating Lavender
- Choose the Right Variety: Some varieties of lavender root better from cuttings than others. English lavender (Lavandula angustifolia) is generally the easiest to propagate, while French lavender (Lavandula dentata) may be a little more challenging.
- Use Clean Tools: Always use clean tools to prevent infection. A clean, sharp cut will help the cutting heal faster and root more successfully.
- Be Patient: Lavender is a slow grower, and it can take several weeks for cuttings to root. Don’t rush the process, and give your cuttings plenty of time to establish strong roots before moving them to their permanent location.
Conclusion
Propagating lavender from cuttings is an easy, cost-effective way to grow more of this fragrant herb. By following these steps and tips, you can enjoy an abundance of lavender in your garden. Whether you’re using lavender for its beauty, its scent, or its many culinary and medicinal benefits, taking the time to propagate this herb will be a rewarding experience. Start propagating today, and you’ll soon have a garden full of thriving lavender plants to enjoy for years to come.
Motivating Sentence
Ready to grow your own lavender collection? Start propagating today and watch your garden bloom with beautiful, fragrant lavender! 🌿💜 #LavenderLove #PlantPropagation #GardenGoals #HerbGarden #GardeningTips