
Hydrangeas are stunning, lush flowering plants that bring vibrancy to any garden. Known for their large blooms and variety of colors, these perennial beauties can easily become the centerpiece of your outdoor space. One of the most cost-effective ways to expand your collection is through propagation, specifically from cuttings. This method not only saves money but also allows you to share these beautiful plants with friends and family. In this guide, we’ll explore how to propagate hydrangeas from cuttings in 7 easy steps, along with tips, tricks, and best practices to ensure success.
Understanding Hydrangeas
Before we dive into propagation, it’s important to understand the different types of hydrangeas. The most common varieties include:
- Hydrangea macrophylla (Bigleaf Hydrangea): Known for its large, rounded flower heads and ability to change color based on soil pH.
- Hydrangea paniculata (Panicle Hydrangea): Features cone-shaped flower clusters and is more tolerant of pruning and drought.
- Hydrangea arborescens (Smooth Hydrangea): Characterized by its white flowers and ability to thrive in various conditions.
Each type has its specific growing needs and preferred environmental conditions, so choose the one that best suits your gardening style and location.
Benefits of Propagating Hydrangeas from Cuttings
Propagating hydrangeas from cuttings has several advantages:
- Cost-Effective: Instead of purchasing new plants, you can create new ones from existing plants.
- Genetic Consistency: Cuttings will retain the characteristics of the parent plant, ensuring you get the same beautiful flowers.
- Expand Your Garden: It’s a great way to fill your garden with more of your favorite hydrangeas without spending a lot of money.
- Fun and Educational: Learning to propagate plants can be a rewarding experience, enhancing your gardening skills.
Tools and Materials Needed
Before you begin propagating hydrangeas, gather the necessary tools and materials:
- Sharp pruning shears: To take clean cuts without damaging the plant.
- Rooting hormone: Optional but recommended for enhancing root development.
- Small pots or trays: For planting the cuttings.
- Potting mix: A well-draining mix that retains moisture without becoming soggy.
- Plastic bag or dome: To create a humid environment for the cuttings.
- Watering can or spray bottle: For keeping the soil moist.
Step-by-Step Guide to Propagate Hydrangeas from Cuttings
Step 1: Choose the Right Time
Timing is crucial when propagating hydrangeas. The best time to take cuttings is in late spring or early summer, during the plant’s active growing season. At this time, the stems are soft and pliable, making them more receptive to rooting. Avoid taking cuttings during late summer or fall when the plant is preparing for dormancy.
Step 2: Select Healthy Cuttings
Choose healthy, vigorous stems from the parent hydrangea plant. Look for non-flowering stems, as these are typically more successful in rooting. Cuttings should be about 4 to 6 inches long and have at least two or three sets of leaves. Avoid using stems that show signs of disease or damage.
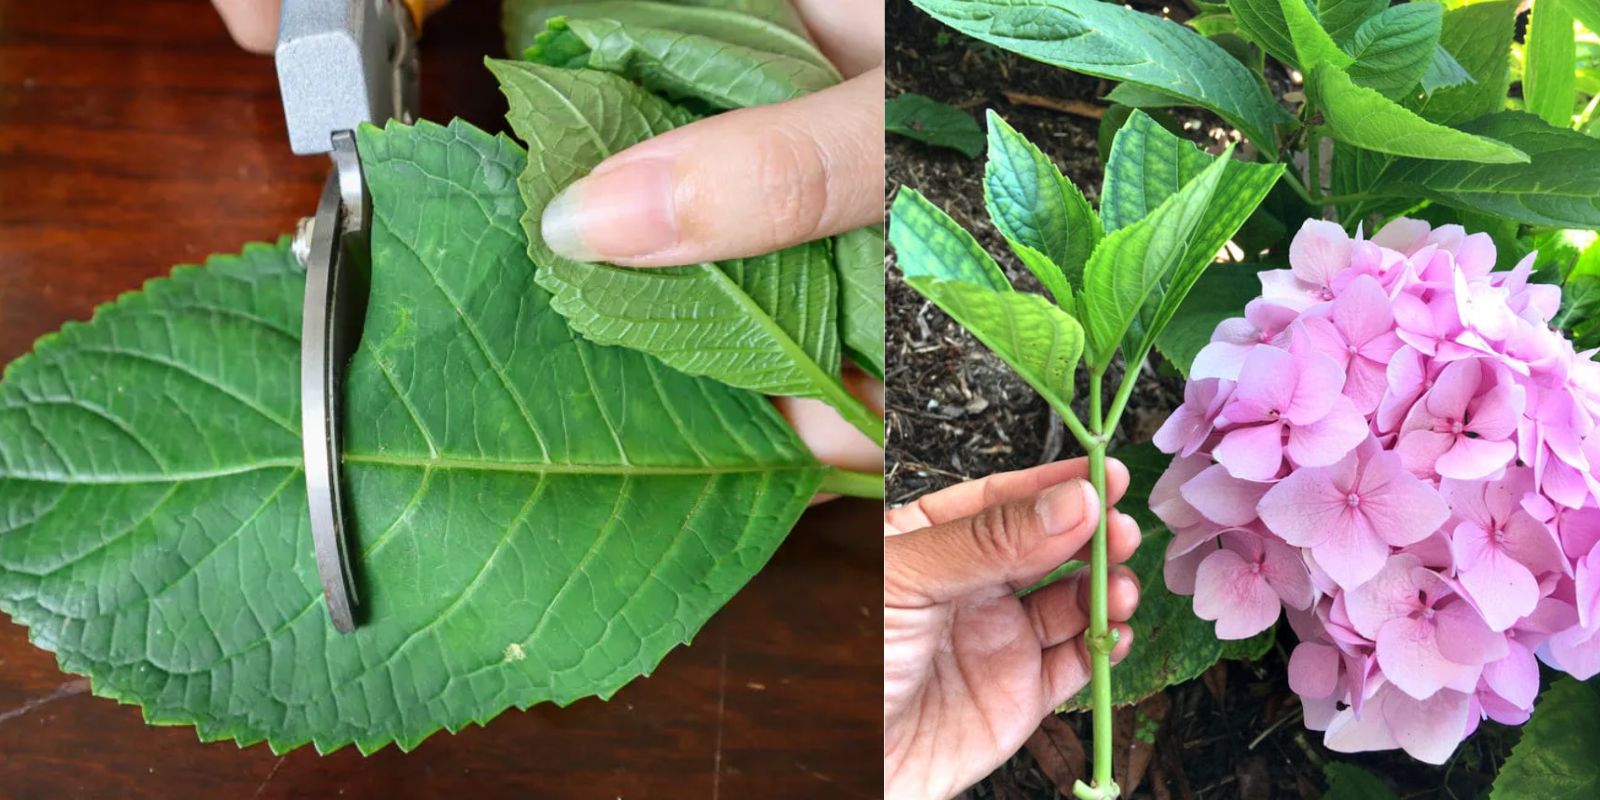
Step 3: Prepare the Cuttings
Once you have selected the cuttings, it’s time to prepare them for planting:
- Use sharp pruning shears to cut the stem just below a leaf node (the bump where leaves grow).
- Remove the lower leaves, leaving one or two leaves at the top of the cutting. This minimizes moisture loss while still allowing the cutting to photosynthesize.
Step 4: Use Rooting Hormone
While not strictly necessary, using rooting hormone can significantly improve your chances of success. It helps stimulate root growth and can lead to faster development:
- Dip the cut end of each cutting into rooting hormone, ensuring it’s well-coated.
- Tap off any excess powder. If you’re using liquid rooting hormone, follow the manufacturer’s instructions.
Step 5: Plant the Cuttings
Now it’s time to plant your cuttings:
- Fill small pots or trays with a well-draining potting mix. Make sure to moisten the soil before planting.
- Use your finger or a pencil to create a hole in the soil for each cutting.
- Insert the cut end of the cutting into the hole, burying it about 2 inches deep.
- Gently firm the soil around the cutting to ensure good contact.
Step 6: Provide Humidity
Creating a humid environment is essential for successful rooting. Hydrangea cuttings require high humidity levels to prevent them from wilting while they develop roots:
- Cover the pots or trays with a plastic bag or a clear plastic dome to trap moisture.
- Ensure the cover doesn’t touch the leaves of the cuttings, as this can lead to mold or rot.
- If using a plastic bag, you can support it with stakes to create space for the cuttings.
Step 7: Monitor and Care for the Cuttings
Once your cuttings are planted and covered, it’s essential to monitor their conditions:
- Light: Place the pots in a location that receives bright, indirect sunlight. Direct sunlight can scorch the cuttings, while too little light can slow down growth.
- Watering: Keep the potting mix consistently moist but not soggy. Use a spray bottle to mist the cuttings daily, maintaining humidity levels.
- Temperature: Aim for a warm environment, ideally between 70°F and 75°F (21°C to 24°C). If temperatures drop, consider using a heat mat to provide warmth.
- Check for Roots: After about 4–6 weeks, gently tug on the cuttings to see if you feel resistance. If they resist pulling, roots are likely developing.
Transplanting Your New Hydrangeas
Once the cuttings have established a robust root system, it’s time to transplant them into larger pots or your garden:
- Timing: Wait until the cuttings have at least 2–3 inches of roots before transplanting.
- Transplanting: Gently remove the cuttings from their pots, being careful not to damage the roots. Plant them in larger pots filled with quality potting mix or directly in the garden.
- Acclimatization: If transplanting outdoors, gradually acclimate the young plants to outdoor conditions over a week or two. This process is known as “hardening off” and helps reduce transplant shock.
Caring for Newly Transplanted Hydrangeas
After transplanting, your new hydrangeas will need some care:
- Watering: Keep the soil consistently moist as the plants establish themselves. Water deeply but allow the top inch of soil to dry out between watering sessions.
- Fertilizing: After a few weeks, you can begin fertilizing with a balanced fertilizer to promote growth. Follow the manufacturer’s instructions for application rates.
- Mulching: Apply a layer of mulch around the base of the plants to help retain moisture, suppress weeds, and regulate soil temperature.
Common Challenges and Troubleshooting
While propagating hydrangeas is generally straightforward, you may encounter some challenges:
- Wilting Cuttings: If your cuttings are wilting, they may be exposed to too much sunlight or not enough humidity. Ensure they are in a suitable environment and mist them more frequently.
- Root Rot: Overly wet soil can lead to root rot. Make sure your potting mix drains well and avoid overwatering.
- Mold Growth: If you notice mold forming on the soil surface or the cuttings, increase air circulation by removing the plastic cover for short periods. If mold persists, consider repotting the cuttings in fresh soil.
Frequently Asked Questions
Q: How long does it take for hydrangea cuttings to root?
A: Hydrangea cuttings typically take about 4–6 weeks to develop roots, but this can vary based on environmental conditions.
Q: Can I propagate hydrangeas in water?
A: While it’s possible to propagate hydrangeas in water, the success rate is generally lower than with soil. It’s best to follow the soil method for optimal results.
Q: What should I do if my cuttings don’t root?
A: If your cuttings don’t root, try taking new cuttings and ensure you follow all steps closely, particularly focusing on humidity and light conditions.
Q: Can I propagate hydrangeas in the fall?
A: Fall is not ideal for taking cuttings as the plant is entering dormancy. Late spring or early summer is the best time for propagation.
Conclusion
Propagating hydrangeas from cuttings is a simple and gratifying way to expand your garden and enjoy these beautiful blooms year after year. By following these seven easy steps, you can successfully root hydrangeas and enjoy the satisfaction of nurturing new plants from your existing ones. Whether you choose to keep them for yourself or share them with others, the joy of growing your own hydrangeas is truly rewarding.
Are you ready to propagate your hydrangeas? Share your progress, tips, and questions in the comments below! 🌺🌿