
Hibiscus plants, with their large, vibrant flowers, are a favorite among gardeners and plant lovers. These tropical beauties can be grown outdoors in warm climates or indoors in cooler regions. While hibiscus plants can be propagated through seeds, cuttings are often a faster and more reliable way to grow new plants. One of the easiest and most successful methods for propagating hibiscus is in water. This method not only simplifies the process but also ensures a higher success rate, making it an ideal option for both beginners and experienced gardeners.
In this comprehensive guide, we’ll walk you through everything you need to know about propagating hibiscus in water. From selecting the perfect cutting to caring for your new plant, we’ll cover each step to help you achieve 100% success. So, let’s dive into the world of hibiscus propagation and learn how to grow your own beautiful hibiscus plants!
Why Propagate Hibiscus in Water?
Water propagation is a fantastic method for hibiscus because it provides a clean, simple, and straightforward way to grow roots without the need for complex tools or techniques. By rooting hibiscus cuttings in water, you can visually monitor the progress of the roots, which gives you the advantage of knowing exactly when the cutting is ready to be planted. Furthermore, water propagation eliminates the risk of over-watering or underwatering, as the cutting naturally absorbs the right amount of water.
Using this method, you’ll have a healthy, thriving hibiscus plant in no time—and the best part is that it’s a technique that almost anyone can do, regardless of their gardening experience.
Step 1: Choose the Right Hibiscus Cutting
The first step in propagating hibiscus is to select the right cutting. It’s important to use a healthy, disease-free stem for the best chance of success. Look for a young, non-flowering branch that has strong, healthy growth. Avoid choosing stems with flowers or buds, as they will divert energy away from rooting.
What to Look For:
- Healthy Growth: Choose a stem that looks fresh and vibrant with no signs of wilting, yellowing, or damage.
- Length: Aim for a cutting that is about 6-8 inches long. A longer cutting can be trimmed if needed.
- Node: A stem with at least one leaf node (the small bump where leaves grow) is ideal for rooting. This is where the roots will begin to form.
- No Flowers or Buds: Remove any flowers or buds, as the plant will focus on root development rather than blooming.
Using the right cutting is essential to ensuring the success of your propagation. A healthy, vigorous stem is more likely to produce strong roots and develop into a healthy plant.
Step 2: Preparing the Cutting
Once you’ve selected the right stem, it’s time to prepare it for water propagation. Proper preparation will help prevent rot and encourage root growth.
Steps to Prepare the Cutting:
- Make the Cut: Use clean, sharp scissors or pruning shears to cut a 6-8 inch stem just below a leaf node. Be sure to cut at a slight angle to help the cutting absorb water more efficiently.
- Remove the Lower Leaves: Carefully remove any leaves from the bottom 2-3 inches of the cutting. This will prevent the leaves from touching the water, which can lead to rot. Leave a few leaves at the top of the cutting to help the plant absorb energy through photosynthesis.
- Trim the Cutting: If your cutting has any remaining flowers or buds, gently remove them. These can take away energy from root development.
Once your cutting is prepared, it’s ready to be placed in water. Take care to make the cutting clean and neat to avoid contamination.
Step 3: Submerge the Cutting in Water
Now that you’ve prepared your hibiscus cutting, it’s time to place it in water. The next part of the process is crucial: keeping the cutting submerged in water while ensuring it’s not touching the container’s sides or bottom. This will keep the cutting from rotting while allowing the roots to form.
How to Place the Cutting:
- Choose a Container: Select a glass or clear plastic container that is tall enough to hold the cutting. A clear container will allow you to see the roots as they begin to develop. Make sure the container is clean and free from any residues or contaminants.
- Add Water: Fill the container with clean, room-temperature water. Use filtered water or tap water that has been left to sit for 24 hours to allow any chlorine to dissipate. The water should cover the bottom 2-3 inches of the cutting but should not submerge the leaves.
- Submerge the Cutting: Place the cutting in the container, ensuring that only the cut end is submerged in the water. Be sure that no leaves are touching the water, as this can cause rot.
- Place the Container in a Bright Spot: Put the container in a location that receives bright, indirect sunlight. Too much direct sunlight can heat the water and damage the cutting, while too little light will slow down the rooting process.
It’s important to change the water every 2-3 days to keep it fresh and oxygenated. Stagnant water can lead to mold, algae, or rot, which can harm the cutting.
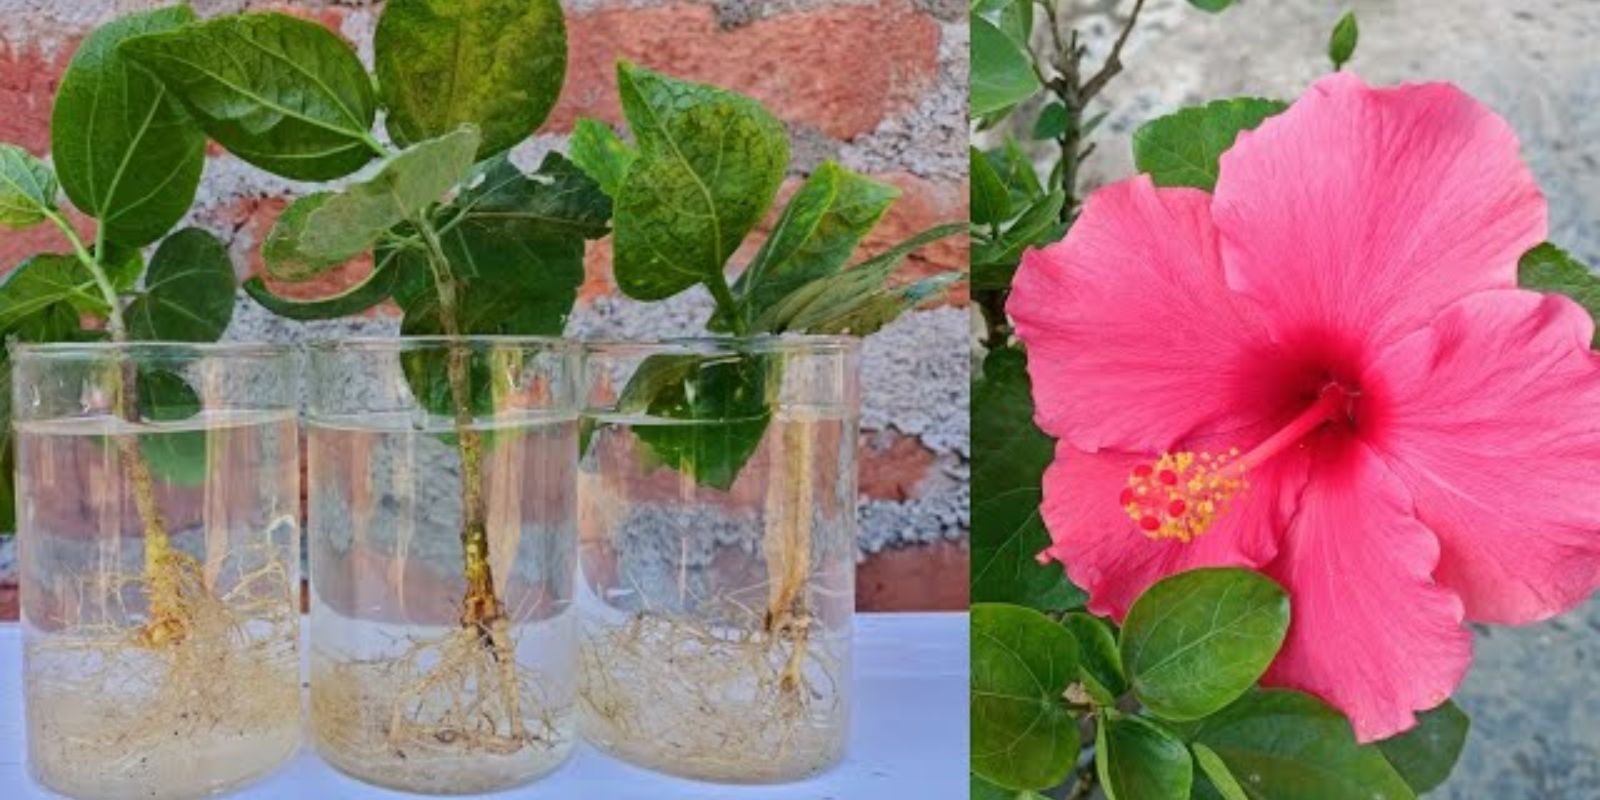
Step 4: Wait for Roots to Develop
The next step in the propagation process is waiting for the roots to form. Be patient during this stage, as it can take anywhere from 2-4 weeks for roots to develop, depending on the temperature, light, and health of the cutting. As the cutting begins to form roots, you’ll notice small white tendrils starting to emerge from the base of the stem. This is a sign that the cutting is beginning to establish a healthy root system.
Tips for Successful Rooting:
- Maintain Proper Water Levels: Make sure the water level remains consistent and the cut end is always submerged. Add water as needed to keep the cutting covered.
- Monitor Root Development: Check the roots every few days. As the roots grow longer, it’s a good idea to gently rinse the cutting with fresh water to remove any debris.
- Be Patient: Rooting takes time, so be patient and avoid moving the cutting around too much. Let the roots grow naturally.
Once the roots are 2-3 inches long, your hibiscus cutting is ready to be transplanted into soil.
Step 5: Transplant the Rooted Cutting into Soil
After a few weeks, when the cutting has developed a solid root system, it’s time to plant it into a pot with well-draining soil. The soil will provide the cutting with the nutrients it needs to grow and flourish.
How to Transplant:
- Prepare the Pot: Choose a small pot with drainage holes to prevent waterlogging. Fill it with a good-quality potting mix, such as one formulated for tropical plants.
- Plant the Cutting: Carefully remove the rooted cutting from the water and gently plant it into the soil. Ensure that the roots are spread out and not tangled. Firm the soil around the base of the cutting to secure it.
- Water the Plant: Water the newly planted cutting thoroughly, ensuring that the soil is moist but not soggy. Continue to water it regularly to keep the soil slightly moist.
- Place in Indirect Light: Keep the potted hibiscus cutting in a location with bright, indirect sunlight. Avoid direct sunlight until the plant is well-established.
Step 6: Care for the New Hibiscus Plant
After transplanting, your hibiscus plant will need some care to ensure it thrives. Keep an eye on the plant as it adjusts to its new home.
Tips for Hibiscus Care:
- Watering: Water the plant regularly, ensuring the soil remains evenly moist but not soggy. Hibiscus plants like consistently moist soil, but they don’t like to sit in water.
- Fertilizing: After the plant has been in the soil for about 4-6 weeks, begin feeding it with a balanced liquid fertilizer every 4 weeks to encourage healthy growth.
- Repotting: As the plant grows, it may outgrow its pot. Repot it into a larger container when necessary, ensuring the new pot has good drainage.
- Pruning: Prune the hibiscus plant to encourage branching and a bushy shape. Remove dead or yellowing leaves to keep the plant looking tidy.
Common Problems and Solutions
While propagating hibiscus in water is generally easy, there are a few challenges you might face. Here are some common issues and how to address them:
- Rotting Cuttings: If your cutting starts to rot, it could be due to stagnant water or the cutting being submerged too long. Make sure to change the water regularly and keep the cutting above the waterline.
- No Root Development: If roots aren’t forming, it may be due to inadequate light or too low of a temperature. Make sure the cutting is in a bright spot with indirect sunlight and keep the room temperature warm (70°F to 85°F or 21°C to 29°C).
- Wilting After Transplanting: Sometimes, newly transplanted cuttings can wilt. This is normal, but be sure to water them thoroughly and keep them in a shaded spot until they recover.
Conclusion
Propagating hibiscus in water is a fun and rewarding process that can lead to the creation of new, beautiful plants. By following the steps outlined in this guide, you can achieve a high success rate and grow your own hibiscus plants from cuttings. With proper care and attention, your new plants will thrive and bloom, adding a burst of color to your home or garden.
So, gather your hibiscus cutting, prepare your container, and get started with water propagation today! Happy gardening! 🌺