
Introduction
Guava trees (Psidium guajava) are known for their delicious fruit and attractive foliage. They are relatively easy to grow and care for, making them a popular choice for home gardeners. One of the most efficient ways to propagate guava trees is through cuttings, and when combined with the natural rooting properties of Aloe Vera, the process becomes even more accessible. This guide will take you through the steps of propagating guava trees from cuttings using Aloe Vera, making it perfect for beginners looking to expand their garden.
Why Propagate Guava Trees from Cuttings?
Propagation by cuttings is a favored method among gardeners for several reasons:
- Consistency: Trees grown from cuttings will be true to the parent plant, ensuring that the new trees will bear fruit identical in quality and flavor.
- Faster Growth: Compared to growing from seeds, cuttings tend to establish more quickly, leading to faster fruit production.
- Cost-Effective: Propagating from cuttings allows you to grow multiple trees without purchasing new plants.
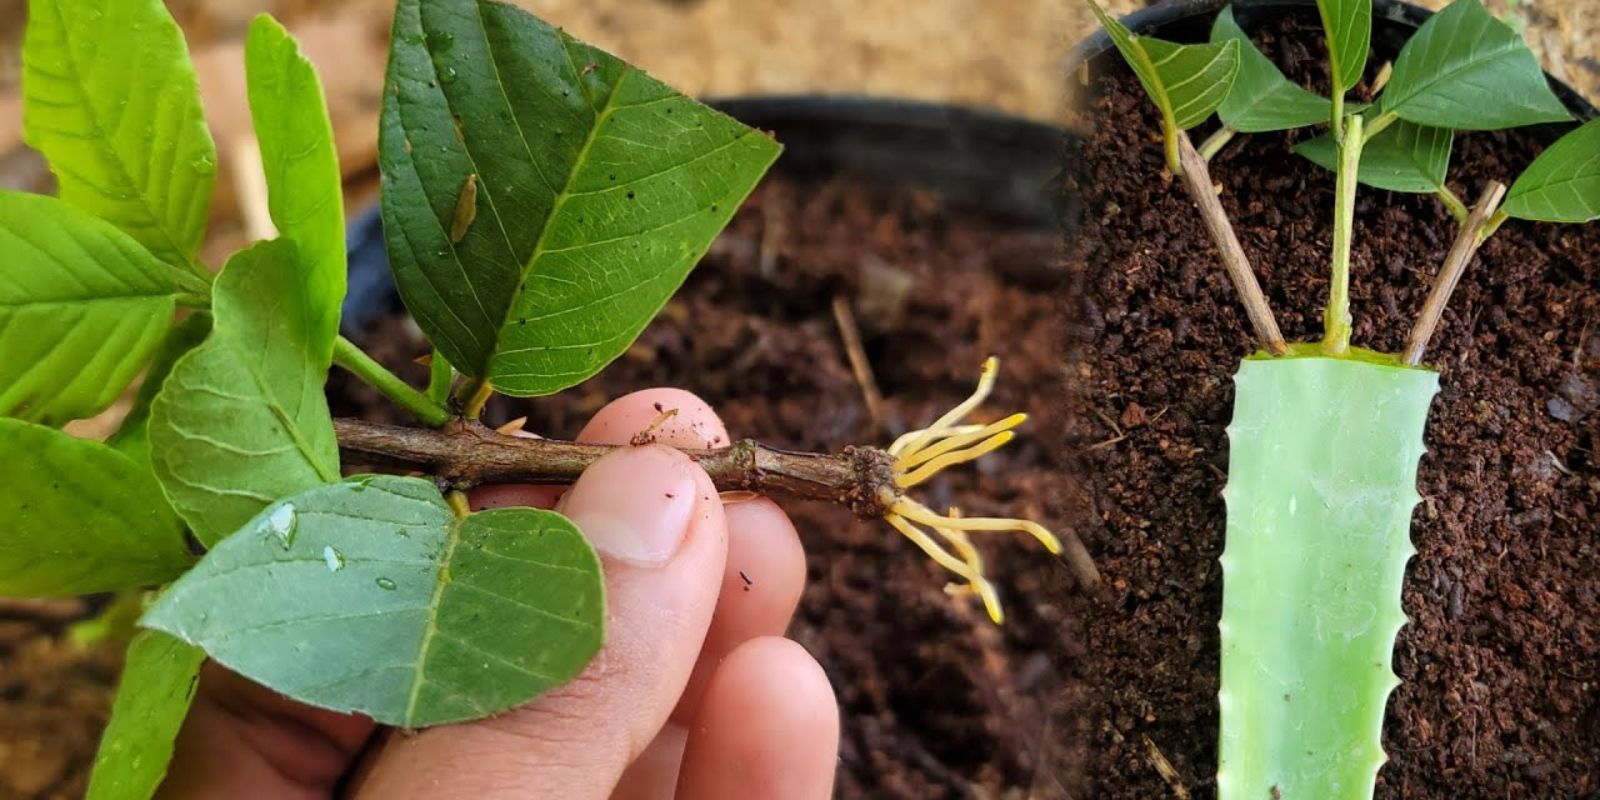
The Role of Aloe Vera in Propagation
Aloe Vera is not just a household remedy for burns and skin irritations; it’s also a powerful natural rooting agent. Aloe Vera gel contains enzymes and hormones that promote root growth, making it an excellent choice for encouraging the development of roots in plant cuttings.
Step-by-Step Guide to Propagating Guava Trees Using Aloe Vera
1. Selecting and Preparing Your Guava Cuttings
The first step in propagating guava trees is selecting the right cutting from a healthy parent tree. Here’s how:
- Choose the Right Branch: Look for a healthy branch that is about 6-8 inches long. The branch should be semi-hardwood, meaning it’s not too young and green, but not too old and woody either. A semi-hardwood cutting will have the best chance of rooting successfully.
- Make the Cut: Using a sharp, clean pair of pruning shears, make a clean cut at a 45-degree angle just below a node (the point where leaves are attached to the stem). This angle increases the surface area for root development.
- Remove Lower Leaves: Carefully remove the leaves from the lower half of the cutting, leaving only a few leaves at the top. This reduces water loss through transpiration and encourages the cutting to focus its energy on root development.
2. Preparing the Aloe Vera Gel
Aloe Vera gel acts as a natural rooting hormone, helping your guava cutting to establish roots more quickly. To prepare the Aloe Vera:
- Harvest the Gel: If you have an Aloe Vera plant, simply cut a leaf close to the base and squeeze out the fresh gel. If you don’t have a plant, store-bought pure Aloe Vera gel can also be used, but make sure it contains no added chemicals or preservatives.
- Apply the Gel: Dip the cut end of the guava cutting into the Aloe Vera gel, ensuring that the gel covers the entire cut surface. You can also apply a small amount of gel to the nodes where leaves were removed.
3. Planting the Guava Cutting
Once your guava cutting is prepared and treated with Aloe Vera, it’s time to plant it. Here’s what you need to do:
- Choose the Right Soil: Guava cuttings need well-draining soil to prevent root rot. A mixture of equal parts perlite, sand, and potting soil works well. This blend ensures that the soil retains enough moisture without becoming waterlogged.
- Plant the Cutting: Make a small hole in the center of the soil using your finger or a pencil. Insert the cutting into the hole, burying it about 2 inches deep. Gently press the soil around the base of the cutting to hold it in place.
- Watering: Lightly water the soil to settle it around the cutting. The soil should be moist but not soaked. Overwatering can lead to fungal growth and rot, which can kill the cutting before it has a chance to root.
4. Caring for Your Guava Cutting
After planting, proper care is essential to encourage root development and overall health of the cutting:
- Light: Place the potted cutting in a warm, bright location where it will receive indirect sunlight. Direct sunlight can be too harsh and may cause the cutting to dry out before it establishes roots.
- Temperature: Guava cuttings prefer a warm environment, ideally between 70°F and 85°F. If you live in a cooler climate, consider using a heat mat to maintain a consistent temperature.
- Humidity: High humidity helps prevent the cutting from losing moisture too quickly. You can create a mini greenhouse effect by covering the cutting with a plastic bag or placing it in a propagator. Just make sure to ventilate occasionally to prevent mold growth.
- Watering: Keep the soil consistently moist but not waterlogged. Check the soil regularly, and water as needed to maintain a light moisture level. Be cautious not to overwater, as this can lead to rot.
5. Transplanting Your Rooted Guava Cutting
With proper care, your guava cutting should begin to develop roots within 4-6 weeks. You can check for root growth by gently tugging on the cutting; if you feel resistance, it means roots have formed.
- Transplanting: Once the cutting has developed a healthy root system, it’s time to transplant it into a larger pot or directly into the ground. Choose a sunny location with well-draining soil for your new guava tree.
- Ongoing Care: Continue to care for your guava tree by providing adequate sunlight, water, and occasional fertilization. With time, your guava tree will grow strong and healthy, eventually producing delicious fruit.
Conclusion
Propagating guava trees from cuttings using Aloe Vera is a straightforward and rewarding process, especially for beginners. By following these simple steps, you can grow your own guava trees at home, enjoying the benefits of this tropical fruit right from your garden. Not only does this method save you money, but it also allows you to cultivate strong, healthy trees that are true to the parent plant. So why not give it a try? With a bit of patience and care, you’ll soon have a thriving guava tree ready to produce fruit for years to come.
Call to Action
Ready to start propagating guava trees? Gather your materials, follow these steps, and share your progress with us! If you have any questions or need additional tips, feel free to ask in the comments below. Happy gardening! 🌱