
Orchids are among the most popular and beautiful houseplants, known for their exotic flowers and long-lasting blooms. While many people enjoy growing orchids, propagating them can seem like a daunting task. However, there is a surprisingly simple method involving a common household item: a banana peel. This natural and effective technique can help you propagate your orchids with ease. In this article, we will explore the step-by-step process of propagating an orchid using a banana peel, ensuring you have a healthy and thriving new plant.
Introduction
Orchids (family Orchidaceae) are beloved for their stunning flowers and unique appearance. However, propagating these delicate plants can be challenging, particularly for beginners. Traditional methods often involve complex techniques and specialized equipment. Fortunately, nature provides a simple and organic alternative: the banana peel. Rich in potassium and other nutrients, banana peels can aid in the growth and development of orchid roots, making them an ideal tool for propagation.
Benefits of Using a Banana Peel for Orchid Propagation
- Nutrient-Rich: Banana peels are high in potassium, phosphorus, and calcium, essential nutrients that support root development and overall plant health.
- Natural and Organic: This method avoids chemical rooting hormones, making it a safe and environmentally friendly option.
- Cost-Effective: Using banana peels is a cost-effective way to propagate orchids, utilizing a common kitchen waste product.
- Simple and Accessible: This technique is straightforward and requires minimal materials, making it accessible for all gardeners, regardless of experience level.
Step-by-Step Guide to Propagating an Orchid with a Banana Peel
Step 1: Select a Healthy Orchid
- Choose a Healthy Parent Plant: Select a mature and healthy orchid with strong, green leaves and robust aerial roots. The parent plant should be free from diseases and pests.
- Identify Suitable Aerial Roots: Look for healthy aerial roots on the orchid. These roots are typically green or white and firm to the touch.
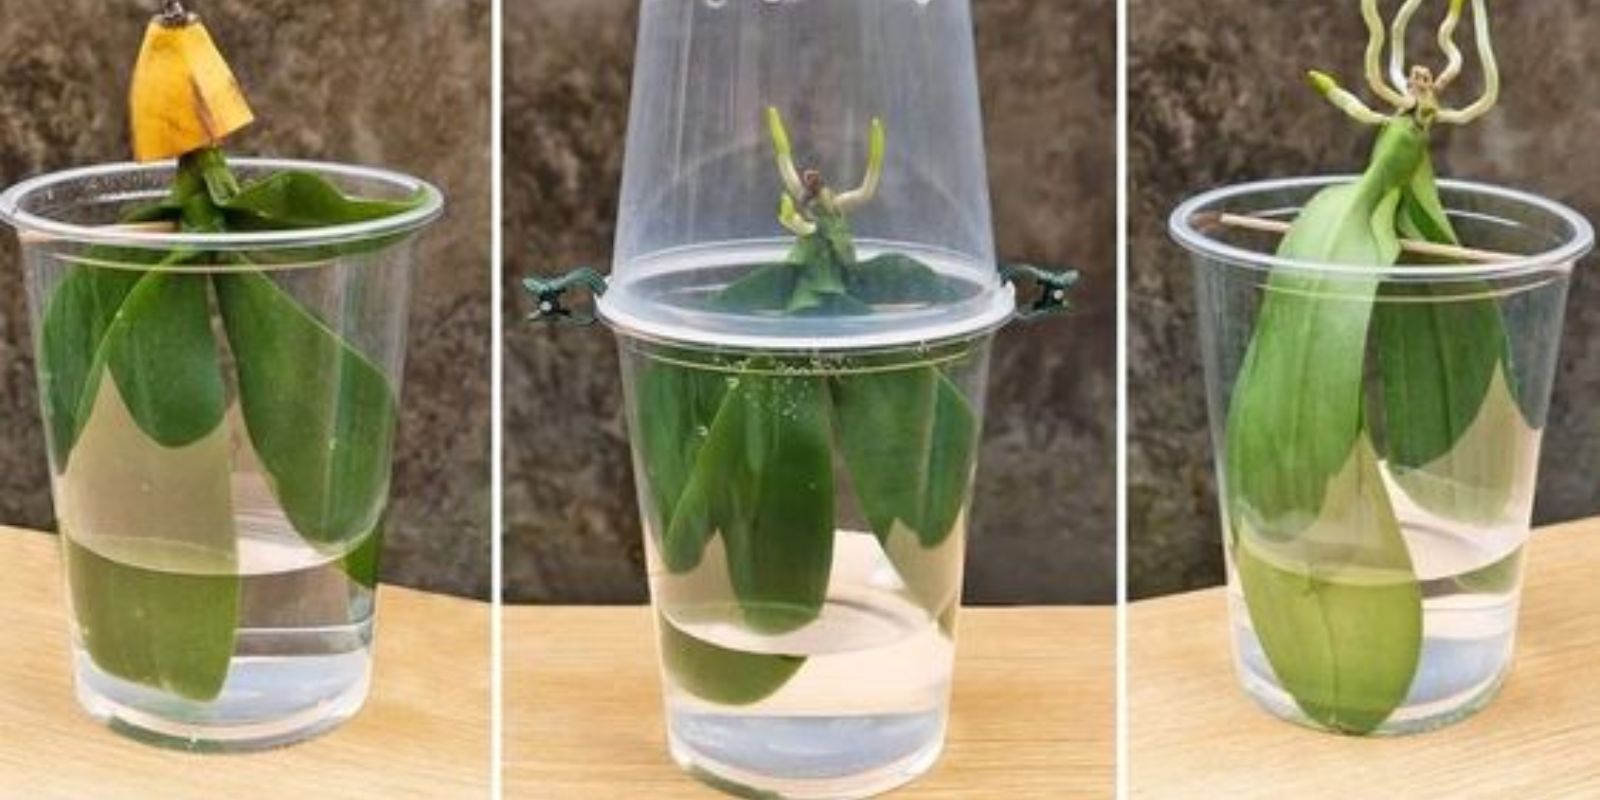
Step 2: Prepare the Banana Peel
- Select a Fresh Banana Peel: Use a fresh, ripe banana peel, as it contains the highest concentration of nutrients. Avoid using overripe or rotting peels.
- Cut the Peel into Pieces: Cut the banana peel into small pieces, about 1-2 inches in length. These pieces will be placed around the orchid’s roots.
Step 3: Apply the Banana Peel to the Orchid
- Place the Banana Peel Pieces: Gently place the banana peel pieces around the orchid’s aerial roots. Ensure the peel is in contact with the roots but does not cover the entire root system.
- Secure the Banana Peel: Use a soft, breathable material such as gauze or a loose tie to secure the banana peel pieces in place. Avoid tying too tightly, as this can damage the roots.
Step 4: Creating the Right Environment
- Maintain Humidity: Orchids thrive in humid environments. Place the orchid in a location with high humidity or use a humidity tray to maintain moisture levels.
- Provide Indirect Light: Position the orchid in a spot with bright, indirect light. Direct sunlight can be too harsh and may cause the banana peel to dry out quickly.
- Water Regularly: Water the orchid as usual, ensuring the roots and banana peel remain slightly moist but not waterlogged. Avoid overwatering, as this can lead to root rot.
Step 5: Monitoring Growth and Development
- Observe Root Growth: Over the next few weeks, monitor the orchid for signs of new root growth. The nutrients from the banana peel will stimulate the development of new roots.
- Replace Banana Peel: If the banana peel pieces begin to decompose, replace them with fresh pieces to continue providing nutrients to the orchid.
Step 6: Transplanting the New Orchid
- Prepare a New Pot: Once the new roots have developed sufficiently, prepare a new pot with a suitable orchid potting mix. Orchids prefer a well-draining mix such as bark, sphagnum moss, or a specialized orchid substrate.
- Remove the Banana Peel: Gently remove the banana peel pieces from the roots. Be careful not to damage the delicate new roots.
- Plant the New Orchid: Carefully transplant the orchid into the new pot, ensuring the roots are well-covered by the potting mix. Avoid burying the base of the plant too deeply.
Additional Tips for Success
- Choose the Right Time: The best time to propagate orchids is during their active growing season, typically in spring or early summer.
- Avoid Overwatering: Keep the orchid slightly moist but not overly wet. Proper drainage is essential to prevent root rot.
- Maintain Consistent Conditions: Orchids thrive in stable conditions. Avoid sudden changes in temperature, humidity, or light levels.
- Fertilize Sparingly: Once the new orchid is established, feed it with a balanced, diluted orchid fertilizer every 4-6 weeks during the growing season.
Conclusion
Propagating orchids using a banana peel is a simple, natural, and effective method that can yield impressive results. By harnessing the nutrients in banana peels, you can encourage healthy root development and successfully grow new orchid plants. This technique is not only cost-effective but also environmentally friendly, making it an ideal choice for gardeners of all experience levels. Give this method a try and enjoy the satisfaction of nurturing new orchids from your existing plants.
Motivation:
Ready to propagate your orchids using banana peels? Start today and experience the joy of watching your orchids thrive. Share your progress and tips with fellow gardening enthusiasts, and inspire others to try this easy and rewarding propagation method!