
Orchids are one of the most beloved and graceful plants, known for their elegant, long-lasting blooms. However, many orchid owners are faced with the dilemma of what to do once the flowers begin to fade. The good news is, orchids don’t have to be discarded once they’ve finished blooming. With a little patience and the right care, you can encourage your orchid to bloom again and again, creating a cycle of beauty and joy in your home. In this article, we’ll explore the essential steps and tips to make your orchid rebloom successfully.
Understanding Orchid Blooming Cycles
Before we dive into the steps, it’s important to understand the blooming cycle of an orchid. Orchids, particularly the popular Phalaenopsis variety, typically bloom once a year for several months. After the flowers wither, the plant enters a resting phase. However, with the right care, you can trigger another blooming cycle. Orchids have a natural dormancy period, which can be shortened or lengthened depending on how they are treated.
Knowing when your orchid is ready to bloom again requires understanding its environment and growth habits. Each orchid species may have slightly different needs, but the principles outlined below can apply to most common types, including Phalaenopsis, Dendrobium, and Cattleya orchids.
Step 1: Trim the Flower Spike
Once your orchid has finished blooming, the first step is to properly trim the flower spike. It’s crucial to do this correctly to encourage the plant to focus its energy on new growth and potential new flowers. Here’s how to do it:
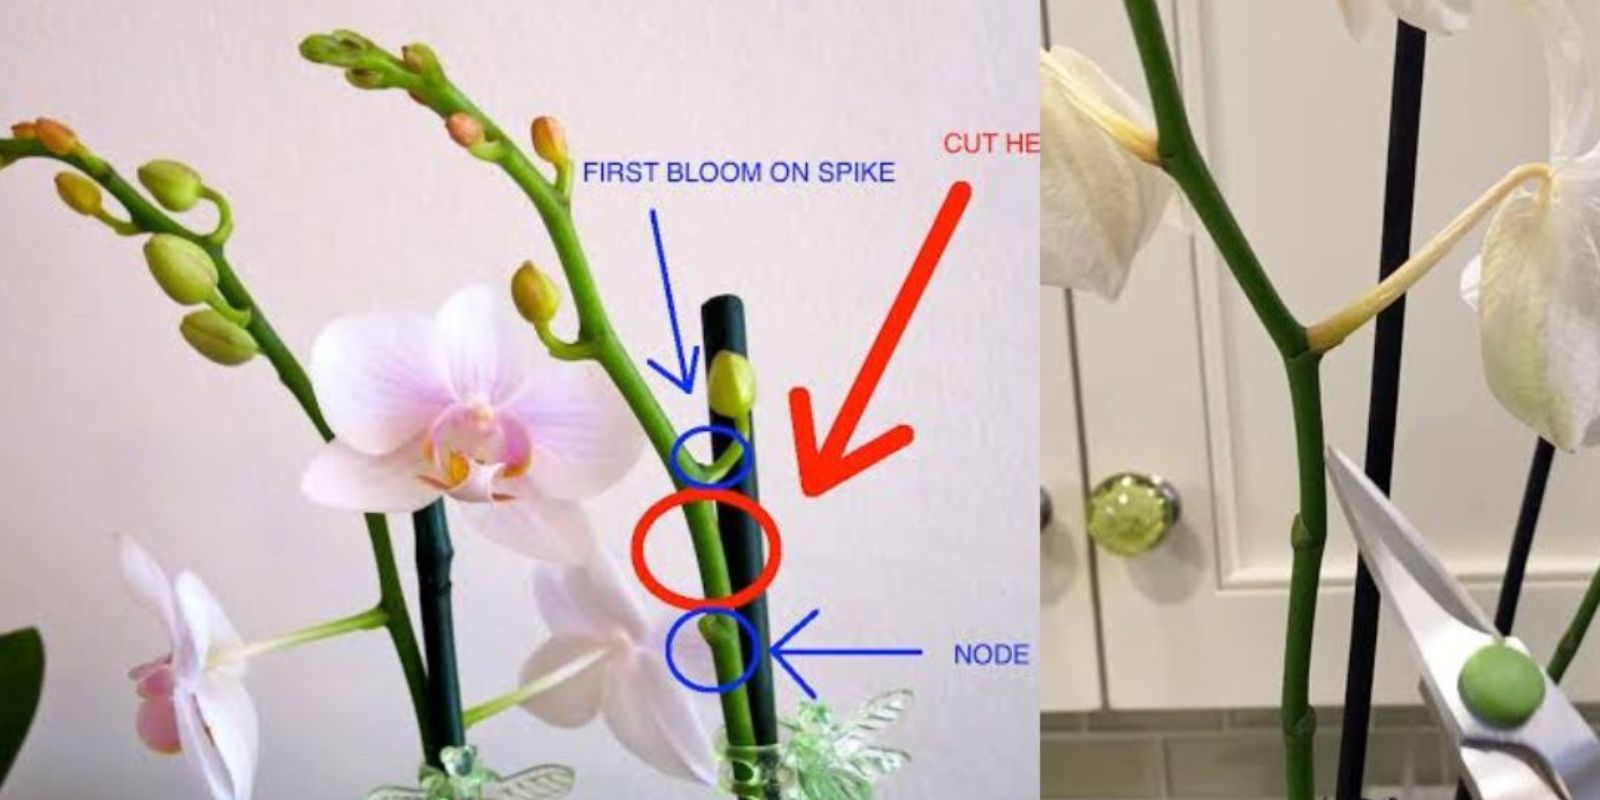
- Examine the Spike: Look at the flower spike after the blooms have fallen. If the spike has turned brown or dried up completely, you can cut it off completely at the base of the plant. If it is still green and healthy, you have a couple of options. Some orchid owners choose to leave it and wait for it to produce new blooms, while others cut it back to a node (a small bump along the spike) to encourage a side shoot.
- Cut Above the Node: If you decide to trim, use clean, sharp scissors or pruning shears to cut just above a healthy node. This can encourage the plant to produce a secondary spike and potentially more blooms.
- Leave Time for Recovery: After trimming, give the orchid time to recover before attempting any other care changes. Let the plant rest and focus on root and leaf health for a while.
Step 2: Adjust Lighting
Orchids thrive on bright, indirect light, which is essential for stimulating blooming. If your orchid isn’t getting enough light, it may not rebloom as quickly or at all. Here’s how to ensure your orchid gets the right amount of light:
- Indirect Light: Orchids dislike direct sunlight, which can scorch their leaves. Place your orchid in a location that receives bright, filtered sunlight. A spot near an east-facing window is ideal.
- Monitor Light Exposure: If the orchid is in too much shade, you may notice it becoming leggy (with long, sparse growth), and its blooms may not be as vibrant. On the other hand, too much direct sunlight can lead to burned leaves. Finding the sweet spot is key to encouraging reblooming.
- Use Grow Lights: In case natural light is insufficient, especially during the winter months, consider using grow lights. These lights mimic natural sunlight and can help stimulate blooming cycles.
Step 3: Watering and Humidity
Watering is one of the most crucial aspects of orchid care. Too much or too little water can hinder the blooming process. Orchids need a balance of hydration, but they also need excellent drainage to prevent their roots from rotting. Here are some watering tips to keep your orchid healthy and primed for blooming:
- Watering Frequency: Orchids generally require watering once a week, but this can vary based on the environment. During the warmer months, your orchid may need water more frequently, but in winter, when temperatures are lower and humidity is lower, watering may need to be less frequent.
- Check for Dryness: Before watering, check if the top inch or so of the soil feels dry. If it does, it’s time to water. If not, wait another day or two before checking again.
- Watering Technique: When watering, be sure to thoroughly soak the roots. Avoid letting the orchid sit in water, as this can cause root rot. Ensure that your pot has good drainage to allow excess water to escape.
- Humidity: Orchids love high humidity, so if the air in your home is dry, consider using a humidity tray or a room humidifier. Alternatively, misting your orchid’s leaves lightly can help, but be sure not to overdo it, as excess moisture on the leaves can cause fungal issues.
Step 4: Fertilizing for Re-blooming
Fertilizing your orchid can give it the nutrients it needs to produce new blooms. Orchids are relatively light feeders, but during their growing season (typically spring and summer), regular fertilization can make a big difference.
- Use Orchid-Specific Fertilizer: Look for a balanced, water-soluble fertilizer designed specifically for orchids. A 30-10-10 fertilizer (high in nitrogen) is typically good for encouraging leaf growth, while a 10-30-20 fertilizer (high in phosphorus) is beneficial for blooming.
- Fertilize Monthly: During the growing season, fertilize your orchid about once a month. In winter, when the plant is resting, reduce fertilization or stop it altogether.
- Dilute the Fertilizer: Always dilute the fertilizer to about one-quarter strength to avoid burning the delicate roots of your orchid.
Step 5: Temperature Control
Orchids are quite particular when it comes to temperature. They generally prefer warm days and cooler nights, which is a key trigger for blooming. Temperature fluctuations can encourage flowering by mimicking the conditions they experience in their natural habitat.
- Daytime Temperature: Aim to keep your orchid in a location where the daytime temperature ranges between 70°F (21°C) and 80°F (27°C).
- Nighttime Temperature: To trigger blooming, your orchid will need a slight drop in temperature at night. A range of 60°F (15°C) to 65°F (18°C) at night will help encourage the formation of flower buds.
Step 6: Be Patient
The most important factor in getting your orchid to bloom again is patience. Orchids are slow growers, and it may take several months before you start to see new buds. If your orchid is still healthy, trust that it will eventually reward you with new blooms. During this time, continue with regular care, including watering, fertilizing, and providing the right amount of light and temperature.
Step 7: Repotting and Root Care
If you’ve had your orchid for a while and it hasn’t bloomed again, it might be time to consider repotting. Orchids generally need to be repotted every one to two years. Over time, the potting medium can break down, affecting the roots’ ability to absorb water and nutrients.
- Check the Roots: When you repot, inspect the roots. Healthy orchid roots should be firm and white or green. Trim any rotting or dead roots with sterilized scissors.
- Choose the Right Potting Medium: Orchids need a well-draining medium such as bark, sphagnum moss, or a mix designed for orchids. Be sure not to pack the roots too tightly when repotting.
- Choose a Larger Pot: If your orchid has outgrown its pot, move it to one size up. Orchids prefer slightly tight pots, but too small a pot can restrict root growth and blooming.
Conclusion: Keep Your Orchid Blooming All Year Long
With a little care and attention, your orchid can bloom again and again, offering you a constant source of beauty and satisfaction. By following these steps—trimming the flower spike, adjusting lighting, watering and fertilizing properly, controlling temperature, and being patient—you’ll set the stage for your orchid’s success. Remember, orchids may take time to bloom, but when they do, the results are well worth the wait.
Don’t let your orchid’s blooming cycle end—keep it going and enjoy the beauty and elegance that orchids bring into your home. Happy growing! 🌸🌿