
Growing sweet potatoes at home is a rewarding gardening project that can yield a nutritious and versatile harvest. While sweet potatoes are typically grown from slips—young shoots that are sprouted from mature sweet potatoes—many gardeners are unsure how to start this process. Making your own sweet potato slips at home is not only simple but also a fun and inexpensive way to grow a garden full of these healthy, tasty tubers. In this article, we’ll cover everything you need to know about how to make sweet potato slips, from selecting the right sweet potato to planting your slips in the garden.
Why Grow Sweet Potatoes at Home?
Before diving into the step-by-step process of making sweet potato slips, let’s explore why growing sweet potatoes at home is a great idea. Sweet potatoes are nutrient-dense, rich in fiber, vitamins (particularly vitamin A), and antioxidants. They can be used in a wide variety of recipes, from casseroles to baked fries to pies. Plus, they are fairly easy to grow once you get the hang of it!
Growing sweet potatoes at home gives you control over the growing process, allowing you to avoid pesticides and chemicals often found in store-bought produce. Sweet potatoes are also highly adaptable to different growing conditions, which makes them an ideal crop for many home gardeners. They can be grown in raised beds, traditional garden plots, or even containers, making them accessible for nearly any growing space.
What Are Sweet Potato Slips?
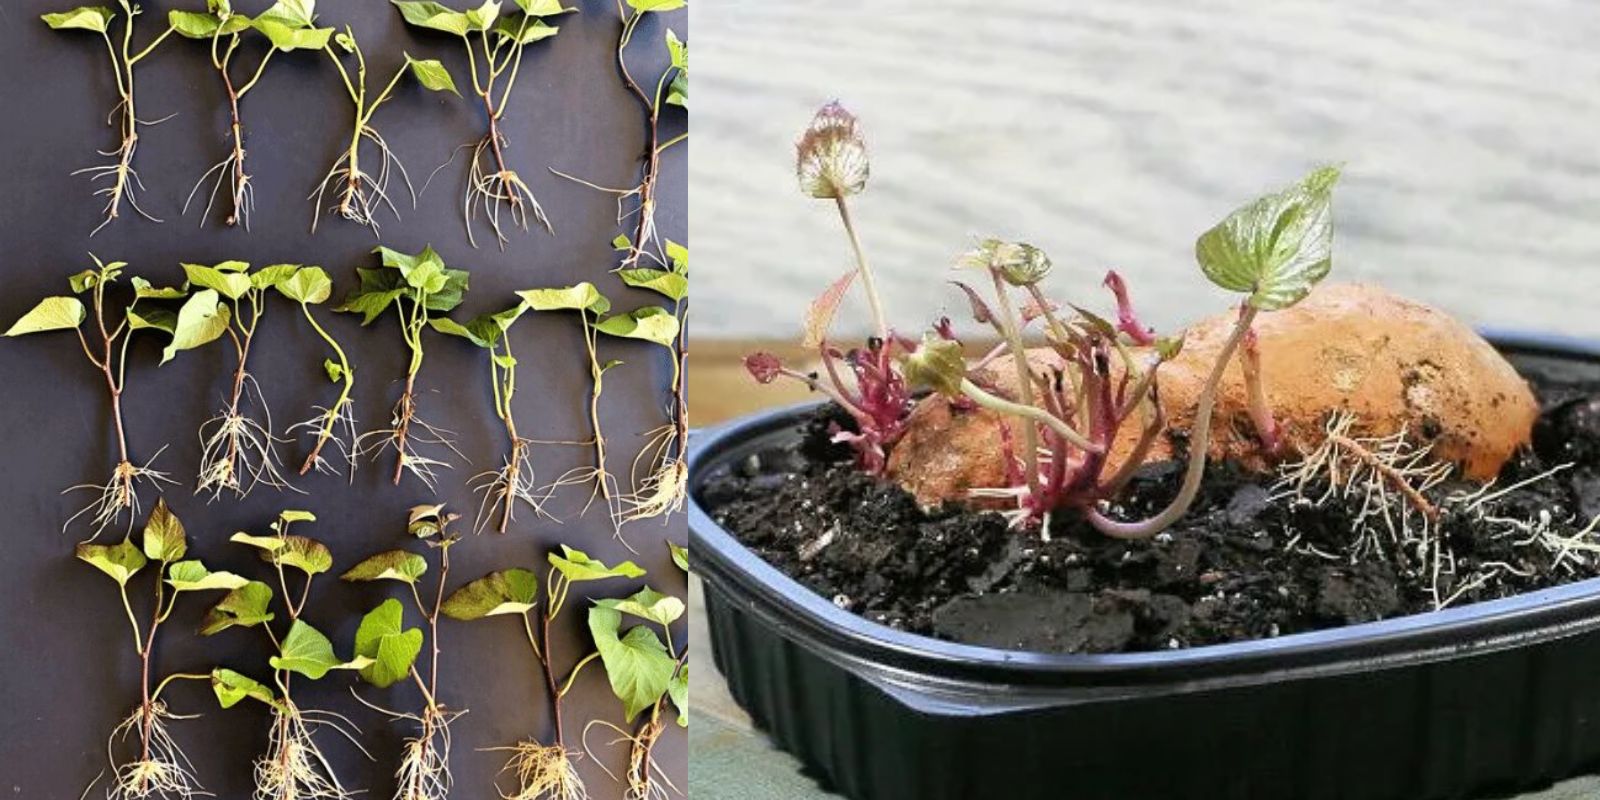
Sweet potato slips are small, rooted sprouts that grow from a mature sweet potato. These slips are the starting point for your sweet potato plants. When grown properly, they will develop into vines that spread across the garden, producing large, sweet-tasting tubers underground. The slips themselves are essentially baby plants ready to be planted in the soil, where they will continue to grow into mature sweet potato plants.
Materials You’ll Need to Make Sweet Potato Slips
Before you begin, gather the following materials:
- A healthy, firm sweet potato (preferably organic if possible)
- A large jar or glass container
- Toothpicks or bamboo skewers (to suspend the sweet potato in the water)
- Water
- A warm, sunny spot in your home (e.g., windowsill or greenhouse)
- Potting soil (if transplanting into containers or garden soil later)
- A garden bed or containers for planting the slips once they’re ready
Step-by-Step Guide on How to Make Sweet Potato Slips
Step 1: Selecting the Right Sweet Potato
The first step in growing sweet potato slips is choosing a good-quality sweet potato. The best sweet potatoes to use are those that are mature, firm, and free from any blemishes or signs of rot. Organic sweet potatoes are an excellent option as they are not treated with chemicals that may inhibit sprouting.
When selecting sweet potatoes, look for those that have not been stored in overly cold or dry conditions, as this may affect their ability to sprout. Opt for medium to large-sized sweet potatoes for the best results.
Step 2: Preparing the Sweet Potato for Sprouting
After you’ve selected your sweet potato, it’s time to start the sprouting process. The traditional method is to suspend the sweet potato in a jar or glass container of water. Here’s how to do it:
- Fill a large jar or container with water.
- Insert three to four toothpicks or bamboo skewers into the middle of the sweet potato, evenly spaced around the circumference. These will act as supports, keeping the sweet potato suspended above the water.
- Place the sweet potato in the jar with the pointed end facing upward. Ensure the bottom of the sweet potato is submerged in the water while the top is exposed to the air.
Step 3: Finding the Right Spot for Sprouting
Place the jar with the sweet potato in a warm, sunny spot. Sweet potatoes need warmth and light to sprout properly, so a south-facing windowsill or a spot with at least 6-8 hours of sunlight each day is ideal. The temperature should be between 70 and 80 degrees Fahrenheit (21-27°C) for optimal growth. If the weather is too cold, you can also use a grow light or a heat mat to provide additional warmth.
Step 4: Waiting for the Slips to Form
The sprouting process takes time, typically 4-6 weeks, although this can vary depending on temperature and other factors. During this time, you will notice shoots or sprouts emerging from the top of the sweet potato. These are the “slips” that you will eventually transplant into the garden. Make sure the water level in the jar stays consistent, as the sweet potato will absorb water and the level will drop over time.
After a few weeks, the slips should grow to about 4-6 inches in length. When they reach this size, it’s time to remove them from the sweet potato.
Step 5: Rooting the Slips
Once the slips have grown to a reasonable size, carefully twist or cut them off the sweet potato. Place the slips in a separate jar or container with water to encourage rooting. Leave them in the water for about 1-2 weeks, or until they develop healthy roots. It’s important to ensure that at least the bottom part of the slip is submerged in the water, while the top portion remains above.
You may notice that the slips begin to grow new roots within days, but it’s essential to wait until the roots are well-established before planting them. Once the slips are ready, you’ll see visible root growth, and they will be ready to plant.
Step 6: Planting the Slips in Soil
After the slips have rooted, it’s time to plant them in the garden or in containers. Sweet potatoes thrive in loose, well-draining soil with plenty of space for the roots to spread out. The best time to plant the slips is after the danger of frost has passed and the soil has warmed up.
If planting in a garden, dig a hole about 4-6 inches deep, place the rooted slip into the hole, and cover the roots with soil. If planting in containers, make sure the pot is large enough to accommodate the growth of the sweet potato vines. Sweet potatoes are typically grown in large, deep containers or raised beds to allow for the spreading of the roots.
Step 7: Caring for the Sweet Potato Vines
Sweet potatoes need plenty of water during the growing season, especially in the first few weeks after planting. However, make sure the soil is well-drained to prevent waterlogging, which can lead to rot. Once the vines begin to spread, you can mulch around the plants to retain moisture and keep the soil temperature consistent.
Sweet potato plants are also sensitive to pests and diseases. Monitor your plants for common issues such as aphids, weevils, and fungal infections. If necessary, use organic pest control methods or natural remedies to address any issues.
Step 8: Harvesting Sweet Potatoes
Sweet potatoes are ready to harvest when the vines start to die back, usually about 4-5 months after planting. Gently dig up the sweet potatoes, being careful not to damage the tubers. Once harvested, allow them to cure in a warm, dry place for about 1-2 weeks to enhance their flavor and texture. After curing, store your sweet potatoes in a cool, dark place, and enjoy the fruits of your labor!
Conclusion
Growing sweet potatoes from slips is a straightforward and rewarding gardening project. With just a little patience and care, you can enjoy a bountiful harvest of delicious sweet potatoes right from your own backyard. By following the steps outlined in this article, you can easily start your own sweet potato plants from slips and watch them grow into healthy vines that produce an abundance of flavorful tubers.
So, gather your materials, select your sweet potato, and get started today! Happy gardening, and enjoy the process of growing your own homegrown sweet potatoes!
#SweetPotatoSlips #HomeGardening #GrowYourOwnFood #OrganicGardening #GardeningTips #HealthyEating #GardenToTable #SustainableLiving #HomegrownHarvest #GardeningCommunity