
Composting is one of the best ways to recycle organic waste and enrich your garden soil. By transforming kitchen scraps and yard waste into nutrient-rich compost, you not only help the environment by reducing landfill waste but also create a healthier, more productive garden. In this beginner’s guide, we’ll walk you through the essential steps to make compost at home, along with tips, tricks, and the benefits of this sustainable practice.
Why Composting is Important
1. Reduces Waste
Composting significantly reduces the amount of waste sent to landfills. Organic materials like fruit and vegetable peels, grass clippings, and leaves can account for a large portion of household waste. By composting these materials, you can divert them from landfills and help minimize the environmental impact of waste disposal.
2. Enhances Soil Health
Compost is rich in nutrients and organic matter, which improves soil structure, increases its ability to retain moisture, and enhances its fertility. Using compost in your garden can lead to healthier plants, increased crop yields, and better resistance to pests and diseases.
3. Supports Biodiversity
Healthy compost supports a thriving ecosystem in your garden. It attracts beneficial organisms such as earthworms, beneficial bacteria, and fungi, all of which contribute to healthy soil and plant growth.
4. Reduces the Need for Chemical Fertilizers
Using compost can reduce or eliminate the need for chemical fertilizers, making your gardening practices more sustainable and eco-friendly.
What You Need to Get Started
Before diving into the composting process, gather the necessary materials and tools:
Materials:
- Compost Bin or Pile: Choose a bin specifically designed for composting, or designate an area in your yard for an open compost pile. Bins come in various sizes and materials, such as plastic or wood.
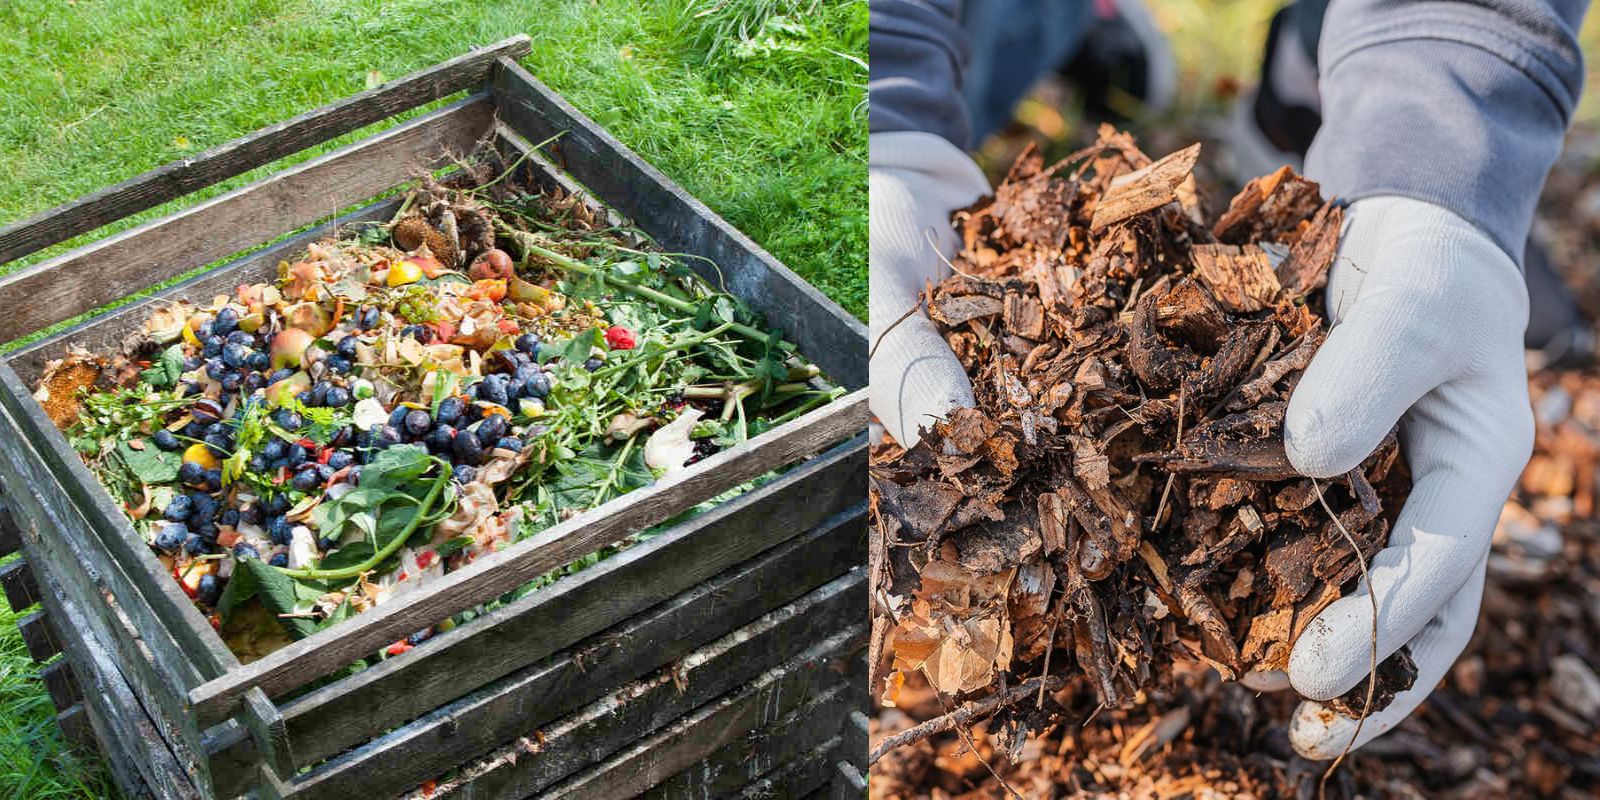
- Green Materials: These are nitrogen-rich materials that will provide the necessary nutrients for composting. Examples include:
- Fruit and vegetable scraps
- Coffee grounds and filters
- Grass clippings
- Fresh plant clippings
- Brown Materials: These carbon-rich materials help balance the nitrogen in green materials. Examples include:
- Dry leaves
- Straw or hay
- Shredded paper or cardboard
- Small branches and twigs
Tools:
- Pitchfork or Shovel: For turning the compost pile.
- Watering Can or Hose: To moisten the compost pile as needed.
- Garden Gloves: To keep your hands clean while handling compost materials.
Step-by-Step Guide to Making Compost
Step 1: Choose Your Compost Bin or Pile Location
Select a location that is convenient and accessible. If using a compost bin, make sure it is well-ventilated and has drainage holes. If you’re making a pile, choose a spot in your yard that gets some sun but is not too exposed to harsh weather conditions.
Step 2: Gather Your Compost Materials
Collect both green and brown materials to create a balanced compost mix. Aim for a ratio of about 2:1 or 3:1 of brown to green materials. Here’s a breakdown:
- Green Materials (Nitrogen-Rich):
- Kitchen scraps: fruit and vegetable peels, coffee grounds, eggshells, etc.
- Grass clippings and fresh plant trimmings
- Brown Materials (Carbon-Rich):
- Dry leaves, straw, shredded newspaper, cardboard, or wood chips
Step 3: Layer Your Ingredients
Begin layering your compost materials in the bin or pile:
- Start with Coarse Materials: Place a layer of coarse materials like twigs or straw at the bottom. This helps with drainage and aeration.
- Add Greens and Browns Alternately: Alternate layers of green and brown materials. For example, add a layer of kitchen scraps, followed by a layer of dried leaves. This layering helps to achieve a balanced carbon-to-nitrogen ratio.
- Continue Layering: Repeat the process until you’ve used all your materials or filled the bin.
Step 4: Moisten the Pile
Water the compost pile lightly as you build it. Aim for a damp but not soaking wet pile, similar to a sponge. The moisture will help the decomposition process. If your compost appears too dry, add water; if it’s too wet, mix in more brown materials.
Step 5: Turn the Pile
After a few weeks, use a pitchfork or shovel to turn the compost pile. This process aerates the materials, helping to speed up decomposition. Turning the pile also helps mix the materials and distribute moisture evenly.
- Frequency: Turn the pile every 2-4 weeks. If you notice a strong odor, it might be an indication that your compost is not aerating properly.
Step 6: Monitor Temperature and Moisture
Keep an eye on the temperature and moisture levels of your compost pile. A properly functioning compost pile will heat up as microorganisms break down the materials. You can use a compost thermometer to monitor the internal temperature, which should ideally reach between 130°F and 160°F (54°C to 71°C) to kill pathogens and weed seeds.
- Adjusting Moisture: If the pile is too dry, add water; if it’s too wet, turn the pile and mix in more dry brown materials to absorb excess moisture.
Step 7: Harvest Your Compost
In 3-6 months, your compost will be ready to use. Signs that it’s finished include:
- Dark, crumbly texture
- Earthy smell
- No recognizable food scraps or yard waste
To harvest, simply remove the finished compost from the bottom of the bin or pile and use it in your garden.
Step 8: Store and Use Your Compost
Store the finished compost in a dry, shaded area until you’re ready to use it. You can mix it into garden beds, top-dress potted plants, or use it as a soil amendment when planting new flowers or vegetables.
Common Mistakes to Avoid
- Not Balancing Greens and Browns: A common mistake is not achieving the right balance of green and brown materials. Too many greens can lead to a smelly pile, while too many browns can slow down decomposition. Aim for a balanced mix.
- Overwatering: While moisture is essential, overwatering can lead to a soggy pile that inhibits decomposition. Maintain a damp, not soaked, environment.
- Ignoring Aeration: Failing to turn the compost pile can lead to anaerobic conditions, resulting in odors and slow decomposition. Regularly turning the pile keeps it aerated and promotes healthy decomposition.
- Adding Unwanted Materials: Avoid adding meat, dairy, oily foods, and diseased plants to your compost, as they can attract pests and create unpleasant odors.
Benefits of Composting
1. Improves Soil Structure
Compost enhances soil structure by promoting the development of aggregates, improving aeration, and increasing water retention.
2. Increases Nutrient Content
Adding compost to your garden provides essential nutrients, including nitrogen, phosphorus, and potassium, which are vital for plant growth.
3. Encourages Beneficial Microorganisms
Compost is teeming with beneficial microorganisms that help break down organic matter and improve soil health.
4. Saves Money
Making your own compost reduces the need to purchase commercial fertilizers and soil amendments, saving you money in the long run.
5. Supports Sustainable Gardening Practices
Composting is an eco-friendly practice that contributes to sustainable gardening by recycling organic waste and reducing the environmental impact of waste disposal.
Conclusion
Composting is a simple yet powerful way to enrich your garden soil, reduce waste, and support a more sustainable lifestyle. By following the steps outlined in this guide, you can create your own nutrient-rich compost at home, providing your plants with the essential nutrients they need to thrive.
So, roll up your sleeves, gather your kitchen scraps, and start composting today! You’ll be amazed at the positive impact it can have on your garden and the environment. 🌱♻️
Hashtags: #Composting #SustainableGardening #WasteReduction #GardenTips #EcoFriendly #OrganicGardening #GreenLiving